레이블이 NVIDIA-TensorRT-Python인 게시물을 표시합니다. 모든 게시물 표시

9/06/2019

TensorRT 5 Python uff_custom_plugin 분석

1. TensorRT Python Custom Layer 분석 

우선 TensorRT Python UFF Custom Layer Source를 이해하기전에 아래의 소스들을 기본적으로 이해를 하고 오는 것이 좋을 것 같다

  • TensorRT Python Code 분석 
TensorRT 5 MNIST 분석
  https://ahyuo79.blogspot.com/2019/09/tensorrt-5-python-tensorflow-mnist.html
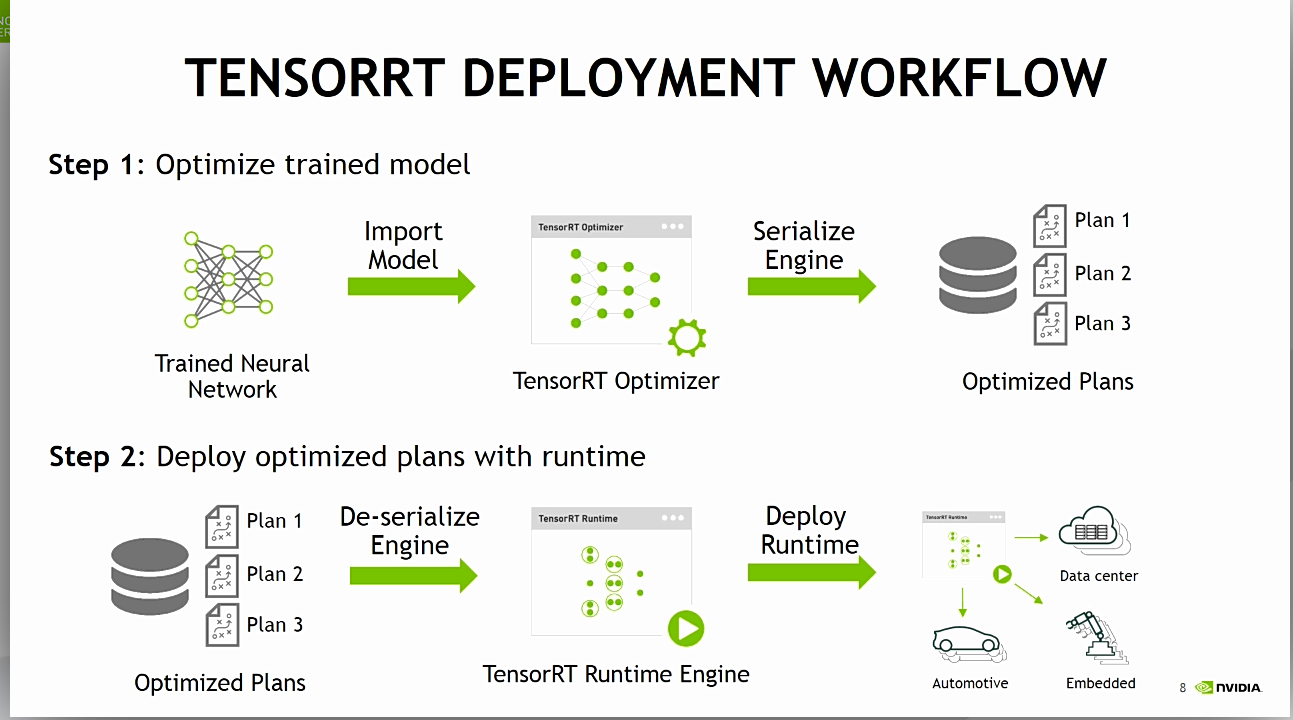
TensorRT 5 기본구조
  https://ahyuo79.blogspot.com/2019/08/tensorrt-5-python.html


아래사항은 Tensorflow와 TensorRT 설치가이드이며 관련사항이므로 참고하자
  • Tensorflow 와 TensorRT Package
  https://docs.nvidia.com/deeplearning/frameworks/install-tf-jetson-platform/index.html
  https://docs.nvidia.com/deeplearning/sdk/tensorrt-install-guide/index.html#installing


1.1 TensorRT 소스구조 파악 과 실행 

현재 모든 Manual이 X86기반으로 되어 있으므로, ARM Version이 맞게 이를 변경하고 관련된 Package를 설치하여 아래의 소스를 실행해보자


  • UFF_Custom_PlugIn의 README 정보 
아래의 정보는 어떻게 빌드를 해야할 지 관련된  정보와 실행방법을 알려준다
  https://docs.nvidia.com/deeplearning/sdk/tensorrt-sample-support-guide/index.html#uff_custom_plugin


  • UFF Custom PlugIn 소스구조 및 필요사항 확인 

$ cd /usr/src/tensorrt/samples/python/uff_custom_plugin
$ tree -t
.
├── CMakeLists.txt       // cmake 필요 
├── __init__.py
├── lenet5.py
├── README.md            // 반드시 참조 
├── requirements.txt
├── sample.py
└── plugin
    ├── clipKernel.cu         // CUDA Complier 필요 
    ├── clipKernel.h
    ├── customClipPlugin.cpp  // GCC->G++ Compiler 필요 
    └── customClipPlugin.h

$ cat requirements.txt
Pillow
pycuda
numpy
tensorflow


  • C++ PlugiN 빌드를 위해 cmake 설정 변경 
 cmake의 설정을 아래와 같이 x86->ARM 기반으로 변경하고 필요 Package 설치

$ vi CMakeLists.txt
# We need cmake >= 3.8, since 3.8 introduced CUDA as a first class language
cmake_minimum_required(VERSION 3.8 FATAL_ERROR)
project(ClipPlugin LANGUAGES CXX CUDA)

# Enable all compile warnings
set(CMAKE_CXX_FLAGS "${CMAKE_CXX_FLAGS} -Wall -Wno-long-long -pedantic -Werror")

# Sets variable to a value if variable is unset.
macro(set_ifndef var val)
    if (NOT ${var})
        set(${var} ${val})
    endif()
    message(STATUS "Configurable variable ${var} set to ${${var}}")
endmacro()

# -------- CONFIGURATION --------
##set_ifndef(TRT_LIB /usr/lib/x86_64-linux-gnu)
##set_ifndef(TRT_INCLUDE /usr/include/x86_64-linux-gnu)
set_ifndef(TRT_LIB /usr/lib/aarch64-linux-gnu/)
set_ifndef(TRT_INCLUDE /usr/include/aarch64-linux-gnu/ )

# Find dependencies:
message("\nThe following variables are derived from the values of the previous variables unless provided explicitly:\n")

# TensorRT's nvinfer lib
find_library(_NVINFER_LIB nvinfer HINTS ${TRT_LIB} PATH_SUFFIXES lib lib64)
set_ifndef(NVINFER_LIB ${_NVINFER_LIB})

# -------- BUILDING --------

# Add include directories
include_directories(${CUDA_INC_DIR} ${TRT_INCLUDE} ${CMAKE_SOURCE_DIR}/plugin/)

# Define clip plugin library target
add_library(clipplugin MODULE
  ${CMAKE_SOURCE_DIR}/plugin/clipKernel.cu
  ${CMAKE_SOURCE_DIR}/plugin/customClipPlugin.cpp
  ${CMAKE_SOURCE_DIR}/plugin/clipKernel.h
  ${CMAKE_SOURCE_DIR}/plugin/customClipPlugin.h
)

# Use C++11
target_compile_features(clipplugin PUBLIC cxx_std_11)

# Link TensorRT's nvinfer lib
target_link_libraries(clipplugin PRIVATE ${NVINFER_LIB})

# We need to explicitly state that we need all CUDA files
# to be built with -dc as the member functions will be called by
# other libraries and executables (in our case, Python inference scripts)
set_target_properties(clipplugin PROPERTIES
  CUDA_SEPARABLE_COMPILATION ON
)


$ find / -name pybind* 2> /dev/null
$ find / -name cuda* 2> /dev/null
$ find / -name libnvinfer.so 2> /dev/null
$ find / -name NvInfer.h 2> /dev/null  or find / -name NvUffParser.h 2> /dev/null
$ which cmake 

//필요사항 cmake, pybind11 필요 
$ sudo apt install cmake
$ sudo pip3 install pybind11  


  • C++ PlugIn Build 진행 
cmake를 실행하면 CUDACXX, 즉 CUDA Compiler를 못찾기때문에 아래와 같이 추가하고 빌드진행
$ echo $PATH
/home/nvidia/.local/bin:/usr/local/cuda-10.0/bin:/usr/local/sbin:/usr/local/bin:/usr/sbin:/usr/bin:/sbin:/bin:/usr/games:/usr/local/games:/snap/bin

// cmake 실행시 CUDACXX 를 /etc/environment 넣거나, CMAKE_CUDA_COMPILER=/usr/local/cuda-10.0/bin/nvcc  설정진행 
$ sudo vi /etc/environment 
PATH="/usr/local/sbin:/usr/local/bin:/usr/sbin:/usr/bin:/sbin:/bin:/usr/games:/usr/local/games"
CUDACXX=/usr/local/cuda-10.0/bin/nvcc 

$ sudo mkdir build && pushd build
$ sudo cmake ..   
or 
//X86기반 설정을 ARM으로 현재사항에 맞게변경 
$ sudo cmake .. \
  -DPYBIND11_DIR=/usr/local/include/python3.6/pybind11/ \
  -DCUDA_ROOT=/usr/local/cuda-10.0/ \
  -DPYTHON3_INC_DIR=/usr/include/python3.6/ \
  -DNVINFER_LIB=/usr/lib/aarch64-linux-gnu/libnvinfer.so \
  -DTRT_INC_DIR=/usr/include/aarch64-linux-gnu/ \
  -DTRT_LIB=/usr/lib/aarch64-linux-gnu/

$ sudo make -j
Scanning dependencies of target clipplugin
[ 50%] Building CXX object CMakeFiles/clipplugin.dir/plugin/customClipPlugin.cpp.o
[ 50%] Building CUDA object CMakeFiles/clipplugin.dir/plugin/clipKernel.cu.o
[ 75%] Linking CUDA device code CMakeFiles/clipplugin.dir/cmake_device_link.o
[100%] Linking CXX shared module libclipplugin.so
[100%] Built target clipplugin

$ popd 

빌드관련 설정사항 (CUDACXX)
  https://github.com/jetsonhacks/buildLibrealsense2TX/issues/13


  • MNIST Training과 TEST 진행 후 모델로 저장 
총 10번의 Training을 실행하며 Progress Bar로 이를 표시 해주고 마지막에 TEST진행한 후 Model로 저장

$ sudo python3 lenet5.py
......
Epoch 1/10
2019-09-06 15:23:04.843040: I tensorflow/stream_executor/platform/default/dso_loader.cc:42] Successfully opened dynamic library libcublas.so.10.0
60000/60000 [==============================] - 8s 139us/sample - loss: 0.2036 - acc: 0.9403
Epoch 2/10
60000/60000 [==============================] - 8s 126us/sample - loss: 0.0816 - acc: 0.9756
Epoch 3/10
60000/60000 [==============================] - 7s 124us/sample - loss: 0.0525 - acc: 0.9839
Epoch 4/10
60000/60000 [==============================] - 7s 124us/sample - loss: 0.0375 - acc: 0.9879
Epoch 5/10
60000/60000 [==============================] - 7s 122us/sample - loss: 0.0277 - acc: 0.9915
Epoch 6/10
60000/60000 [==============================] - 7s 122us/sample - loss: 0.0223 - acc: 0.9928
Epoch 7/10
60000/60000 [==============================] - 7s 122us/sample - loss: 0.0158 - acc: 0.9948
Epoch 8/10
60000/60000 [==============================] - 7s 123us/sample - loss: 0.0152 - acc: 0.9949
Epoch 9/10
60000/60000 [==============================] - 7s 122us/sample - loss: 0.0104 - acc: 0.9969
Epoch 10/10
60000/60000 [==============================] - 7s 123us/sample - loss: 0.0119 - acc: 0.9961
10000/10000 [==============================] - 1s 73us/sample - loss: 0.0810 - acc: 0.9800
Test loss: 0.08098314766188651
Test accuracy: 0.9800000190734863
W0906 15:24:20.296670 547944542224
............................


  • 생성된 모델을 이용하여 예측 테스트 

생성된 모델을 읽어서 Custom Layer를 적용후 Test Case와 예측 Case를 비교

$ sudo python3 sample.py
......
UFF Version 0.6.3
=== Automatically deduced input nodes ===
[name: "InputLayer"
op: "Placeholder"
attr {
  key: "dtype"
  value {
    type: DT_FLOAT
  }
}
attr {
  key: "shape"
  value {
    shape {
      dim {
        size: -1
      }
      dim {
        size: 1
      }
      dim {
        size: 28
      }
      dim {
        size: 28
      }
    }
  }
}
]
=========================================

Using output node OutputLayer/Softmax
Converting to UFF graph
Warning: No conversion function registered for layer: CustomClipPlugin yet.
Converting trt_relu6 as custom op: CustomClipPlugin
W0906 15:26:19.200886 548537745424 deprecation_wrapper.py:119] From /usr/lib/python3.6/dist-packages/uff/converters/tensorflow/converter.py:179: The name tf.AttrValue is deprecated. Please use tf.compat.v1.AttrValue instead.

DEBUG: convert reshape to flatten node
No. nodes: 13
UFF Output written to /usr/src/tensorrt/samples/python/uff_custom_plugin/models/trained_lenet5.uff
UFF Text Output written to /usr/src/tensorrt/samples/python/uff_custom_plugin/models/trained_lenet5.pbtxt

=== Testing ===
Loading Test Case: 6
Prediction: 6

$ ls models   // models directory 생성되었으며, pb/uff 파일 생성 
trained_lenet5.pb  trained_lenet5.pbtxt  trained_lenet5.uff


2. TensorRT Python Custom Layer(C++) 소스 

왜 Tensorflow의 Layer 중 TensorRT로 사용시 제약사항있어 Custom Layer를 사용할까?
그리고, 언제 사용되는지에 대해 구체적으로 알고 싶었다.
우선 아래의 소스는 TensorRT가 ReLU6를 미지원해서 이를 Custom Layer를 재정의하여 사용하는 구조이다


  • ReLU/ReLU6 의 차이 
Activation Function 이라고 하며 Tensorflow는 두 개의 함수를 지원을 해주고 있으며, 두개의 함수의 차이설명

  1. Relu      y = max(x ,0)                그래프, x좌표가 0기반으로 y좌표 증가 
  2. Relu6    y = min(max(x, 0), 6)   그래프, x좌표가 0기반으로 y좌표 증가 x좌표의 6까지 한계

  https://woolulu.tistory.com/84
  https://www.tensorflow.org/api_docs/python/tf/nn/relu
  https://www.tensorflow.org/api_docs/python/tf/nn/relu6
  http://www.cs.utoronto.ca/~kriz/conv-cifar10-aug2010.pdf


  • Tensorflow와 TensorRT 제약사항
아래의 사이트를 여러번 봤지만 세부적으로 좀 더 자세히 분석해보자
우선 TensorRT의 제약사항을 아래에서 확인가능하다
그리고, 두번째 Site에서 Tensorflow의 UFF Parser 지원사항을 보면  ReLU6 지원가능을 볼수 있다
이렇게 보면 TensorRT도 지원가능할 것 같지만, 이것은 UFF Parser까지만 인식가능가능하다는 말이다

  https://docs.nvidia.com/deeplearning/sdk/tensorrt-support-matrix/index.html
  https://docs.nvidia.com/deeplearning/sdk/tensorrt-support-matrix/index.html#supported-ops
  UFF에서 인식가능
  https://docs.nvidia.com/deeplearning/sdk/tensorrt-api/python_api/uff/Operators.html?highlight=relu#activation

  • TensorRT API C++/Python 확인 (Activition Layer에서 ReLu만 지원)
이제 실제 TensorRT의 Layer에서 직접 찾아보면, ReLu만 지원가능하고 ReLu6는 찾을 수 없다
Python의 API를 보면 더 쉽다

  https://docs.nvidia.com/deeplearning/sdk/tensorrt-developer-guide/index.html#layers
  https://docs.nvidia.com/deeplearning/sdk/tensorrt-api/c_api/classnvinfer1_1_1_i_activation_layer.html
  https://docs.nvidia.com/deeplearning/sdk/tensorrt-api/c_api/namespacenvinfer1.html#acbd177748000d30ae0277ee980757eb6
  https://docs.nvidia.com/deeplearning/sdk/tensorrt-api/python_api/infer/Graph/Layers.html#iactivationlayer


  • TensorRT로 Network 직접 구성할때 Relu 예제참조 (C++/Python) 
이제 실제 TensorRT로 ReLu을 구성할때를 살펴보자

  https://docs.nvidia.com/deeplearning/sdk/tensorrt-developer-guide/index.html#create_network_c
  https://docs.nvidia.com/deeplearning/sdk/tensorrt-developer-guide/index.html#create_network_python


  • DLA의 ReLu 제약사항 (참고사항, Xavier만 해당)
  https://docs.nvidia.com/deeplearning/sdk/tensorrt-developer-guide/index.html#dla_layers


2.1 lenet5.py 분석 
기본처럼 MNIST DataSet를 Download하여 Training과 TEST를 진행한 후 결과를 Model 생성하여, 즉 PB파일로 저장하는 구조이다
이전 소스와 거의 유사하지만 아래의 build_model시 network 구조가 다르다고 보면된다

$ cat lenet5.py 
import tensorflow as tf
import numpy as np
import os

WORKING_DIR = os.environ.get("TRT_WORKING_DIR") or os.path.dirname(os.path.realpath(__file__))

## 생성될 Model의 저장장소 
MODEL_DIR = os.path.join(
    WORKING_DIR,
    'models'
)

## Google mnist data를 download하여 ReShape 진행 
def load_data():
    mnist = tf.keras.datasets.mnist
    (x_train, y_train),(x_test, y_test) = mnist.load_data()
    x_train, x_test = x_train / 255.0, x_test / 255.0

    ## 기존과 다르게 reshape를 하여, 1차원을 추가하는데, -1 값이 60000 과 10000로 정의되는 것 같음 
    ## https://docs.scipy.org/doc/numpy/reference/generated/numpy.reshape.html#numpy.reshape
    x_train = np.reshape(x_train, (-1, 1, 28, 28))
    x_test = np.reshape(x_test, (-1, 1, 28, 28))
    return x_train, y_train, x_test, y_test

## Tensorflow Keras를 이용하여 Model의 Network 정의 
def build_model():
    # Create the keras model
    model = tf.keras.models.Sequential()
    model.add(tf.keras.layers.InputLayer(input_shape=[1, 28, 28], name="InputLayer"))
    model.add(tf.keras.layers.Flatten())
    model.add(tf.keras.layers.Dense(512))
    ## ReLU6 부분이 TensorRT로 Custom Layer로 재정의 될 부분이다 
    ## TensorRT는 ReLU6을 지원하지 못하므로, 이 부분을 C++로 PlugIn으로 재정의하고 Custom Layer로 구현한다
    ## https://devtalk.nvidia.com/default/topic/1037149/tensorrt/relu6-not-supported-in-tensorrt-for-mobilenetv2/   
    model.add(tf.keras.layers.Activation(activation=tf.nn.relu6, name="ReLU6"))
    model.add(tf.keras.layers.Dense(10, activation=tf.nn.softmax, name="OutputLayer"))
    return model

## Model의 Build 부터 설정 부터 Training 
def train_model():

    ## 기본 Network 정의 
    # Build and compile model
    model = build_model()
    model.compile(optimizer='adam',
                  loss='sparse_categorical_crossentropy',
                  metrics=['accuracy'])

    ## Model의 TESTSET의 Download와 설정변경 
    # Load data
    x_train, y_train, x_test, y_test = load_data()

    ## 실제 Training 할 숫자 정의, epochs  , verbose는 1은 Prograss bar 설정  
    # Train the model on the data
    model.fit(
        x_train, y_train,
        epochs = 10,
        verbose = 1
    )

    ## 실제 Training 과 TEST 진행 
    # Evaluate the model on test data
    test_loss, test_acc = model.evaluate(x_test, y_test)
    print("Test loss: {}\nTest accuracy: {}".format(test_loss, test_acc))

    return model

## Save Model를 위해서 Mkdir 
def maybe_mkdir(dir_path):
    if not os.path.exists(dir_path):
        os.makedirs(dir_path)


## Training/Test가 된 model을 freezing 하여 저장 
def save_model(model):
    output_names = model.output.op.name
    sess = tf.keras.backend.get_session()

    graphdef = sess.graph.as_graph_def()
    frozen_graph = tf.graph_util.convert_variables_to_constants(sess, graphdef, [output_names])
    frozen_graph = tf.graph_util.remove_training_nodes(frozen_graph)

    # Make directory to save model in if it doesn't exist already
    maybe_mkdir(MODEL_DIR)

    model_path = os.path.join(MODEL_DIR, "trained_lenet5.pb")
    with open(model_path, "wb") as ofile:
        ofile.write(frozen_graph.SerializeToString())


if __name__ == "__main__":
    ## Model 생성부터 Training/Test 관련 설정 과 Training/Test 진행 
    model = train_model()

    ## 생성된 Model 저장 
    save_model(model)


  • Tensorflow Keras model 관련함수
Tensorflow의 keras 관련 함수는 아래에서 찾자
  https://www.tensorflow.org/api_docs/python/tf/keras/Sequential


2.2 sample.py 분석 
기존소스 Sample Source와 거의 유사하지만 C++의 IPlugInv2와 사용하여 TensorRT의 Layer를 재정의하고, Custom Layer를 C++로 구현된것을 연결한다.


$ cat sample.py 
import sys
import os
import ctypes
from random import randint

from PIL import Image
import numpy as np
import tensorflow as tf

import pycuda.driver as cuda
import pycuda.autoinit

import tensorrt as trt
import graphsurgeon as gs
import uff

# ../common.py
sys.path.insert(1,
    os.path.join(
        os.path.dirname(os.path.realpath(__file__)),
        os.pardir
    )
)
import common

# lenet5.py
import lenet5


# MNIST dataset metadata
MNIST_IMAGE_SIZE = 28
MNIST_CHANNELS = 1
MNIST_CLASSES = 10

WORKING_DIR = os.environ.get("TRT_WORKING_DIR") or os.path.dirname(os.path.realpath(__file__))

# Path where clip plugin library will be built (check README.md)
CLIP_PLUGIN_LIBRARY = os.path.join(
    WORKING_DIR,
    'build/libclipplugin.so'
)

# Path to which trained model will be saved (check README.md)
MODEL_PATH = os.path.join(
    WORKING_DIR,
    'models/trained_lenet5.pb'
)

# Define global logger object (it should be a singleton,
# available for TensorRT from anywhere in code).
# You can set the logger severity higher to suppress messages
# (or lower to display more messages)
TRT_LOGGER = trt.Logger(trt.Logger.WARNING)

## 기본설정된 정의는 이곳에서 모두 확인 
# Define some global constants about the model.
class ModelData(object):
    INPUT_NAME = "InputLayer"
    INPUT_SHAPE = (MNIST_CHANNELS, MNIST_IMAGE_SIZE, MNIST_IMAGE_SIZE)
    RELU6_NAME = "ReLU6"
    OUTPUT_NAME = "OutputLayer/Softmax"
    OUTPUT_SHAPE = (MNIST_IMAGE_SIZE, )
    DATA_TYPE = trt.float32

## TensorRT의 Custom Layer 연결부분 (핵심)
# Generates mappings from unsupported TensorFlow operations to TensorRT plugins
def prepare_namespace_plugin_map():
    # In this sample, the only operation that is not supported by TensorRT
    # is tf.nn.relu6, so we create a new node which will tell UffParser which
    # plugin to run and with which arguments in place of tf.nn.relu6.


    ## Model의 ReLU6 -> trt_relu6 Layer 재정의하고 , 이 부분을  C++에서 Custom Layer에 연결구현 
    ## customClipPlugin.cpp의 CustomClipPlugin 연결하며,  clipMin ,clipMax Argument로 설정 Plugin의 Arg
    ## IPluginV2 C++ Class 의 Override로 구현(customClipPlugin.cpp)하고 있으며, 아래의 TensorRT C++ 참조 
    ## https://docs.nvidia.com/deeplearning/sdk/tensorrt-api/c_api/classnvinfer1_1_1_i_plugin_v2.html
    ## python API- create_plugin_node
    ## https://docs.nvidia.com/deeplearning/sdk/tensorrt-api/python_api/graphsurgeon/graphsurgeon.html
    ## https://docs.nvidia.com/deeplearning/sdk/tensorrt-developer-guide/index.html#graphsurgeon
    ## 상위 C++ 소스는 iPlugInv2를 사용하며, 이로 재정의한다 
    ## iPlugIn도 Python API가 있는데, C++ 예제만 있으니, 이소스의 한계는 여기까지이다. 
    ## clipMax/clipMin 값은 상위 Relu/Relu6의 차이를 보면될 것 같다  
    # The "clipMin" and "clipMax" fields of this TensorFlow node will be parsed by createPlugin,
    # and used to create a CustomClipPlugin with the appropriate parameters.
    trt_relu6 = gs.create_plugin_node(name="trt_relu6", op="CustomClipPlugin", clipMin=0.0, clipMax=6.0)
    namespace_plugin_map = {
        ModelData.RELU6_NAME: trt_relu6
    }
    return namespace_plugin_map

## PB파일이름을 UFF파일으로 변경 
# Transforms model path to uff path (e.g. /a/b/c/d.pb -> /a/b/c/d.uff)
def model_path_to_uff_path(model_path):
    uff_path = os.path.splitext(model_path)[0] + ".uff"
    return uff_path

## PB파일을 UFF로 변경하는 것으로 PB파일과 PlugIN 정보
# Converts the TensorFlow frozen graphdef to UFF format using the UFF converter
def model_to_uff(model_path):
     
    ## Model의 Layer 중 ReLU6 이 부분을 C++ PlugIn으로 연결하고 재정의 
    # Transform graph using graphsurgeon to map unsupported TensorFlow
    # operations to appropriate TensorRT custom layer plugins
    dynamic_graph = gs.DynamicGraph(model_path)
    dynamic_graph.collapse_namespaces(prepare_namespace_plugin_map())

    ## UFF File로 저장 
    # Save resulting graph to UFF file
    output_uff_path = model_path_to_uff_path(model_path)
    uff.from_tensorflow(
        dynamic_graph.as_graph_def(),
        [ModelData.OUTPUT_NAME],
        output_filename=output_uff_path,
        text=True
    )
    return output_uff_path

## Build TensorRT Engine이며, Pb파일을 UFF로 변경하고 이를 기준으로 정의 
# Builds TensorRT Engine
def build_engine(model_path):
    with trt.Builder(TRT_LOGGER) as builder, builder.create_network() as network, trt.UffParser() as parser:
        builder.max_workspace_size = common.GiB(1)
      
        ## PB를 UFF로 변경 상위 함수 호출 
        uff_path = model_to_uff(model_path)

        ## INPUT_SHAPE 1,28,28로 설정 
        parser.register_input(ModelData.INPUT_NAME, ModelData.INPUT_SHAPE)
        parser.register_output(ModelData.OUTPUT_NAME)
        parser.parse(uff_path, network)
        
        ## TensorRT Engine 생성 
        return builder.build_cuda_engine(network)

## pagelocked_buffer는 Host(CPU) input buffer에 Data 저장 하고 random으로 test case를 설정하고 이 결과를 반환 
# Loads a test case into the provided pagelocked_buffer. Returns loaded test case label.
def load_normalized_test_case(pagelocked_buffer):
    _, _, x_test, y_test = lenet5.load_data()
    num_test = len(x_test)
    case_num = randint(0, num_test-1)
    img = x_test[case_num].ravel()
    np.copyto(pagelocked_buffer, img)
    return y_test[case_num]

def main():

    ## PlugIn File 없으면, 에러처리
    # Load the shared object file containing the Clip plugin implementation.
    # By doing this, you will also register the Clip plugin with the TensorRT
    # PluginRegistry through use of the macro REGISTER_TENSORRT_PLUGIN present
    # in the plugin implementation. Refer to plugin/clipPlugin.cpp for more details.
    if not os.path.isfile(CLIP_PLUGIN_LIBRARY):
        raise IOError("\n{}\n{}\n{}\n".format(
            "Failed to load library ({}).".format(CLIP_PLUGIN_LIBRARY),
            "Please build the Clip sample plugin.",
            "For more information, see the included README.md"
        ))

    ## PlugIn을 동적 라이브러리 연결 
    ctypes.CDLL(CLIP_PLUGIN_LIBRARY)

    ## 학습된 Model이 없으면 에러 발생 
    # Load pretrained model
    if not os.path.isfile(MODEL_PATH):
        raise IOError("\n{}\n{}\n{}\n".format(
            "Failed to load model file ({}).".format(MODEL_PATH),
            "Please use 'python lenet5.py' to train and save the model.",
            "For more information, see the included README.md"
        ))

    ##  build_engine 함수 호출  
    # Build an engine and retrieve the image mean from the model.
    with build_engine(MODEL_PATH) as engine:

        ## 기존의 common.py 참조하면, host(CPU) /device(GPU) buffer 할당  
        inputs, outputs, bindings, stream = common.allocate_buffers(engine)
 
        ## Engine 생성
        with engine.create_execution_context() as context:
             
            ## 기존과 동일하게 host(CPU) 정보를 넣고, Random으로 설정한 test_case  표시 
            print("\n=== Testing ===")
            test_case = load_normalized_test_case(inputs[0].host)
            print("Loading Test Case: " + str(test_case))

            ## common.py의 inference해서 얻은 결과 표시하여 상위 값과 비교 
            # The common do_inference function will return a list of outputs - we only have one in this case.
            [pred] = common.do_inference(context, bindings=bindings, inputs=inputs, outputs=outputs, stream=stream)
            print("Prediction: " + str(np.argmax(pred)))


if __name__ == "__main__":
    main()


3. TensorRT Python Custom Layer(Python) 소스

상위 구현된 IPluginV2와 관련된 함수를 Python으로 구현을 한번 해보자
아래와 같이 Python으로도 IPlugInV2를 지원을 해주고 있다

Python의 iPlugInv2 부분 아래 주소
  https://docs.nvidia.com/deeplearning/sdk/tensorrt-api/python_api/infer/Plugin/pyPlugin.html
  https://docs.nvidia.com/deeplearning/sdk/tensorrt-api/python_api/infer/Plugin/IPluginV2.html

다음은 Custom Layer의 예제 C++과 Python의 예제를 다루고 있다

Custom Layer C++ Example
  https://docs.nvidia.com/deeplearning/sdk/tensorrt-developer-guide/index.html#add_custom_layer


3.1 Python Custom Layer  Example

Python Custom Layer Example은 이곳을 보면 되고 구성은 두개로 나뉘어 지면, 연결하는 Interface인 IPlugin에 관련되어서만 서술하고 있다.
Custom Layer의 구현에 대해서 별다른 이야기가 없다
TensorRT Manual이 계속 변경되니, 추후에 예제도 추가될지도 모른다

  https://docs.nvidia.com/deeplearning/sdk/tensorrt-developer-guide/index.html#add_custom_layer_python


  • Layer를 새롭게 정의하여 Network에 추가방식 (IPluginCreator)
IPluginCreator로 사용하여 새롭게 Layer정의하고 이 Plugin을 network 추가 (상위구성과 다름)
Layer의 구체적인 동작방식은 정의하지 않았다 (동작방식은 C++로 구현?)

  https://docs.nvidia.com/deeplearning/sdk/tensorrt-developer-guide/index.html#example1_add_custom_layer_python
  https://docs.nvidia.com/deeplearning/sdk/tensorrt-api/python_api/infer/Plugin/IPluginCreator.html
  https://docs.nvidia.com/deeplearning/sdk/tensorrt-api/python_api/infer/Graph/Network.html?highlight=add_plugin_v2#tensorrt.INetworkDefinition.add_plugin_v2


  • UFF Parser에 존재하는 Layer를 재정의해서 구현하는 방식  (IPluginV2)
이 예제가 상위 구성 IPluginV2의 비슷하지만 아래참조사이트의 op="LReLU_TRT"의 부분이 별도의 구현예제는 없다 (개인생각으로는 C++로 구현)

  https://docs.nvidia.com/deeplearning/sdk/tensorrt-developer-guide/index.html#example2_add_custom_layer_no_uff_python


만약 상위 소스를 Python으로만 수정한다면 PlugIn의 Custom Layer부분이 Serialize가 되어야 할 것인데, 이 부분이 어떻게 될까 한번 생각해보면, 일단
C++은 Compiler라서 이미 Binary이기때문에 Serialize가 쉽지만, Python은 Interpreter 이므로 PlugIn을 Python으로 구현하면 성능뿐만 아니라, 동작구현에도 어려움이 있을 것 같다

내 개인생각으로는 PlugIn은 Python으로 해도, 동작방식(Custom Layer)은 C++으로 구현을 해야할 것 같다
이 부분은 생각해볼만한 문제이며, 만약 순수 Python 구현된 Custom Layer 예제가 나오면 어떻게 나올지 궁금하다

9/05/2019

TensorRT 5 Python Tensorflow MNIST 분석

1. TensorRT Python 전체소스 구조 및 확인  

이전에 TensorRT의 Python 소스를  분석했지만, Python 다양한 소스가 존재하기 때문에 아래와 같이 우선 NVIDIA에서 제공해주는 TensorRT Python 전체예제를 살펴보자

TensorRT 기본 Release 정보확인
  https://docs.nvidia.com/deeplearning/sdk/tensorrt-archived/index.html


1.1  TensorRT  Python 점검사항 

  • Jetpack 4.2.1 설치기준 
  https://ahyuo79.blogspot.com/2019/07/jetpack-421.html

  • TensorRT Version Check 
일단 현재 사용하고 있는 TensorRT Version 다시 체크

$  dpkg -l | grep TensorRT   
ii  graphsurgeon-tf                               5.1.6-1+cuda10.0                             arm64        GraphSurgeon for TensorRT package
ii  libnvinfer-dev                                5.1.6-1+cuda10.0                             arm64        TensorRT development libraries and headers
ii  libnvinfer-samples                            5.1.6-1+cuda10.0                             all          TensorRT samples and documentation
ii  libnvinfer5                                   5.1.6-1+cuda10.0                             arm64        TensorRT runtime libraries
ii  python-libnvinfer                             5.1.6-1+cuda10.0                             arm64        Python bindings for TensorRT
ii  python-libnvinfer-dev                         5.1.6-1+cuda10.0                             arm64        Python development package for TensorRT
ii  python3-libnvinfer                            5.1.6-1+cuda10.0                             arm64        Python 3 bindings for TensorRT
ii  python3-libnvinfer-dev                        5.1.6-1+cuda10.0                             arm64        Python 3 development package for TensorRT
ii  tensorrt                                      5.1.6.1-1+cuda10.0                           arm64        Meta package of TensorRT
ii  uff-converter-tf                              5.1.6-1+cuda10.0                             arm64        UFF converter for TensorRT package 

  https://docs.nvidia.com/deeplearning/sdk/tensorrt-install-guide/index.html#installing

  • TensorRT Python 기본구조 및 필요 Package 설치 
  1. pyCuda 설치 (python2만 설치 했으나, python3에도 설치진행)
  2. TensorRT UFF/Caffe/Onnx Parser 소스 분석 
  3. TensorRT 직접Network 직접구성 분석 

이전소스 구조가 비슷하기에 이전 내용을 이해면 이해가 쉽다 
  https://ahyuo79.blogspot.com/2019/08/tensorrt-5-python.html


  • Tensorflow 설치부분확인  
Tensorflow 설치부분 확인 (Python3만 설치확인)

$ pip3 list  // python3 version만 설치 
..
tensorboard                   1.14.0             
tensorflow-estimator          1.14.0             
tensorflow-gpu                1.14.0+nv19.7   
...
$ pip list  // python2는 없음 


아래 사이트의 2.2 IPlugIn SSD 기능확인의 Tensorflow 설치부분참고
  https://ahyuo79.blogspot.com/2019/08/ds-sdk-40-test4-iplugin-sample.html
  https://docs.nvidia.com/deeplearning/frameworks/install-tf-jetson-platform/index.html


1.2 TensorRT Python 소스구조 확인 


NVIDIA에서 제공해주는 TensorRT의 Python 예제들을 전체 살펴보자

  • TensorRT의 Python 전체소스 확인 
$ cd /usr/src/tensorrt/samples/python
$ tree -t
.
├── common.py  // 거의 공통적으로 사용 import common 
├── end_to_end_tensorflow_mnist
│   ├── model.py
│   ├── README.md
│   ├── requirements.txt
│   └── sample.py
├── engine_refit_mnist
│   ├── model.py
│   ├── README.md
│   ├── requirements.txt
│   └── sample.py
├── fc_plugin_caffe_mnist
│   ├── CMakeLists.txt
│   ├── __init__.py
│   ├── README.md
│   ├── requirements.txt
│   ├── sample.py
│   └── plugin
│       ├── FullyConnected.h
│       └── pyFullyConnected.cpp
├── int8_caffe_mnist
│   ├── calibrator.py
│   ├── README.md
│   ├── requirements.txt
│   └── sample.py
├── network_api_pytorch_mnist // 이전에 이미 설명 
│   ├── model.py
│   ├── README.md
│   ├── requirements.txt
│   └── sample.py
├── uff_custom_plugin                   // UFF cumtome PlugIn 부분 예제 (중요)
│   ├── CMakeLists.txt
│   ├── __init__.py
│   ├── lenet5.py
│   ├── README.md
│   ├── requirements.txt
│   ├── sample.py
│   └── plugin
│       ├── clipKernel.cu
│       ├── clipKernel.h
│       ├── customClipPlugin.cpp
│       └── customClipPlugin.h
├── uff_ssd
│   ├── CMakeLists.txt
│   ├── detect_objects.py
│   ├── README.md
│   ├── requirements.txt
│   ├── voc_evaluation.py
│   ├── images
│   │   ├── image1.jpg
│   │   ├── image2.jpg
│   │   └── image_details.txt
│   ├── plugin
│   │   └── FlattenConcat.cpp
│   └── utils
│       ├── boxes.py
│       ├── coco.py
│       ├── engine.py
│       ├── inference.py
│       ├── __init__.py
│       ├── mAP.py
│       ├── model.py
│       ├── paths.py
│       └── voc.py
├── yolov3_onnx
│   ├── coco_labels.txt
│   ├── data_processing.py
│   ├── onnx_to_tensorrt.py
│   ├── README.md
│   ├── requirements.txt
│   └── yolov3_to_onnx.py
├── common.pyc
└── introductory_parser_samples  // 이전에 이미 설명 
    ├── caffe_resnet50.py
    ├── onnx_resnet50.py
    ├── README.md
    ├── requirements.txt
    ├── sample_uff.engine
    └── uff_resnet50.py


1.3 common.py 소스 
대부분의 TensorRT Python Code에서 "import common" 사용호출되면 사용이되는 소스로 이 구조를 대충 알아두어야 한다

$ cat common.py
import os
import argparse
import numpy as np
import pycuda.driver as cuda
import pycuda.autoinit
import tensorrt as trt

try:
    # Sometimes python2 does not understand FileNotFoundError
    FileNotFoundError
except NameError:
    FileNotFoundError = IOError

## 2의 30승 이므로 Giga Byte로 변경 
def GiB(val):
    return val * 1 << 30

## 기본위치설정은 /usr/src/tensorrt/data 이며 subfolder와 find_files에 따라 변경  
def find_sample_data(description="Runs a TensorRT Python sample", subfolder="", find_files=[]):
    '''
    Parses sample arguments.
    Args:
        description (str): Description of the sample.
        subfolder (str): The subfolder containing data relevant to this sample
        find_files (str): A list of filenames to find. Each filename will be replaced with an absolute path.
    Returns:
        str: Path of data directory.
    Raises:
        FileNotFoundError
    '''

    # Standard command-line arguments for all samples.
    kDEFAULT_DATA_ROOT = os.path.join(os.sep, "usr", "src", "tensorrt", "data")
    parser = argparse.ArgumentParser(description=description, formatter_class=argparse.ArgumentDefaultsHelpFormatter)
    parser.add_argument("-d", "--datadir", help="Location of the TensorRT sample data directory.", default=kDEFAULT_DATA_ROOT)
    args, unknown_args = parser.parse_known_args()

    # If data directory is not specified, use the default.
    data_root = args.datadir
    # If the subfolder exists, append it to the path, otherwise use the provided path as-is.
    subfolder_path = os.path.join(data_root, subfolder)
    data_path = subfolder_path
    if not os.path.exists(subfolder_path):
        print("WARNING: " + subfolder_path + " does not exist. Trying " + data_root + " instead.")
        data_path = data_root

    # Make sure data directory exists.
    if not (os.path.exists(data_path)):
        raise FileNotFoundError(data_path + " does not exist. Please provide the correct data path with the -d option.")

    # Find all requested files.
    for index, f in enumerate(find_files):
        find_files[index] = os.path.abspath(os.path.join(data_path, f))
        if not os.path.exists(find_files[index]):
            raise FileNotFoundError(find_files[index] + " does not exist. Please provide the correct data path with the -d option.")

    return data_path, find_files

## 아래 allocate_buffers에서 사용되어지며, host(CPU) host_mem , device(GPU) device_mem 할당
## 추후에 inputs[0].host 이런식으로 사용되어짐 
# Simple helper data class that's a little nicer to use than a 2-tuple.
class HostDeviceMem(object):
    def __init__(self, host_mem, device_mem):
        self.host = host_mem
        self.device = device_mem

    def __str__(self):
        return "Host:\n" + str(self.host) + "\nDevice:\n" + str(self.device)

    def __repr__(self):
        return self.__str__()

## GPU추론을 위해서 host(CPU) 와 device(GPU)  inputs/output 별도Buffer 생성  
# Allocates all buffers required for an engine, i.e. host/device inputs/outputs.
def allocate_buffers(engine):
    inputs = []
    outputs = []
    bindings = []
    stream = cuda.Stream()
    for binding in engine:
        size = trt.volume(engine.get_binding_shape(binding)) * engine.max_batch_size
        dtype = trt.nptype(engine.get_binding_dtype(binding))

        ## HOST (CPU) 와 Device(GPU) Memory 할당이 다르다
        ## 추후에 inputs[0].host 이런식으로 사용되어짐 
        # Allocate host and device buffers        
        host_mem = cuda.pagelocked_empty(size, dtype)
        device_mem = cuda.mem_alloc(host_mem.nbytes)
        # Append the device buffer to device bindings.
        bindings.append(int(device_mem))
        
        ## 상위 input/output이 NULL인 상태에서 선언된 HostDeviceMem를 추가    
        # Append to the appropriate list.
        if engine.binding_is_input(binding):
            inputs.append(HostDeviceMem(host_mem, device_mem))
        else:
            outputs.append(HostDeviceMem(host_mem, device_mem))
    return inputs, outputs, bindings, stream

## inference할 때도 host(CPU) 와 device(GPU) 의 개념존재 
## 추론을 위해서 CPU->GPU Buffer 이동하고 추론하고 GPU->CPU로 가져오는 방식이다
## 최종적으로 CPU의 Output Buffer를 반환하여 Linux에서 실행가능
# This function is generalized for multiple inputs/outputs.
# inputs and outputs are expected to be lists of HostDeviceMem objects.
def do_inference(context, bindings, inputs, outputs, stream, batch_size=1):
    # Transfer input data to the GPU.
    [cuda.memcpy_htod_async(inp.device, inp.host, stream) for inp in inputs]
    # Run inference.
    context.execute_async(batch_size=batch_size, bindings=bindings, stream_handle=stream.handle)
    # Transfer predictions back from the GPU.
    [cuda.memcpy_dtoh_async(out.host, out.device, stream) for out in outputs]
    # Synchronize the stream
    stream.synchronize()
    # Return only the host outputs.
    return [out.host for out in outputs]


Python Sample Section
  https://docs.nvidia.com/deeplearning/sdk/tensorrt-sample-support-guide/index.html#python_samples_section
  https://docs.nvidia.com/deeplearning/sdk/tensorrt-developer-guide/index.html#python_topics


2. Tensorflow MINIST 소스 실행  

Tensorflow의 Keras를  Model를 생성하고 이를 테스트 하는 실행소스

$ cd /usr/src/tensorrt/samples/python/end_to_end_tensorflow_mnist
$ cat requirements.txt   //python3 에 이미 설치됨 
numpy
Pillow
pycuda
tensorflow

$ sudo mkdir models           //권한문제 
$ sudo python3 model.py    // download 권한문제 
.........
2019-09-05 14:23:43.819912: I tensorflow/stream_executor/platform/default/dso_loader.cc:42] Successfully opened dynamic library libcublas.so.10.0
60000/60000 [==============================] - 8s 136us/sample - loss: 0.2010 - acc: 0.9414               // loss acc는 어떻게 계산이 되는지 모르겠음 
Epoch 2/5
60000/60000 [==============================] - 7s 121us/sample - loss: 0.0803 - acc: 0.9754               // acc는 정확성 같고,  loss 무슨손실인지 
Epoch 3/5
60000/60000 [==============================] - 7s 119us/sample - loss: 0.0523 - acc: 0.9838
Epoch 4/5
60000/60000 [==============================] - 7s 118us/sample - loss: 0.0361 - acc: 0.9887
Epoch 5/5
60000/60000 [==============================] - 7s 117us/sample - loss: 0.0291 - acc: 0.9907               // 5 번 Training이 진행될 수록 acc의 수치는 증가  loss는 줄어든다 
10000/10000 [==============================] - 1s 73us/sample - loss: 0.0600 - acc: 0.9812                 // 마지막 Test 진행하여 결과 
W0905 14:24:21.071296 547892088848 deprecation_wrapper.py:119] From model.py:78: The name tf.keras.backend.get_session is deprecated. Please use tf.compat.v1.keras.backend.get_session instead.
.........

$ find / -name convert_to_uff.py 2> /dev/null 
/usr/lib/python3.6/dist-packages/uff/bin/convert_to_uff.py
/usr/lib/python2.7/dist-packages/uff/bin/convert_to_uff.py

$ sudo python3 /usr/lib/python3.6/dist-packages/uff/bin/convert_to_uff.py models/lenet5.pb
.........
UFF Version 0.6.3
=== Automatically deduced input nodes ===
[name: "input_1"
op: "Placeholder"
attr {
  key: "dtype"
  value {
    type: DT_FLOAT
  }
}
attr {
  key: "shape"
  value {
    shape {
      dim {
        size: -1
      }
      dim {
        size: 28
      }
      dim {
        size: 28
      }
      dim {
        size: 1
      }
    }
  }
}
]
=========================================

=== Automatically deduced output nodes ===
[name: "dense_1/Softmax"
op: "Softmax"
input: "dense_1/BiasAdd"
attr {
  key: "T"
  value {
    type: DT_FLOAT
  }
}
]
==========================================

Using output node dense_1/Softmax
Converting to UFF graph
DEBUG: convert reshape to flatten node
No. nodes: 13
UFF Output written to models/lenet5.uff

$ ls models/                      //UFF Format 생성확인 (PB->UFF)
lenet5.pb  lenet5.uff

// Test Case :  Random으로 선택된 Case , Prediction:  추론의 의한값  동일 
$ sudo python3 sample.py     //  -d  /usr/src/tensorrt/data
Test Case: 1
Prediction: 1

$ ls /usr/src/tensorrt/data/mnist/
0.pgm  3.pgm  6.pgm  9.pgm            LegacyCalibrationTable      lenet5_mnist_frozen.pb  mnistapi.wts      mnist_lenet.caffemodel  mnist.prototxt
1.pgm  4.pgm  7.pgm  batches          lenet5_custom_pool.uff      lenet5.uff              mnist.caffemodel  mnist_mean.binaryproto
2.pgm  5.pgm  8.pgm  deploy.prototxt  lenet5_custom_pool.uff.txt  lenet5.uff.txt          mnistgie.wts      mnist.onnx


UFF Utility
  https://docs.nvidia.com/deeplearning/sdk/tensorrt-api/python_api/uff/uff.html


2.1  Tensorflow MNIST Model 소스분석 

기본소스는 Tensorflow의 Keras로 생성된 모델과 설정된 Netowkr으로 동작되며, Tensorflow의 MNIST DATASET을 Download하여 Training과 TEST를 걸쳐
최종적으로 Model을 파일로 PB파일로 저장한다

$ cat model.py 
import tensorflow as tf
import numpy as np

## Google에서 minist.npz download 후 TRAIN과 TEST를 횟수를 정의하기위해 1차원추가
def process_dataset():

    ## Google에서 mnist.npz data를 가져온 후 값을 255로 나누어 저장 
    # Import the data
    (x_train, y_train),(x_test, y_test) = tf.keras.datasets.mnist.load_data()
    x_train, x_test = x_train / 255.0, x_test / 255.0

    ## TRAINING 횟수 , TEST 횟수를 reshape를 해서 1차원을 추가 (4차원) 
    # Reshape the data
    NUM_TRAIN = 60000
    NUM_TEST = 10000
    x_train = np.reshape(x_train, (NUM_TRAIN, 28, 28, 1))
    x_test = np.reshape(x_test, (NUM_TEST, 28, 28, 1))
    return x_train, y_train, x_test, y_test

## Model의 Network 생성 과 구성(각 Layer 추가설정)
def create_model():
    model = tf.keras.models.Sequential()
    model.add(tf.keras.layers.InputLayer(input_shape=[28,28, 1]))
    model.add(tf.keras.layers.Flatten())
    model.add(tf.keras.layers.Dense(512, activation=tf.nn.relu))
    model.add(tf.keras.layers.Dense(10, activation=tf.nn.softmax))
    model.compile(optimizer='adam', loss='sparse_categorical_crossentropy', metrics=['accuracy'])
    return model

## Model과 File 명을 입력 받아 freeze하여 lenet5.pb로 저장 
def save(model, filename):
    # First freeze the graph and remove training nodes.
    output_names = model.output.op.name
    sess = tf.keras.backend.get_session()
    frozen_graph = tf.graph_util.convert_variables_to_constants(sess, sess.graph.as_graph_def(), [output_names])
    frozen_graph = tf.graph_util.remove_training_nodes(frozen_graph)
    # Save the model
    with open(filename, "wb") as ofile:
        ofile.write(frozen_graph.SerializeToString())

def main():
    ##  DataSet Download 하여 Training/TEST 숫자 변경, 상위함수
    x_train, y_train, x_test, y_test = process_dataset()

    ##  상위에 정의된 Layer로 모델구성,상위함수
    model = create_model()

    ## Training을 위해 전체횟수 5번 과 1번의 Progress Bar로 표시 
    # Train the model on the data
    model.fit(x_train, y_train, epochs = 5, verbose = 1)
 
    ## Model Training/TEST 진행 x_test:input , y_test:output 
    # Evaluate the model on test data
    model.evaluate(x_test, y_test)

    ## Training/TEST한 Model File로 lenet5.pb 저장
    save(model, filename="models/lenet5.pb")

if __name__ == '__main__':
    main()


  • 기본용어이해 
epochs:  DataSet을 가지고 전체 Training 하는 횟수
step :  weight 와 Bias를 1회 update하는 것을 1 step
batch size : 1회 step에 사용한 data의 수를 정의

  https://m.blog.naver.com/PostView.nhn?blogId=wideeyed&logNo=221333529176&proxyReferer=https%3A%2F%2Fwww.google.com%2F

  • Tensorflow의 mnist DATASET
  1. tf.keras.datasets.mnist.load_data
  https://www.tensorflow.org/api_docs/python/tf/keras/datasets/mnist/load_data

  • Tensorflow keras model 이해 
  1. tf.keras.models.Sequential
  2. model.fi (verbose:  0은 silent 1은 1은  progress bar 표시)
  3. model.evaluate
  https://www.tensorflow.org/api_docs/python/tf/keras/Sequential

  • numpy의 reshape / ravel 이해 
  https://docs.scipy.org/doc/numpy/reference/generated/numpy.reshape.html
  https://rfriend.tistory.com/349


2.2 TensorRT의 Sample.py 소스분석 

상위에서 Training/TEST를 걸쳐 생성된 PB파일을 UFF로 변경된 모델로 읽어서 TensorRT의 Engine을 생성하고 이를 실행하여,
임의로 정한 TEST CASE와  추론을 통한  PREDICTION CASE를 비교한다


$ cat sample.py 
# This sample uses a UFF MNIST model to create a TensorRT Inference Engine
from random import randint
from PIL import Image
import numpy as np

import pycuda.driver as cuda
# This import causes pycuda to automatically manage CUDA context creation and cleanup.
import pycuda.autoinit

import tensorrt as trt

import sys, os
sys.path.insert(1, os.path.join(sys.path[0], ".."))

## 상위 common.py 
import common

# You can set the logger severity higher to suppress messages (or lower to display more messages).
TRT_LOGGER = trt.Logger(trt.Logger.WARNING)


## Class로 ModelData 정의하고 초기값들을 설정 (Class는 설정값만 이용)
class ModelData(object):
    MODEL_FILE = "lenet5.uff"
    INPUT_NAME ="input_1"
    INPUT_SHAPE = (1, 28, 28)
    OUTPUT_NAME = "dense_1/Softmax"

## Build Engine을 만드는 함수 (UFF를 통해 Network 정의)
## UFF Parser에  INPUT정보  input_1  (1, 28, 28) , 이 부분 상위 model.py의 create_model 확인
## UFF Parser에  OUTPUT정보 dense_1/Softmax 
def build_engine(model_file):
    # For more information on TRT basics, refer to the introductory samples.
    with trt.Builder(TRT_LOGGER) as builder, builder.create_network() as network, trt.UffParser() as parser:
        builder.max_workspace_size = common.GiB(1)
        # Parse the Uff Network
        parser.register_input(ModelData.INPUT_NAME, ModelData.INPUT_SHAPE)
        parser.register_output(ModelData.OUTPUT_NAME)
        parser.parse(model_file, network)
        # Build and return an engine.
        return builder.build_cuda_engine(network)


## CPU Input Buffer에 그림이미지를 넣고 추론준비하고, Random으로 TESTCASE 0~9.pgm 파일준비 
## pagelocked_buffer=inputs[0].host, 즉 Host(CPU) Input Buffer를 입력받는다  
## 그리고 Host(CPU) Input Buffer 에 Random으로 선택된 TEST Case의 Image를 읽어 1차원으로 변경후
## 1.0 - img/255 연산을 걸친 후 최종 Host Input Buffer 넣는다 
## Random으로 선택된 TEST_CASE는 그대로 리턴 

# Loads a test case into the provided pagelocked_buffer.
def load_normalized_test_case(data_path, pagelocked_buffer, case_num=randint(0, 9)):
    test_case_path = os.path.join(data_path, str(case_num) + ".pgm")
    # Flatten the image into a 1D array, normalize, and copy to pagelocked memory.
    img = np.array(Image.open(test_case_path)).ravel()
    np.copyto(pagelocked_buffer, 1.0 - img / 255.0)
    return case_num

## Main 함수 순차적으로 보자 
def main():
    ## /usr/src/tensorrt/data/mnist/로 data_path로 설정 
    data_path, _ = common.find_sample_data(description="Runs an MNIST network using a UFF model file", subfolder="mnist")

    ## MODEL_PATH 정의가 되었다면, 이것으로 설정 
    ## os.path.dirname(__file__)를 통해 현재 작업중인 Directory 알아내고, models 의 directory 설정 
    model_path = os.environ.get("MODEL_PATH") or os.path.join(os.path.dirname(__file__), "models")

    ## 상위에서 정의된 모델 파일 확인 lenet5.uff 
    model_file = os.path.join(model_path, ModelData.MODEL_FILE)

    ## 상위 함수 호출로 TensorRT(Cuda) Engine 생성 
    with build_engine(model_file) as engine:

        ## Host(CPU), Device(GPU)의 Input/Output Buffer를 설정 
        # Build an engine, allocate buffers and create a stream.
        # For more information on buffer allocation, refer to the introductory samples.
        inputs, outputs, bindings, stream = common.allocate_buffers(engine)

        ## 실제적인 Engine을 생성하고 준비 중인 상태로 진입 (이전에는 Build상태)
        with engine.create_execution_context() as context:
            
            ## 상위함수로, Host(CPU) Input Buffer Image Data를 넣고 추론준비하고, Test Case 선택   
            case_num = load_normalized_test_case(data_path, pagelocked_buffer=inputs[0].host)

            ## Engine이 생성되고 준비가 되었으니, 추론을 진행 (GPU에게 추론진행)
            # For more information on performing inference, refer to the introductory samples.
            # The common.do_inference function will return a list of outputs - we only have one in this case.
            [output] = common.do_inference(context, bindings=bindings, inputs=inputs, outputs=outputs, stream=stream)

            ## 추론된 output 중 가장 큰값 찾고 index 값을 추출   
            pred = np.argmax(output)

            ## TEST CASE 상위 Random으로 선택된 값과 추론에 나온값비교 
            print("Test Case: " + str(case_num))
            print("Prediction: " + str(pred))

if __name__ == '__main__':
    main()

8/17/2019

TensorRT 5 Python 기본구조 파악

1.  TensorRT Python 분석 

TensorRT C++ 기준으로 작성된 Inference 엔진이며,  최신 Version 부터 Python를 제공하고 있어 쉽게 TensorRT를 동작방식가능하고 이를 수정가능하다.
이 TensorRT Python을 이용하여 C++ 대신 손쉽게 TensorRT를 Control 하는 방법들을 알고자하여  테스트 진행한다
일단 C++ API는 골치아파서 넘어가자


1.1 TensorRT Python 관련사항정리 

  • TensorRT 5.0  기본구조 및 동작 (C++/Python 참조)
TensorRT는 기본동작을 C++과 Python을 이용하여 설명
  https://ahyuo79.blogspot.com/2019/06/tensorrt-50-jetson-agx-xavier.html

  • Jetpack 4.2.1 설치기준 
  https://ahyuo79.blogspot.com/2019/07/jetpack-421.html


우선 기존에도 설명을 했지만, TensorRT는 각각의 Layer를 지원하며, 이에 맞추어 각각의 Model에 맞는 network를  지원을 해준다고 한다
그러므로, Model 안에 TensorRT의 Layer가 지원이 안되는 경우는 직접 Custom Layer로 구현을 해야한다 (이 부분 이전에도 설명)
  https://docs.nvidia.com/deeplearning/sdk/tensorrt-developer-guide/index.html#extending
  https://docs.nvidia.com/deeplearning/sdk/tensorrt-api/python_api/infer/Plugin/pyPlugin.html

DeepStream 의 Yolo의 Custom Layer 부분참조 ( C++ 로 구현) 와 IPlugin 확인
  https://ahyuo79.blogspot.com/2019/08/ds-sdk-40-test4-iplugin-sample.html
  https://ahyuo79.blogspot.com/2019/08/deepstream-sdk-40-plugin-gstreamer.html

TensorRT Support Matrix
  https://docs.nvidia.com/deeplearning/sdk/tensorrt-support-matrix/index.html

TensorRT Layer
  https://docs.nvidia.com/deeplearning/sdk/tensorrt-api/python_api/infer/Graph/Layers.html


1.2 TensorRT 기본구조  

TensorRT는 NVIDIA에서 제공하는 Inference 를 위한 Engine이며, 기본소스가 C++로 구성되며, TensorRT의 기본구조는 C++/Python API 동일하며, 두가지 모드로 나누어 생각해볼 수 있다.

  • Caffe/UFF/Onnx  Parser 이용방법 
기존의 Framwork과 호환성을 위해서 Training된 Model를 존재하다면, TensorRT의 UFF/Caffe/Onnx Parser를 이용하여 Model의 Network를 쉽게 구성하고
이를 기반으로 TensorRT Engine을 만들어 추론으로 바로 가능하다.
다만, TensorRT가 지원되지 않는 Layer는 Custom Layer로 구현하여 연결해야한다.


  • TensorRT에서 직접 Network 구성 
TensorRT도 Network를 Layer를 추가하여 구성을 직접할수 있지만, 문제는 Training된 weight와 bias 값을 얻어올 수가 없으므로, 이 부분도 다른 Framework에서 가져와야한다


1.3 TensorRT Python 필요사항 (pyCuda 설치)

Sample의 TensorRT Python 실행을 위해서는 필수로 필요하기 때문에 아래사항을들을 설치하자

$ cd /usr/src/tensorrt/samples/python/introductory_parser_samples
$ cat requirements.txt   
numpy
Pillow
pycuda
$ export CUDA_INC_DIR=/usr/local/cuda-10.0/include

$ sudo python2 -m pip install -r requirements.txt   //pycuda 설치 중 cuda 문제로 에러발생 (#include cuda .h)
or  
$ sudo python3 -m pip install -r requirements.txt  //pycuda 설치 중 cuda 문제로 에러발생 (#include cuda .h)

$ pip list or pip3 list  // 상위 requrement.txt package 확인 
...


TensorRT를 C++로 작성하면 pycuda는 필요가 없을 텐데,  TensorRT를 python으로하니, pycuda문제가 발생하며, 이는 필수로 설치를 해야한다 

  • pycuda 직접설치 (필수 설치)
pycuda는 필수로 필요하므로, 상위에서 매번에러가 발생하여, Package대신 아래와 같이 직접 다운받아 설치로 결정

//pycuda 직접설치로 결정 (pip list 검색불가)  아래 사이트참조 
$ cd ~ 
//https://pypi.org/project/pycuda/#files
$ wget https://files.pythonhosted.org/packages/5e/3f/5658c38579b41866ba21ee1b5020b8225cec86fe717e4b1c5c972de0a33c/pycuda-2019.1.2.tar.gz
$ tar zxvf pycuda-2019.1.2.tar.gz 
$ cd pycuda-2019.1.2/

$ python configure.py --cuda-root=/usr/local/cuda-10.0   //python2 로 진행 
or 
$ python3 configure.py --cuda-root=/usr/local/cuda-10.0
//pycuda 설치 
$ sudo make install
........
Using /usr/local/lib/python2.7/dist-packages
Finished processing dependencies for pycuda==2019.1.2
//설치완료 

pycuda 설치방법
  https://docs.nvidia.com/deeplearning/sdk/tensorrt-install-guide/index.html#installing-pycuda
  https://devtalk.nvidia.com/default/topic/1013387/jetson-tx2/is-the-memory-management-method-of-tx1-and-tx2-different-/post/5167500/#5167500
  https://docs.nvidia.com/deeplearning/sdk/tensorrt-api/python_api/gettingStarted.html


2. TensorRT Caffe/UFF/Onnx Parser 실행  

아래와 같이 Parser Sample로 찾아가서 Python으로 실행해보면,  /usr/src/tensorrt/data/resnet50 의 각각의 caffe/uff/onnx format의 모델을 사용하여 동일하게 추론을 한다
그리고 아래의위치 /usr/src/tensorrt/data/resnet50/*.jpg Test Sample 그림을 인식하는 것이다

$ cd /usr/src/tensorrt/samples/python/introductory_parser_samples

$ find / -name ResNet50_fp32.caffemodel 2> /dev/null 
/usr/src/tensorrt/data/resnet50/ResNet50_fp32.caffemodel

$ python caffe_resnet50.py    // 기본설정, /usr/src/tensorrt/data
Correctly recognized /usr/src/tensorrt/data/resnet50/reflex_camera.jpeg as reflex camera

$ python uff_resnet50.py 
Correctly recognized /usr/src/tensorrt/data/resnet50/binoculars.jpeg as binoculars

$ python onnx_resnet50.py 
Correctly recognized /usr/src/tensorrt/data/resnet50/binoculars.jpeg as binoculars

각각의 caffe/uff/onnx의 reset50 동작확인이 가능하며 기본적인 구조들이 비슷하기 때문에, 아래의 UFF기준으로만 분석한다.( Tensorflow)

Resnet50의 정보
  https://datascienceschool.net/view-notebook/958022040c544257aa7ba88643d6c032/


2.1 uff_resnet50.py 소스분석 

TensorRT는 Framework와 호환성을 위해서 3개의 Parser를 지원을 해주고 있으며, 이 Parser를 이용하여 동작되는 구조는 3개가 거의 유사하므로,
현재 3개중 UFF만을 선택해서 소스분석를 세부분석 해보고, 돌아가는 원리를 파악해보자.


다음 소스구조는 resenet50-infer-5.uff model을 UFF Parser 이용하여 Engine생성 후 실제 적용하여추론하는 소스이다.

$ cat uff_resnet50.py 
# This sample uses a UFF ResNet50 Model to create a TensorRT Inference Engine
import random
from PIL import Image
import numpy as np

import pycuda.driver as cuda
# This import causes pycuda to automatically manage CUDA context creation and cleanup.
import pycuda.autoinit

import tensorrt as trt

import sys, os
sys.path.insert(1, os.path.join(sys.path[0], ".."))

## common.py 부분으로 생략
import common

## class를 이용하여 각 설정값을 정의 
class ModelData(object):
    MODEL_PATH = "resnet50-infer-5.uff"
    INPUT_NAME = "input"
    INPUT_SHAPE = (3, 224, 224)
    OUTPUT_NAME = "GPU_0/tower_0/Softmax"
    # We can convert TensorRT data types to numpy types with trt.nptype()
    DTYPE = trt.float32

# You can set the logger severity higher to suppress messages (or lower to display more messages).
TRT_LOGGER = trt.Logger(trt.Logger.WARNING)

## host(CPU) 와 device(GPU)  buffer를 분리해서 할당하며, 할당방식도 다르다 
## https://docs.nvidia.com/deeplearning/sdk/tensorrt-developer-guide/index.html#perform_inference_python
## 상위 링크에서 아래의 기능확인가능 
## Host(CPU) 와 Device(GPU) 의 Buffer를 설정하고, Stream의 생성 
# Allocate host and device buffers, and create a stream.
def allocate_buffers(engine):
    # Determine dimensions and create page-locked memory buffers (i.e. won't be swapped to disk) to hold host inputs/outputs.
    h_input = cuda.pagelocked_empty(trt.volume(engine.get_binding_shape(0)), dtype=trt.nptype(ModelData.DTYPE))
    h_output = cuda.pagelocked_empty(trt.volume(engine.get_binding_shape(1)), dtype=trt.nptype(ModelData.DTYPE))
    # Allocate device memory for inputs and outputs.
    d_input = cuda.mem_alloc(h_input.nbytes)
    d_output = cuda.mem_alloc(h_output.nbytes)
    # Create a stream in which to copy inputs/outputs and run inference.
    stream = cuda.Stream()
    return h_input, d_input, h_output, d_output, stream

## host(CPU) 와 device(GPU)  buffer  관리와 추론 진행 
def do_inference(context, h_input, d_input, h_output, d_output, stream):
    ## CPU->GPU로 전송
    # Transfer input data to the GPU.
    cuda.memcpy_htod_async(d_input, h_input, stream)
    ## GPU 전송후 inference 실행 
    # Run inference.
    context.execute_async(bindings=[int(d_input), int(d_output)], stream_handle=stream.handle)
    ## GPU->CPU Memory 결과값을 가져오기
    # Transfer predictions back from the GPU.
    cuda.memcpy_dtoh_async(h_output, d_output, stream)
    # Synchronize the stream
    stream.synchronize()

## TensorRT Engine Build이며, UFF Parser를 이용하여 각 정의 
## UFF File,resnet50-infer-5.uff의 input name/output name, input shape를 등록  
## https://docs.nvidia.com/deeplearning/sdk/tensorrt-archived/tensorrt_500rc/tensorrt-api/python_api/coreConcepts.html
## 상위 링크에서 확인가능 
# The UFF path is used for TensorFlow models. You can convert a frozen TensorFlow graph to UFF using the included convert-to-uff utility.
def build_engine_uff(model_file):
    # You can set the logger severity higher to suppress messages (or lower to display more messages).
    with trt.Builder(TRT_LOGGER) as builder, builder.create_network() as network, trt.UffParser() as parser:
        # Workspace size is the maximum amount of memory available to the builder while building an engine.
        # It should generally be set as high as possible.
        builder.max_workspace_size = common.GiB(1)
        # We need to manually register the input and output nodes for UFF.
        parser.register_input(ModelData.INPUT_NAME, ModelData.INPUT_SHAPE)
        parser.register_output(ModelData.OUTPUT_NAME)
        # Load the UFF model and parse it in order to populate the TensorRT network.
        parser.parse(model_file, network)
        # Build and return an engine.
        return builder.build_cuda_engine(network)

## test_image의 변형이 없이 그대로 리턴하며, pagelocked_buffer(h_input), HOST(CPU) Buffer 에 Image정보를 Resize, antialias ,transpose 후 최종 1D Array 변경 
## CHW (Channel × Height × Width) 상위 INPUT_SHAPE (3, 224, 224)
## 들어온 test_image 그대로 return
def load_normalized_test_case(test_image, pagelocked_buffer):
    # Converts the input image to a CHW Numpy array
    def normalize_image(image):
        # Resize, antialias and transpose the image to CHW.
        c, h, w = ModelData.INPUT_SHAPE
        return np.asarray(image.resize((w, h), Image.ANTIALIAS)).transpose([2, 0, 1]).astype(trt.nptype(ModelData.DTYPE)).ravel()

    # Normalize the image and copy to pagelocked memory.
    np.copyto(pagelocked_buffer, normalize_image(Image.open(test_image)))
    return test_image

def main():
    
    ## commom.py를 이용하여 다음과 같이 설정 
    ## data_path  = /usr/src/tensorrt/data/resnet50 설정 
    ## data_files = "binoculars.jpeg", "reflex_camera.jpeg", "tabby_tiger_cat.jpg","resnet50-infer-5.uff" ,"class_labels.txt"    
    # Set the data path to the directory that contains the trained models and test images for inference.
    data_path, data_files = common.find_sample_data(description="Runs a ResNet50 network with a TensorRT inference engine.", subfolder="resnet50", find_files=["binoculars.jpeg", "reflex_camera.jpeg", "tabby_tiger_cat.jpg", ModelData.MODEL_PATH, "class_labels.txt"])

    ## test_images 에는 data_files의 0~2까지 즉 Image 3개 0>=x && x< 3
    # Get test images, models and labels.
    test_images = data_files[0:3]

    ## 3부터 uff_model_file 과 lables_file 설정  
    uff_model_file, labels_file = data_files[3:]

    ## labels 값을 File을 읽어 줄 순서대로 넣음 
    labels = open(labels_file, 'r').read().split('\n')

    ## 상위함수로 Build TensorRT Engine이며, UFF Parser를 하여 준비  
    # Build a TensorRT engine.
    with build_engine_uff(uff_model_file) as engine:
        # Inference is the same regardless of which parser is used to build the engine, since the model architecture is the same.

        ## 상위함수로 Host(CPU), Device(GPU) 별로 Buffer를 input/output 할당 
        # Allocate buffers and create a CUDA stream.
        h_input, d_input, h_output, d_output, stream = allocate_buffers(engine)

        ## Build된 Engine을 생성하고 inference를 위해 준비 
        # Contexts are used to perform inference.
        with engine.create_execution_context() as context:

            ## Random으로 3개의 test_images들 중 선택하여 하나확정 
            # Load a normalized test case into the host input page-locked buffer.
            test_image = random.choice(test_images)

            ## Host(CPU) Buffer에 test_image를 넣어주고, test_case로 그대로 반환 
            test_case = load_normalized_test_case(test_image, h_input)

            ## Host(CPU) input buffer 기반으로 Device(GPU)로 추론하여 결과를 다시 Host(CPU) output
            # Run the engine. The output will be a 1D tensor of length 1000, where each value represents the
            # probability that the image corresponds to that label
            do_inference(context, h_input, d_input, h_output, d_output, stream)

            ## 추론에서 얻은 Host output중 가장 큰 값의 index를 찾아 반환 (pred)
            # We use the highest probability as our prediction. Its index corresponds to the predicted label.
            pred = labels[np.argmax(h_output)]

            ## Random으로 선택한 Test Case와 추론한 prediction을 비교 
            if "_".join(pred.split()) in os.path.splitext(os.path.basename(test_case))[0]:
                print("Correctly recognized " + test_case + " as " + pred)
            else:
                print("Incorrectly recognized " + test_case + " as " + pred)

if __name__ == '__main__':
    main()


  • 상위 전체소스를  이해하기 위해서 아래 문서 (필수)
UFF Parser를 이용하기 때문에 이곳부터 소스를 보면 쉽게 이해가 쉽다
  https://docs.nvidia.com/deeplearning/sdk/tensorrt-developer-guide/index.html#import_tf_python

TensorRT Python Concept (Build Engine, 상위링크에도 설명)
  https://docs.nvidia.com/deeplearning/sdk/tensorrt-archived/tensorrt_500rc/tensorrt-api/python_api/coreConcepts.html


2.2 uff_resnet50.py  관련 TensorRT API 문서  

초기 Class를 생성시 설정되는 값은 중요하며, 각 모델마다 차이점이 존재한다.
  1. Caffemodel : model-file, proto-file, output-blob-names        
  2. UFF: uff-file, input-dims, uff-input-blob-name, output-blob-names                  
  3. ONNX: onnx-file   

  • Python Parser (Caffe,UFF,ONNX)
trt로 검색후 Model별 확인
  https://docs.nvidia.com/deeplearning/sdk/tensorrt-api/python_api/parsers/Uff/pyUff.html
  https://docs.nvidia.com/deeplearning/sdk/tensorrt-api/python_api/parsers/Caffe/pyCaffe.html
  https://docs.nvidia.com/deeplearning/sdk/tensorrt-api/python_api/parsers/Onnx/pyOnnx.html


  • TensorRT 기본적인 Types / Core  (상위 Logger 와 Datatype 확인)
상위소스에서 trt로 검색하여 관련된 것을 아래에서 확인가능
  https://docs.nvidia.com/deeplearning/sdk/tensorrt-api/python_api/infer/FoundationalTypes/pyFoundationalTypes.html
  https://docs.nvidia.com/deeplearning/sdk/tensorrt-api/python_api/infer/Core/pyCore.html


  • UFF Converter/Operators
  https://docs.nvidia.com/deeplearning/sdk/tensorrt-api/python_api/uff/uff.html#
  https://docs.nvidia.com/deeplearning/sdk/tensorrt-api/python_api/uff/Operators.html#

  • 상위 TensorRT Model의 성능 및 설정되어야하는 부분 확인 
  1.6  각 모델의 성능비교 (TensorRT)  
  https://ahyuo79.blogspot.com/2019/08/deepstream-sdk-40-plugin-gstreamer.html


아쉬운 점이 있다면 별도로 Serialize 와 Deserialize를 진행하지 않아서 Engine을 저장하지 않아 속도가 느리다.


2.3 uff_resnet50.py model engine 생성하여 속도개선 

상위 소스를 매번 실행할때마다 매번 Engine을  새로생성하므로, 시간이 상당히 많이 걸리므로,아래와 같이 처음생성시 Engine을 File로 저장하고,
만들어진 Engine File을 매번 이용하는 방법으로 소스를 수정해보자.

기존에 이용하던 DeepStream의 model-engine 과 동일하다
아래와 같이 소스를 수정하면 매번 엔진 빌드시간이 없어지므로, 실행되는 시간이  빨라진다.


$ sudo vi uff_resnet50.py 
.............
def main():

# Set the data path to the directory that contains the trained models and test images for inference.
    data_path, data_files = common.find_sample_data(description="Runs a ResNet50 network with a TensorRT inference engine.", subfolder="resnet50", find_files=["binoculars.jpeg", "reflex_camera.jpeg", "tabby_tiger_cat.jpg", ModelData.MODEL_PATH, "class_labels.txt"])
    # Get test images, models and labels.
    test_images = data_files[0:3]
    uff_model_file, labels_file = data_files[3:]
    labels = open(labels_file, 'r').read().split('\n')

   
    ##  두번째 부터 이미 저장된 Engine File을 Open하여 Deserialize하여 사용 (Engine Build Time을 없앰)
    ##  아래소스와 거의 동일하지만, build_engine_uff 함수의 역할이 필요 없으므로, 바로 추론가능 
    ##  마지막에 소스 바로종료를 하여 밑에 소스 실행금지 


    with open("sample_uff.engine","rb") as f, trt.Runtime(TRT_LOGGER) as runtime:
        engine = runtime.deserialize_cuda_engine(f.read())
       # Inference is the same regardless of which parser is used to build the engine, since the model architecture is the same.
        # Allocate buffers and create a CUDA stream.
        h_input, d_input, h_output, d_output, stream = allocate_buffers(engine)
        # Contexts are used to perform inference.
        with engine.create_execution_context() as context:
            # Load a normalized test case into the host input page-locked buffer.
            test_image = random.choice(test_images)
            test_case = load_normalized_test_case(test_image, h_input)
            # Run the engine. The output will be a 1D tensor of length 1000, where each value represents the
            # probability that the image corresponds to that label
            do_inference(context, h_input, d_input, h_output, d_output, stream)
            # We use the highest probability as our prediction. Its index corresponds to the predicted label.
            pred = labels[np.argmax(h_output)]
            if "_".join(pred.split()) in os.path.splitext(os.path.basename(test_case))[0]:
                print("2nd Correctly recognized " + test_case + " as " + pred)
            else:
                print("2nd Incorrectly recognized " + test_case + " as " + pred)
            sys.exit()


    ##  첫번째 실행에만 Engine을 Build하고 이를 Serialize 한 후 File로 저장 (TensorRT Manual 참고) 

    # Build a TensorRT engine.
    with build_engine_uff(uff_model_file) as engine:
        with open("sample_uff.engine","wb") as f:
            f.write(engine.serialize())
        # Inference is the same regardless of which parser is used to build the engine, since the model architecture is the same.
        # Allocate buffers and create a CUDA stream.
        h_input, d_input, h_output, d_output, stream = allocate_buffers(engine)
        # Contexts are used to perform inference.
        with engine.create_execution_context() as context:
            # Load a normalized test case into the host input page-locked buffer.
            test_image = random.choice(test_images)
            test_case = load_normalized_test_case(test_image, h_input)
            # Run the engine. The output will be a 1D tensor of length 1000, where each value represents the
            # probability that the image corresponds to that label
            do_inference(context, h_input, d_input, h_output, d_output, stream)
            # We use the highest probability as our prediction. Its index corresponds to the predicted label.
            pred = labels[np.argmax(h_output)]
            if "_".join(pred.split()) in os.path.splitext(os.path.basename(test_case))[0]:
                print("Correctly recognized " + test_case + " as " + pred)
            else:
                print("Incorrectly recognized " + test_case + " as " + pred)

$ sudo python uff_resnet50.py  // wrtie 시 파일 접근권한 
2nd Correctly recognized /usr/src/tensorrt/data/resnet50/reflex_camera.jpeg as reflex camera

개선된 소스로 하면 속도가 이전과는 다르다
  1. 처음동작시 Engine을 serialize 하여 File로  sample_uff.engine 저장 
  2. 두번째 부터는 이미 저장된 Engine File을  sample_uff.engine  읽어 Deserialize 한 후 바로사용

3. TensorRT 직접 Network를 구성 

만약 Model ( UFF/Caffe/ONNX)의 Parser로 Network를 구성하지 않고 직접 TensorRT에서 Network를 구성한다면 어떻게 해야할까?
그렇다면, Training에서 만들어진 결과값, 즉 (weight,bias)은 어디에서는 가져와야 동작 될 것이다

TensorRT 내부구조를 보면 Layer는 대부분 지원되므로 본인이 API를 이해하고 시간만 있다면, 원하는 Network를 구성은 할수 있을 것 같다.
하지만, 문제는 Training에서 얻은 결과값 필요하며, 이를 가져올 방법은 TensorRT로 Training하거나, 이미 Training된 곳에서 가져오는 것일 것이다.

3.1  NVIDIA TensorRT Network 구성예제  

처음 아래 사이트의 예제기반으로 작성한 다음 왜 동작이 안되는 지 몰라 문서를 자세히 읽어보니, pytorch에서 Training한 값을 가져와서 적용하는 구조이다.

  https://docs.nvidia.com/deeplearning/sdk/tensorrt-developer-guide/index.html#create_network_python


$ cd ~ 
$ vi test.py
import tensorrt as trt

INPUT_NAME = "input"
INPUT_SHAPE = (3, 224, 224)
OUTPUT_NAME = "Markoutput"
OUTPUT_SIZE = 400

TRT_LOGGER = trt.Logger(trt.Logger.WARNING)

# Create the builder and network
with trt.Builder(TRT_LOGGER) as builder, builder.create_network() as network:
 # Configure the network layers based on the weights provided. In this case, the weights are imported from a pytorch model. 
 # Add an input layer. The name is a string, dtype is a TensorRT dtype, and the shape can be provided as either a list or tuple.
 input_tensor = network.add_input(name=INPUT_NAME, dtype=trt.float32, shape=INPUT_SHAPE)

 # Add a convolution layer
 conv1_w = weights['conv1.weight'].numpy()
 conv1_b = weights['conv1.bias'].numpy()
 conv1 = network.add_convolution(input=input_tensor, num_output_maps=20, kernel_shape=(5, 5), kernel=conv1_w, bias=conv1_b)
 conv1.stride = (1, 1)

 pool1 = network.add_pooling(input=conv1.get_output(0), type=trt.PoolingType.MAX, window_size=(2, 2))
 pool1.stride = (2, 2)
 conv2_w = weights['conv2.weight'].numpy()
 conv2_b = weights['conv2.bias'].numpy()
 conv2 = network.add_convolution(pool1.get_output(0), 50, (5, 5), conv2_w, conv2_b)
 conv2.stride = (1, 1)

 pool2 = network.add_pooling(conv2.get_output(0), trt.PoolingType.MAX, (2, 2))
 pool2.stride = (2, 2)

 fc1_w = weights['fc1.weight'].numpy()
 fc1_b = weights['fc1.bias'].numpy()
 fc1 = network.add_fully_connected(input=pool2.get_output(0), num_outputs=500, kernel=fc1_w, bias=fc1_b)

 relu1 = network.add_activation(fc1.get_output(0), trt.ActivationType.RELU)

 fc2_w = weights['fc2.weight'].numpy()
 fc2_b = weights['fc2.bias'].numpy()
 fc2 = network.add_fully_connected(relu1.get_output(0), OUTPUT_SIZE, fc2_w, fc2_b)

 fc2.get_output(0).name =OUTPUT_NAME
 network.mark_output(fc2.get_output(0))

$ python test.py
...
    conv1_w = weights['conv1.weight'].numpy()
NameError: name 'weights' is not defined


  • 상위를 이해하기 위해서 TensorRT의 Python 관련된 API 정리 

TensorRT Python Manual-Network (상위소스 network 연결된 method들 )
  https://docs.nvidia.com/deeplearning/sdk/tensorrt-api/python_api/infer/Graph/Network.html

TensorRT Python Manual-Type (상위소스 INPUT_SHAPE ) 
  https://docs.nvidia.com/deeplearning/sdk/tensorrt-api/python_api/infer/FoundationalTypes/Dims.html

TensorRT Python Manual-Type (상위소스 weights)
  https://docs.nvidia.com/deeplearning/sdk/tensorrt-api/python_api/infer/FoundationalTypes/Weights.html?highlight=weights

TensorRT Python Manual-Layer  ( 상위소스 fc1/fc2 )
  https://docs.nvidia.com/deeplearning/sdk/tensorrt-api/python_api/infer/Graph/LayerBase.html
  https://docs.nvidia.com/deeplearning/sdk/tensorrt-api/python_api/infer/Graph/Layers.html?highlight=ifullyconnectedlayer#ifullyconnectedlayer


3.2  TensorRT pytorch MINIST 실행 

TensorRT pytorch Sample
  https://docs.nvidia.com/deeplearning/sdk/tensorrt-sample-support-guide/index.html#network_api_pytorch_mnist


$ cd /usr/src/tensorrt/samples/python/network_api_pytorch_mnist
$ cat requirements.txt  // pytorch가 x86만 지원 
numpy
https://download.pytorch.org/whl/cpu/torch-1.0.0-cp37-cp37m-linux_x86_64.whl  ; python_version=="3.7"
https://download.pytorch.org/whl/cpu/torch-1.0.0-cp36-cp36m-linux_x86_64.whl  ; python_version=="3.6"
https://download.pytorch.org/whl/cpu/torch-1.0.0-cp35-cp35m-linux_x86_64.whl  ; python_version=="3.5"
https://download.pytorch.org/whl/cpu/torch-1.0.0-cp27-cp27mu-linux_x86_64.whl ; python_version=="2.7"
torchvision==0.2.1
Pillow
pycuda

//아래사이트에서 download ,pip를 업그레이드해도 version이 맞지 않아 설치가 안됨 
$ sudo -H pip install torch-1.0.0a0+8601b33-cp27-cp27mu-linux_aarch64.whl

추후에 다시 설치를 진행하도록하며, 직접소스 비교로 진행하기로함

Pytorch ARM Version Install 방법
  https://devtalk.nvidia.com/default/topic/1041716/pytorch-install-problem/
  https://developer.ridgerun.com/wiki/index.php?title=Xavier/Deep_Learning/Deep_Learning_Tutorials/Jetson_Reinforcement

3.3  pytorch model/ TensorRT sample 소스 분석

Pytorch와 TensorRT 소스를 분석해보면 동작하는 방식은  어느정도는 이해가 쉽게간다.
다만 내가 DeepLearning 관련지식과 Pytorch 지식이 거의 전무하기 때문에 Python으로 손쉽게  이해하려고 한다.
역시 내가 생각하기에도 python 코드는 가독성이 좋아 이해하기 쉽고 사용하기도 편한것 같다.

소스의 구성은 MNIST Model(Pytorch)MINIST Sample(TensorRT)로 구성되어있으며, 각각의 두개의 소스를 비교분석해보고 동작원리를 알아보자

  • MNIST Model Source (Pytorch)
$ cat model.py
import torch
import torch.nn as nn
import torch.nn.functional as F
import torch.optim as optim
from torchvision import datasets, transforms
from torch.autograd import Variable

import numpy as np
import os

from random import randint


## pytorch로 Network 구성하며 아래의 pytorch 예제를 참고
https://pytorch.org/tutorials/beginner/former_torchies/nnft_tutorial.html

# Network
class Net(nn.Module):

## 각 Layer 이름과 Layer부분을 정의 
    def __init__(self):
        super(Net, self).__init__()
        self.conv1 = nn.Conv2d(1, 20, kernel_size=5)
        self.conv2 = nn.Conv2d(20, 50, kernel_size=5)
        self.conv2_drop = nn.Dropout2d()
        self.fc1 = nn.Linear(800, 500)
        self.fc2 = nn.Linear(500, 10)

## Pytorch를 이용하여 구현된 Network의 구조 
    def forward(self, x):
        x = F.max_pool2d(self.conv1(x), kernel_size=2, stride=2)
        x = F.max_pool2d(self.conv2(x), kernel_size=2, stride=2)
        x = x.view(-1, 800)
        x = F.relu(self.fc1(x))
        x = self.fc2(x)
        return F.log_softmax(x, dim=1)


class MnistModel(object):
    ## 초기값을 설정하고, Traing/Test를 위해 DATASET을 Load 한 후 상위 Network 구성 
    def __init__(self):
        self.batch_size = 64
        self.test_batch_size = 100
        self.learning_rate = 0.01
        self.sgd_momentum = 0.9
        self.log_interval = 100
        # Fetch MNIST data set.
        self.train_loader = torch.utils.data.DataLoader(
            datasets.MNIST('/tmp/mnist/data', train=True, download=True, transform=transforms.Compose([
                transforms.ToTensor(),
                transforms.Normalize((0.1307,), (0.3081,))
                ])),
            batch_size=self.batch_size,
            shuffle=True)
        self.test_loader = torch.utils.data.DataLoader(
            datasets.MNIST('/tmp/mnist/data', train=False, transform=transforms.Compose([
                transforms.ToTensor(),
                transforms.Normalize((0.1307,), (0.3081,))
                ])),
            batch_size=self.test_batch_size,
            shuffle=True)
        self.network = Net()

    ## 총 전체 5번을 상위에서 Load한 DATASET기반으로 Training을 진행과 TEST를 진행 
    # Train the network for several epochs, validating after each epoch.
    def learn(self, num_epochs=5):
        # Train the network for a single epoch
        def train(epoch):
            self.network.train()
            optimizer = optim.SGD(self.network.parameters(), lr=self.learning_rate, momentum=self.sgd_momentum)
            for batch, (data, target) in enumerate(self.train_loader):
                data, target = Variable(data), Variable(target)
                optimizer.zero_grad()
                output = self.network(data)
                loss = F.nll_loss(output, target)
                loss.backward()
                optimizer.step()
                if batch % self.log_interval == 0:
                    print('Train Epoch: {} [{}/{} ({:.0f}%)]\tLoss: {:.6f}'.format(epoch, batch * len(data), len(self.train_loader.dataset), 100. * batch / len(self.train_loader), loss.data.item()))

        # Test the network
        def test(epoch):
            self.network.eval()
            test_loss = 0
            correct = 0
            for data, target in self.test_loader:
                with torch.no_grad():
                    data, target = Variable(data), Variable(target)
                output = self.network(data)
                test_loss += F.nll_loss(output, target).data.item()
                pred = output.data.max(1)[1]
                correct += pred.eq(target.data).cpu().sum()
            test_loss /= len(self.test_loader)
            print('\nTest set: Average loss: {:.4f}, Accuracy: {}/{} ({:.0f}%)\n'.format(test_loss, correct, len(self.test_loader.dataset), 100. * correct / len(self.test_loader.dataset)))


        ## 이곳에서 5번을 실행 
        for e in range(num_epochs):
            train(e + 1)
            test(e + 1)

    ## pytorch에서 아래의 state_dict이 Training 값이라고 한다 
    ## https://pytorch.org/tutorials/beginner/saving_loading_models.html#what-is-a-state-dict
    def get_weights(self):
        return self.network.state_dict()

    ## Random으로 Test Case를 선정하는 것 같다 
    def get_random_testcase(self):
        data, target = next(iter(self.test_loader))
        case_num = randint(0, len(data) - 1)
        test_case = data.numpy()[case_num].ravel().astype(np.float32)
        test_name = target.numpy()[case_num]
        return test_case, test_name

  • Pytorch Model 분석 
class Net  과 class MnistModel 구성되며, 상위소스 class Net의 경우는 아래의소스 populate_network 함수와 반드시 비교분석을 해야
Pytorch 와 TensorRT의 API의 비교하여 차이를 알수 있다.

양쪽소스에서는 각각의 동일한 Network를 구성하고있고, TensorRT의 경우 Pytorch에서 얻은 Training에서 얻은값 기반으로 추론(Inference)하고 있다.

Pythorch에 대해 잘알지 못하고 Training한 경험이 없기때문에, 상위처럼 이해만 하고 넘어가기로하며, 세부 Training 동작방식은 Pytorch 혹은 Tensorflow를 공부하고 다시 봐야할 것 같다


  • MNIST Sample Source (TensorRT)
상위 model을 import하고 동작하고 있으며,이 소스에서도 이전의 Model Source와 마찬가지로 Network를 구성을하고 있지만, TensoRT Python API를 사용하고 있다.


$ cat sample.py 
import model
from PIL import Image
import numpy as np

import pycuda.driver as cuda
import pycuda.autoinit

import tensorrt as trt

import sys, os
sys.path.insert(1, os.path.join(sys.path[0], ".."))

## 상위 common.py 이 부분은 생략 
import common

# You can set the logger severity higher to suppress messages (or lower to display more messages).
TRT_LOGGER = trt.Logger(trt.Logger.WARNING)

class ModelData(object):
    INPUT_NAME = "data"
    INPUT_SHAPE = (1, 28, 28)
    OUTPUT_NAME = "prob"
    OUTPUT_SIZE = 10
    DTYPE = trt.float32

## TensorRT를 이용한 Network 구조 (상위 Pytorch Class Net의 forward 비교, 둘다 동일한 Network)

def populate_network(network, weights):
    # Configure the network layers based on the weights provided.
    input_tensor = network.add_input(name=ModelData.INPUT_NAME, dtype=ModelData.DTYPE, shape=ModelData.INPUT_SHAPE)

## pytorch network 와 tensorRT Network 비교, 아래주석이 pytorch network 이며, 이를 비교 

    ## self.conv1 = nn.Conv2d(1, 20, kernel_size=5)     
    ##  x = F.max_pool2d(self.conv1(x), kernel_size=2, stride=2)  
    conv1_w = weights['conv1.weight'].numpy()
    conv1_b = weights['conv1.bias'].numpy()
    conv1 = network.add_convolution(input=input_tensor, num_output_maps=20, kernel_shape=(5, 5), kernel=conv1_w, bias=conv1_b)
    conv1.stride = (1, 1)
    
    ## 상위 pool의 kernel_size 를 window_size 로 변경 
    pool1 = network.add_pooling(input=conv1.get_output(0), type=trt.PoolingType.MAX, window_size=(2, 2))
    pool1.stride = (2, 2)

    ##  self.conv2 = nn.Conv2d(20, 50, kernel_size=5)
    ## x = F.max_pool2d(self.conv2(x), kernel_size=2, stride=2)
    conv2_w = weights['conv2.weight'].numpy()
    conv2_b = weights['conv2.bias'].numpy()
    conv2 = network.add_convolution(pool1.get_output(0), 50, (5, 5), conv2_w, conv2_b)
    conv2.stride = (1, 1)

    pool2 = network.add_pooling(conv2.get_output(0), trt.PoolingType.MAX, (2, 2))
    pool2.stride = (2, 2)
   
    ## x = x.view(-1, 800)
    ## x = F.relu(self.fc1(x))
    fc1_w = weights['fc1.weight'].numpy()
    fc1_b = weights['fc1.bias'].numpy()
    fc1 = network.add_fully_connected(input=pool2.get_output(0), num_outputs=500, kernel=fc1_w, bias=fc1_b)

    relu1 = network.add_activation(input=fc1.get_output(0), type=trt.ActivationType.RELU)
   
    ## x = self.fc2(x)
    ## F.log_softmax(x, dim=1)
    fc2_w = weights['fc2.weight'].numpy()
    fc2_b = weights['fc2.bias'].numpy()
    fc2 = network.add_fully_connected(relu1.get_output(0), ModelData.OUTPUT_SIZE, fc2_w, fc2_b)

    fc2.get_output(0).name = ModelData.OUTPUT_NAME
    network.mark_output(tensor=fc2.get_output(0))

def build_engine(weights):
    # For more information on TRT basics, refer to the introductory samples.
    with trt.Builder(TRT_LOGGER) as builder, builder.create_network() as network:
        builder.max_workspace_size = common.GiB(1)
        # Populate the network using weights from the PyTorch model.
        populate_network(network, weights)
        # Build and return an engine.
        return builder.build_cuda_engine(network)

# Loads a random test case from pytorch's DataLoader
def load_random_test_case(model, pagelocked_buffer):
    # Select an image at random to be the test case.
    img, expected_output = model.get_random_testcase()
    # Copy to the pagelocked input buffer
    np.copyto(pagelocked_buffer, img)
    return expected_output

def main():
    data_path, _ = common.find_sample_data(description="Runs an MNIST network using a PyTorch model", subfolder="mnist")
    # Train the PyTorch model
    mnist_model = model.MnistModel()
    mnist_model.learn()
    weights = mnist_model.get_weights()
    # Do inference with TensorRT.
    with build_engine(weights) as engine:
        # Build an engine, allocate buffers and create a stream.
        # For more information on buffer allocation, refer to the introductory samples.
        inputs, outputs, bindings, stream = common.allocate_buffers(engine)
        with engine.create_execution_context() as context:
            case_num = load_random_test_case(mnist_model, pagelocked_buffer=inputs[0].host)
            # For more information on performing inference, refer to the introductory samples.
            # The common.do_inference function will return a list of outputs - we only have one in this case.
            [output] = common.do_inference(context, bindings=bindings, inputs=inputs, outputs=outputs, stream=stream)
            pred = np.argmax(output)
            print("Test Case: " + str(case_num))
            print("Prediction: " + str(pred))

if __name__ == '__main__':
    main()


  • MINIST Sample  간단분석 
  1. data_path 정의 /usr/src/tensorrt/data/mnist 로 설정 
  2. model.MnistModel() : minist model 생성 
  3. mnist_model.learn() : minist training 
  4. weights = mnist_model.get_weights()  :  pytorch로 부터 weights 값 얻음 
  5. build_engine(weights) :  weight 기반 TensorRT Engine Build
  6. populate_network(network, weights) : weight기반으로 TensorRT network 구성
  7. builder.build_cuda_engine(network) : TensorRT Engine Build 완료 
  8. common.allocate_buffers(engine) : Memory 할당 (commom.py 참조)
  9. with engine.create_execution_context() as context : TensorRT 엔진실행준비
  10. load_random_test_case :  함수호출하여 CPU buffer 할당 및 test_cast 선정 (model.py 참조)
  11. common.do_inference : CPU에 할당된 Buffer를 GPU에 추론적용하고 CPU다시 가져옴
  12. case_num :  임의로 선정된 값 ,   pred : 추론을 통해 예측값  

TensorRT의 이해는 NVIDIA 영문 Manual로 어느 정도 이해는 하겠지만, 근본적으로 Deep Learning 지식과 각각의 Network 구조를 이해하려면
어쩔수 없이 별도로 이 분야에 대해서 세부적으로 공부 해야할 것 같다.

5/31/2019

UFF_SSD 와 Tensorflow 와 개발방법 외 TensorRT 5.0 기능소개

1. TensorRT python3  sample

Jetson TX2의 Jetpack 4.2에서 제공해주는 python 2가 아닌 다른 python3 sample 이며,이를 테스트를 하고자 한다.
UFF는 Format인 것은 알겠는데, SSD가 뭔지를 몰라서 아래와 같이 찾아봤다.

  • SSD ( Single Shot MultiBox Detector)관련사항 
Yolo 처럼  Detection  Network 중에 하나이며, 이 Source Tensorflow 기반으로 사용 중
  https://ai.google/research/pubs/pub44872
  http://openresearch.ai/t/ssd-single-shot-multibox-detector/74

결론적으로 동작은 Tensorflow의 모델을 SSD  Model을 가져와서 UFF로 저장 후 TensorRT로 변환하고 이를 동작하는 개념이다.
이전 Yolo 테스트와 유사하며, 기능도 거의 유사하다.


1.1 UFF_SSD  Sample 

README를 보면, SSD는 Object Detection에서 많이 사용되는 모델이라고 하며, SSD는 크게 두가지로 나뉘어지며, 특징추출과 detection 부분이라고 한다.
  1. convolutional feature extractor like VGG, ResNet, Inception (현재 Inception_v2 사용)
  2. detection part

이외에도 NVIDIA에서는 SSD 관련 example을 제공해주고 있으며, 이를 전부 다 테스트를 진행을 못할 것 같아 아래만 테스트 진행

  • Python3 -UFF_SSD Example 
TensorRT의 example 중  python 부분의 UFF-SSD 확인

$ cd /usr/src/tensorrt/samples/python
$ ls
common.py   end_to_end_tensorflow_mnist  introductory_parser_samples  uff_custom_plugin  yolov3_onnx
common.pyc  fc_plugin_caffe_mnist        network_api_pytorch_mnist    uff_ssd

$ cd uff_ssd 

$ ls
CMakeLists.txt  detect_objects.py  images  plugin  README.md  requirements.txt  utils  voc_evaluation.py

$ cat requirements.txt 
numpy
Pillow
pycuda
requests
tensorflow-gpu

//  README에서 요구하는 Package 설치진행 

$ sudo pip install -r requirements.txt    //tensorflow-gpu version 정의 문제로 찾지못함  
$ python3 -m pip install -r requirements.txt   // tensorflow-gpu version 정의 문제로 찾지못함 
Collecting numpy (from -r requirements.txt (line 1))
Collecting Pillow (from -r requirements.txt (line 2))
Collecting pycuda (from -r requirements.txt (line 3))
  Using cached https://files.pythonhosted.org/packages/4d/29/5a3eb66c2f1a4adc681f6c8131e9ed677af31b0c8a78726d540bd44b3403/pycuda-2019.1.tar.gz
Collecting requests (from -r requirements.txt (line 4))
  Using cached https://files.pythonhosted.org/packages/51/bd/23c926cd341ea6b7dd0b2a00aba99ae0f828be89d72b2190f27c11d4b7fb/requests-2.22.0-py2.py3-none-any.whl
Collecting tensorflow-gpu (from -r requirements.txt (line 5))
  Could not find a version that satisfies the requirement tensorflow-gpu (from -r requirements.txt (line 5)) (from versions: )
No matching distribution found for tensorflow-gpu (from -r requirements.txt (line 5))

// requirement의 tensorflow의 version 명시를 진행하지 않아 설치진행을 못하는 것 같음 
// pip를 진행을 해보면, Collecting 다음에 Building 으로 진행이 되어야 설치진행, 그래서 상위 Package 전부 미설치됨, 별도 설치진행 

$ pip or pip3 search //명령으로 찾으면 tensorflow-gpu (1.13.1) 발견, 혹시 몰라 NVIDIA Site 재확인 (공식버전이 있음) 

$ python3 -m pip install Pillow numpy pycuda requests  // requirment의 Module들을 별도 설치 진행 

python3는 현재 상위 requirment가 하나도 설치가 진행되지 않았으며, 관련부분은 별도설치진행

  • python3 Tensorflow-GPU 별도설치 
상위에서 tensorflow-gpu가 설치되지 않아 원인보면, version 미 정의로 설치가 되지 않는 것 같다.
그래서  NVIDIA의 공식 사이트에서 확인하고 관련사항 확인

$ python3 --version  // python3 version 확인 
Python 3.6.7
//  NVIDIA tensorflow-gpu official version install
$ sudo apt-get install libhdf5-serial-dev hdf5-tools // tensorlfow 에서 필요 
$ pip3 install --extra-index-url https://developer.download.nvidia.com/compute/redist/jp/v42 tensorflow-gpu==1.13.1+nv19.5 --user    //  official release of TensorFlow for Jetson TX2


How To Install Tensorflow-GPU
  https://devtalk.nvidia.com/default/topic/1038957/jetson-tx2/tensorflow-for-jetson-tx2-/
  https://developer.nvidia.com/embedded/downloads#?search=tensorflow
  https://docs.nvidia.com/deeplearning/frameworks/install-tf-jetsontx2/index.html

NVIDIA DeepLearning Frameworks
  https://developer.nvidia.com/deep-learning-frameworks

Jetson Package Download
  https://developer.nvidia.com/embedded/downloads

Jetson How to install Tensorflow Document
  https://docs.nvidia.com/deeplearning/dgx/install-tf-jetsontx2/index.html

  • Python3 -UFF_SSD Build 
README에서 확인가능하며,  그대로 설정

$ pwd
/usr/src/tensorrt/samples/python/uff_ssd

$ sudo  mkdir -p build
$ cd build
$ sudo cmake ..
$ sudo make
$ ls
CMakeCache.txt  CMakeFiles  cmake_install.cmake  libflattenconcat.so  Makefile
$ cd ..
$ pwd
/usr/src/tensorrt/samples/python/uff_ssd


  • UFF_SSD 위해 이미지 복사 및 테스트 
README.md을 읽어보면 다음과 같이 동작한다.
  1. download pretrained ssd_inception_v2_coco_2017_11_17 (tensorflow object detetion API)
  2. 이 모델을 TensorRT로 변환되고 Model version 이름이 추가됨 
  3. TensorRT inference engine 빌드 후 File로 저장 한다.
  4. TensorRT의 Optimization에서  frozen graph가 추가되며, 이는 Time consumimg 측정

세부내용은 README.md 를 확인하자.

$ sudo cp ../yolov3_onnx/dog.jpg .
$ sudo cp ../yolov3_onnx/cat.jpg .

$ vi detect_objects.py //TensorRT로 동작 (UFF->TensorRT Format) 
import os
import ctypes
import time
import sys
import argparse

import numpy as np
from PIL import Image
import tensorrt as trt

import utils.inference as inference_utils # TRT/TF inference wrappers
import utils.model as model_utils # UFF conversion
import utils.boxes as boxes_utils # Drawing bounding boxes
import utils.coco as coco_utils # COCO dataset descriptors
from utils.paths import PATHS # Path management
...............

$ sudo python3 detect_objects.py dog.jpg  // download ssd_inception_v2_coco_2017_11_17.tar.gz
Preparing pretrained model
Downloading /usr/src/tensorrt/samples/python/uff_ssd/utils/../workspace/models/ssd_inception_v2_coco_2017_11_17.tar.gz
Download progress [==================================================] 100%
Download complete
Unpacking /usr/src/tensorrt/samples/python/uff_ssd/utils/../workspace/models/ssd_inception_v2_coco_2017_11_17.tar.gz
Extracting complete
Removing /usr/src/tensorrt/samples/python/uff_ssd/utils/../workspace/models/ssd_inception_v2_coco_2017_11_17.tar.gz
Model ready
WARNING:tensorflow:From /usr/lib/python3.6/dist-packages/graphsurgeon/StaticGraph.py:123: FastGFile.__init__ (from tensorflow.python.platform.gfile) is deprecated and will be removed in a future version.
Instructions for updating:
Use tf.gfile.GFile.
WARNING: To create TensorRT plugin nodes, please use the `create_plugin_node` function instead.
UFF Version 0.5.5
=== Automatically deduced input nodes ===
[name: "Input"
op: "Placeholder"
attr {
  key: "dtype"
  value {
    type: DT_FLOAT
  }
}
attr {
  key: "shape"
  value {
    shape {
      dim {
        size: 1
      }
      dim {
        size: 3
      }
      dim {
        size: 300
      }
      dim {
        size: 300
      }
    }
  }
}
]
=========================================

Using output node NMS
Converting to UFF graph
Warning: No conversion function registered for layer: NMS_TRT yet.
Converting NMS as custom op: NMS_TRT
Warning: No conversion function registered for layer: FlattenConcat_TRT yet.
Converting concat_box_conf as custom op: FlattenConcat_TRT
Warning: No conversion function registered for layer: GridAnchor_TRT yet.
Converting GridAnchor as custom op: GridAnchor_TRT
Warning: No conversion function registered for layer: FlattenConcat_TRT yet.
Converting concat_box_loc as custom op: FlattenConcat_TRT
No. nodes: 563
UFF Output written to /usr/src/tensorrt/samples/python/uff_ssd/utils/../workspace/models/ssd_inception_v2_coco_2017_11_17/frozen_inference_graph.uff
UFF Text Output written to /usr/src/tensorrt/samples/python/uff_ssd/utils/../workspace/models/ssd_inception_v2_coco_2017_11_17/frozen_inference_graph.pbtxt
TensorRT inference engine settings:
  * Inference precision - DataType.FLOAT
  * Max batch size - 1

Building TensorRT engine. This may take few minutes.
TensorRT inference time: 97 ms
Detected bicycle with confidence 98%  // bicycle 발견했지만 에러발생 (libfreetype 문제) 
Traceback (most recent call last):
  File "detect_objects.py", line 193, in module
    main()
  File "detect_objects.py", line 180, in main
    analyze_prediction(detection_out, det * prediction_fields, img_pil)
  File "detect_objects.py", line 87, in analyze_prediction
    color=coco_utils.COCO_COLORS[label]
  File "/usr/src/tensorrt/samples/python/uff_ssd/utils/boxes.py", line 33, in draw_bounding_boxes_on_image
    boxes[i, 3], color, thickness, display_str_list[i])
  File "/usr/src/tensorrt/samples/python/uff_ssd/utils/boxes.py", line 77, in draw_bounding_box_on_image
    font = ImageFont.truetype('arial.ttf', 24)
  File "/home/jetsontx2/.local/lib/python3.6/site-packages/PIL/ImageFont.py", line 280, in truetype
    return FreeTypeFont(font, size, index, encoding, layout_engine)
  File "/home/jetsontx2/.local/lib/python3.6/site-packages/PIL/ImageFont.py", line 136, in __init__
    if core.HAVE_RAQM:
  File "/home/jetsontx2/.local/lib/python3.6/site-packages/PIL/ImageFont.py", line 40, in __getattr__
    raise ImportError("The _imagingft C module is not installed")
ImportError: The _imagingft C module is not installed

$ sudo apt-get install libfreetype6-dev    // libfreetype 문제발생, 설치 진행 
$ pip3 uninstall Pillow;pip3 install --no-cache-dir Pillow  // pillow package 재설치    

$ sudo python3 detect_objects.py dog.jpg   // 재설치 이후 다시 테스트 진행 
TensorRT inference engine settings:
  * Inference precision - DataType.FLOAT  //32bit FLOAT, 16bit HALF
  * Max batch size - 1

Loading cached TensorRT engine from /usr/src/tensorrt/samples/python/uff_ssd/utils/../workspace/engines/FLOAT/engine_bs_1.buf
TensorRT inference time: 347 ms
Detected bicycle with confidence 98%
Detected dog with confidence 95%
Detected car with confidence 79%
Total time taken for one image: 456 ms
Saved output image to: /usr/src/tensorrt/samples/python/uff_ssd/utils/../image_inferred.jpg

$ eog image_inferred.jpg   // 아래그림 참조

$ sudo python3 detect_objects.py cat.jpg   // 재설치 이후 다시 테스트 진행
TensorRT inference engine settings:
  * Inference precision - DataType.FLOAT
  * Max batch size - 1

Loading cached TensorRT engine from /usr/src/tensorrt/samples/python/uff_ssd/utils/../workspace/engines/FLOAT/engine_bs_1.buf
TensorRT inference time: 120 ms
Detected cat with confidence 98%
Total time taken for one image: 186 ms

Saved output image to: /usr/src/tensorrt/samples/python/uff_ssd/utils/../image_inferred.jpg

$ eog image_inferred.jpg  // 아래그림 참조 

SSH로 테스트와 직접 HDMI 연결하여 테스트를 진행해보면, SSH가 좀 느린 것 같다.
처음에는 300x300만 되는줄 알았는데, 테스트해보니, 얼추 다 동작되는 것 같다.


1.2 VOC TEST 부분 

README의 옵션으로 시도 했으며, SSD 모델을 VOC라는 Image들을 이용하여 Training 하여 성능을 향상시키는 것 같다. (세부내용은 README에도 없음)

VOC 내부에는 다양한 Image들이 존재하며 왜 이렇게 존재하는지는 나중에 별도로 알아야 할 것 같다.

$ sudo wget http://host.robots.ox.ac.uk/pascal/VOC/voc2007/VOCtest_06-Nov-2007.tar   //download 가 잘안됨,
$ sudo wget http://pjreddie.com/media/files/VOCtest_06-Nov-2007.tar    //다른 mirror 사이트를 찾음,  https://pjreddie.com/projects/pascal-voc-dataset-mirror/

$ sudo tar xvf VOCtest_06-Nov-2007.tar

$ sudo python3 voc_evaluation.py --voc_dir /usr/src/tensorrt/samples/python/uff_ssd/VOCdevkit/VOC2007  // Model은 상위와 동일 
Preprocessing VOC dataset. It may take few minutes.
TensorRT inference engine settings:
  * Inference precision - DataType.FLOAT
  * Max batch size - 64

Building TensorRT engine. This may take few minutes.
Infering image 1/4952
Infering image 65/4952
Infering image 129/4952
Infering image 193/4952
Infering image 257/4952
Infering image 321/4952
Infering image 385/4952
Infering image 449/4952
Infering image 513/4952
Infering image 577/4952
Infering image 641/4952
Infering image 705/4952
Infering image 769/4952
Infering image 833/4952
Infering image 897/4952
Infering image 961/4952
Infering image 1025/4952
Infering image 1089/4952
Infering image 1153/4952
Infering image 1217/4952
Infering image 1281/4952
Infering image 1345/4952
Infering image 1409/4952
Infering image 1473/4952
Infering image 1537/4952
Infering image 1601/4952
Infering image 1665/4952
Infering image 1729/4952
Infering image 1793/4952
Infering image 1857/4952
Infering image 1921/4952
Infering image 1985/4952
Infering image 2049/4952
Infering image 2113/4952
Infering image 2177/4952
Infering image 2241/4952
Infering image 2305/4952
Infering image 2369/4952
Infering image 2433/4952
Infering image 2497/4952
Infering image 2561/4952
Infering image 2625/4952
Infering image 2689/4952
Infering image 2753/4952
Infering image 2817/4952
Infering image 2881/4952
Infering image 2945/4952
Infering image 3009/4952
Infering image 3073/4952
Infering image 3137/4952
Infering image 3201/4952
Infering image 3265/4952
Infering image 3329/4952
Infering image 3393/4952
Infering image 3457/4952
Infering image 3521/4952
Infering image 3585/4952
Infering image 3649/4952
Infering image 3713/4952
Infering image 3777/4952
Infering image 3841/4952
Infering image 3905/4952
Infering image 3969/4952
Infering image 4033/4952
Infering image 4097/4952
Infering image 4161/4952
Infering image 4225/4952
Infering image 4289/4952
Infering image 4353/4952
Infering image 4417/4952
Infering image 4481/4952
Infering image 4545/4952
Infering image 4609/4952
Infering image 4673/4952
Infering image 4737/4952
Infering image 4801/4952
Infering image 4865/4952
Infering image 4929/4952
Reading annotation for 1/4952
Reading annotation for 101/4952
Reading annotation for 201/4952
Reading annotation for 301/4952
Reading annotation for 401/4952
Reading annotation for 501/4952
Reading annotation for 601/4952
Reading annotation for 701/4952
Reading annotation for 801/4952
Reading annotation for 901/4952
Reading annotation for 1001/4952
Reading annotation for 1101/4952
Reading annotation for 1201/4952
Reading annotation for 1301/4952
Reading annotation for 1401/4952
Reading annotation for 1501/4952
Reading annotation for 1601/4952
Reading annotation for 1701/4952
Reading annotation for 1801/4952
Reading annotation for 1901/4952
Reading annotation for 2001/4952
Reading annotation for 2101/4952
Reading annotation for 2201/4952
Reading annotation for 2301/4952
Reading annotation for 2401/4952
Reading annotation for 2501/4952
Reading annotation for 2601/4952
Reading annotation for 2701/4952
Reading annotation for 2801/4952
Reading annotation for 2901/4952
Reading annotation for 3001/4952
Reading annotation for 3101/4952
Reading annotation for 3201/4952
Reading annotation for 3301/4952
Reading annotation for 3401/4952
Reading annotation for 3501/4952
Reading annotation for 3601/4952
Reading annotation for 3701/4952
Reading annotation for 3801/4952
Reading annotation for 3901/4952
Reading annotation for 4001/4952
Reading annotation for 4101/4952
Reading annotation for 4201/4952
Reading annotation for 4301/4952
Reading annotation for 4401/4952
Reading annotation for 4501/4952
Reading annotation for 4601/4952
Reading annotation for 4701/4952
Reading annotation for 4801/4952
Reading annotation for 4901/4952
Saving cached annotations to /usr/src/tensorrt/samples/python/uff_ssd/utils/../workspace/annotations_cache/annots.pkl
AP for aeroplane = 0.7817
AP for bicycle = 0.7939
AP for bird = 0.6812
AP for boat = 0.5579
AP for bottle = 0.4791
AP for bus = 0.8383
AP for car = 0.7645
AP for cat = 0.8259
AP for chair = 0.5948
AP for cow = 0.7847
AP for diningtable = 0.6731
AP for dog = 0.7886
AP for horse = 0.8402
AP for motorbike = 0.8103
AP for person = 0.7848
AP for pottedplant = 0.4290
AP for sheep = 0.7474
AP for sofa = 0.7683
AP for train = 0.8429
AP for tvmonitor = 0.7145
Mean AP = 0.7251

상위 테스트들은 전부 Jetson TX2의 Normal 상태에서 테스트를 진행을 했으며, 성능을 더 올리고 싶다면, Clock 부분을 수정하여 재 테스트를 진행하자.

2. TensorBoard 테스트 

아직 TensorBoard의 정확한 용도와 사용법을 숙지하지 못하여 실행부분만 실행해본다.

$ cd ~ 
$ mkdir jhlee
$/home/jetsontx2/.local/bin/tensorboard --logdir ~/jhlee   // tensorboard는 상위 tensorflow로 이미 설치됨 

browser를 이용하여 JetsonTX2의 ip를 접속 http://10.0.0.174:6006/


TensorBoard (*.PBTX)
  https://www.tensorflow.org/guide/graph_viz
  https://gusrb.tistory.com/21

3. TensorFlow와 TensorRT 개발방법 

아래의 문서를 보면, TensorRT Inference optimization tool with TensorFlow 발표했으며,  TensorFlow 1.7 에서 이용가능한 것 같다.

아래의 문서를 기반으로 예제를 Download 받아 테스트를 진행을 해보며 추후 시간이 된다면 더 자세히 문서를 읽고 관련내용들을 숙지한 후 테스트를 진행해본다.

Tensorflow와 TensorRT  개발 
  https://devblogs.nvidia.com/tensorrt-integration-speeds-tensorflow-inference/

Example 


  • Tensorflow의 개발 과 Tensorflow와 TensorRT개발 비교 

Trained Graph 만들고, 이를 Frozen Graph 변경하고 실행을 한다.
처음 Freeze 라는 용어를 몰랐는데, 일종의 실행 Format으로 변경한다고 생각하면 되겠다.
TensorRT에서는 Serialize라는 용어가 나오는데 이역시 실행될 수 or 저장되어지는Format이라고 생각하면되겠지만, TensorRT의 동작이 정확히 이해는 안되지만, 정리하자.

하지만, Freeze과 Serialize의 차이는 존재하는 것 같으며, 각각 사용되어지는 Framework에서 저장되는 방식이 다른 것 같다.
Framework에서는 호환

아래를 보면, Optimized Plan들이 TensorRT 유저입장에서는 엔진으로 보이며,
Optimized Plan들은  TensorRT Runtime Engine에 의해 De-Serialized되며, 적용이 된다.


3.1 TensorRT Deployment Flow 


  • 상위 STEP 1의 Optimize trained model


Layer & Tensor Fusion
복잡한 Layer의 갯수를 최소한으로 줄이는 것이며, 이를 통하여, 많은 Layer가 줄어든다.
성능향상이 된다.


Weights & Activation Precision Calibration
FP32, FP16, INT8 로 변경하면 아래와 같이 Range가 변경이 되며, 최적화를 진행하지만, 이는 TensorRT의 Manual 반드시 참조 (각 Layer와 지원여부 확인)


Kernel Auto Tuning 과 Dynamic Tensor Memory
Kernel 과 Memory관리를 해주는 기능인 것 같은데, 이부분은 정확한 이해를 다른 부분을 이해하고 하자.


  • UFF Format TensorRT (python)


아래를 보면 이해를 할수 있다. Plan 파일이  Engine파일이며, 이는 TensorRT에 동작된다
.


  • DEEP LEARNING DEPLOYMENT WITH TENSORRT 
상위설명이 자세히 나오며, 이부분은 이해가 될때까지 여러번 시청을 하자.
  http://on-demand.gputechconf.com/gtcdc/2017/video/DC7172/
  https://youtu.be/6My-daDk4zE?list=PLoS6u5SJMkUk1kk2_WWHfTrANJuYvZNIP


3.2 TensorRT의 장점의 정리 


  • TensorRT는 아래와 같이 다양한 Framework를 지원가능


  1. Caffe                                 ->  Caffe Parser
  2. CNTK, mxnet, pytorch, caffe2  -> onnx parser
  3. Tensorflow                          -> UFF parser  or TF-TRT 사용 


아래의 정리는 TensorRT 4.0이므로 착각하지말고 , TensorRT 5.0은  기능이 더 개선되었음


3.3 Tensorflow 설치 와 tftrt_sample 실행 


  • python2-Tensorflow-gpu 설치 
python2에서 tensorflow를 설치 진행했더니, CUDA Version 9.0 버전문제발생
python3 version 도 제대로 동작이 안됨 (주의, python3 tensorflow-gpu 재설치 진행 )

  $ pip install --extra-index-url=https://developer.download.nvidia.com/compute/redist/jp/v33/ tensorflow-gpu  
// 문제발생 CUDA 9.0 으로 동작하므로 현재 CUDA 10.0하고 PATH가 맞지 않음 
//libcublas.so.9.0: cannot open shared object file: No such file or directory

python2 /3 version 설치방법 있지만, 시도해보지 않음
  https://stackoverflow.com/questions/49811510/how-to-install-tensorflow-gpu-for-both-python2-and-python3?rq=1


  • Example TEST ( python2->python3 변경) 

$ tar -xvf tftrt_sample.tar.xz 
$ cd tftrt/

$ cat README 
TRT Tensorflow integration example

Install tensorRT and Tensorflow with TRT contrib. Instructions are available from:
https://github.com/tensorflow/tensorflow/tree/master/tensorflow/contrib/tensorrt

Run the sample with:
./run_all.sh
It will run through native, FP32, FP16 and INT8 examples


$ cat ./run_all.sh 
#!/bin/bash

python tftrt_sample.py --native --FP32 --FP16 --INT8 \
                       --num_loops 10 \
                       --topN 5 \
                       --batch_size 4 \
                       --workspace_size 2048 \
                       --log_file log.txt \
                       --network resnet_v1_50_frozen.pb \
                       --input_node input \
                       --output_nodes resnet_v1_50/predictions/Reshape_1 \
                       --img_size 224 \
                       --img_file  grace_hopper.jpg
 
$ ./run_all3.sh  // python3로 변경 후 실행 

Namespace(FP16=True, FP32=True, INT8=True, batch_size=4, dump_diff=False, native=True, num_loops=10, topN=5, update_graphdef=False, with_timeline=False, workspace_size=2048)
Starting at 2019-06-05 10:36:28.410090
2019-06-05 10:36:28.522480: W tensorflow/core/platform/profile_utils/cpu_utils.cc:98] Failed to find bogomips in /proc/cpuinfo; cannot determine CPU frequency
2019-06-05 10:36:28.524851: I tensorflow/compiler/xla/service/service.cc:161] XLA service 0x27b6b450 executing computations on platform Host. Devices:
2019-06-05 10:36:28.525015: I tensorflow/compiler/xla/service/service.cc:168]   StreamExecutor device (0): , 
2019-06-05 10:36:28.657662: I tensorflow/stream_executor/cuda/cuda_gpu_executor.cc:965] ARM64 does not support NUMA - returning NUMA node zero
2019-06-05 10:36:28.658228: I tensorflow/compiler/xla/service/service.cc:161] XLA service 0x27a69610 executing computations on platform CUDA. Devices:
2019-06-05 10:36:28.658354: I tensorflow/compiler/xla/service/service.cc:168]   StreamExecutor device (0): NVIDIA Tegra X2, Compute Capability 6.2
2019-06-05 10:36:28.658837: I tensorflow/core/common_runtime/gpu/gpu_device.cc:1433] Found device 0 with properties: 
name: NVIDIA Tegra X2 major: 6 minor: 2 memoryClockRate(GHz): 1.02
pciBusID: 0000:00:00.0
totalMemory: 7.67GiB freeMemory: 784.20MiB
2019-06-05 10:36:28.658921: I tensorflow/core/common_runtime/gpu/gpu_device.cc:1512] Adding visible gpu devices: 0
2019-06-05 10:36:32.198382: I tensorflow/core/common_runtime/gpu/gpu_device.cc:984] Device interconnect StreamExecutor with strength 1 edge matrix:
2019-06-05 10:36:32.198520: I tensorflow/core/common_runtime/gpu/gpu_device.cc:990]      0 
2019-06-05 10:36:32.198596: I tensorflow/core/common_runtime/gpu/gpu_device.cc:1003] 0:   N 
2019-06-05 10:36:32.198931: I tensorflow/core/common_runtime/gpu/gpu_device.cc:1115] Created TensorFlow device (/job:localhost/replica:0/task:0/device:GPU:0 with 3926 MB memory) -> physical GPU (device: 0, name: NVIDIA Tegra X2, pci bus id: 0000:00:00.0, compute capability: 6.2)
WARNING:tensorflow:From tftrt_sample.py:92: FastGFile.__init__ (from tensorflow.python.platform.gfile) is deprecated and will be removed in a future version.
Instructions for updating:
Use tf.gfile.GFile.
INFO:tensorflow:Starting execution
./run_all3.sh: line 13: 31992 Segmentation fault      (core dumped) python3 tftrt_sample.py --native --FP32 --FP16 --INT8 --num_loops 10 --topN 5 --batch_size 4 --workspace_size 2048 --log_file log.txt --network resnet_v1_50_frozen.pb --input_node input --output_nodes resnet_v1_50/predictions/Reshape_1 --img_size 224 --img_file grace_hopper.jpg
일단 상위예제로 Graph가 동작될 줄 알았으나, 문제가 있어 동작되지 않으며, Tensorboard와 연결해서 볼수 있을 줄 알았는데,  디버깅을 해야 할 것 같음

추후 Tensorboard의 graph 부분의 활용법을 알아봐야겠음


4. NVIDIA의 UFF Format  관련사항 

TensorRT에서는 현재 3가지 Parser를 제공하여 다른 기반 Platform 의 모델을 가져올수 있다
현재 상위 Tensorflow는 UFF를 사용하므로, 정확한 역할과 관련기능을 정확하게 이해를 해야겠다.

TensorRT의 배포구조 
  https://devblogs.nvidia.com/deploying-deep-learning-nvidia-tensorrt/

UFF Parser
  https://docs.nvidia.com/deeplearning/sdk/tensorrt-api/python_api/parsers/Uff/pyUff.html

UFF Converter
  https://docs.nvidia.com/deeplearning/sdk/tensorrt-api/index.html
  https://docs.nvidia.com/deeplearning/sdk/tensorrt-api/python_api/uff/uff.html

UFF Operator
  https://docs.nvidia.com/deeplearning/sdk/tensorrt-api/python_api/uff/Operators.html