TensorRT와 DeepStream 관련 소스
https://github.com/NVIDIA-AI-IOT/deepstream_4.x_apps
https://github.com/NVIDIA-AI-IOT/torch2trt
https://github.com/NVIDIA-AI-IOT/redaction_with_deepstream
TensorRT 관련 동작구조도
https://programmer.help/blogs/tensorrt-learns-to-use-c.html
TensorRT 관련내용 ( Serialiaze)
https://devtalk.nvidia.com/default/topic/1058409/jetson-tx2/how-to-load-and-deserialize-the-engine-file-/
OpenVINO,Opencv
라즈베리파이에서 관련자료수집
https://www.pyimagesearch.com/2019/04/08/openvino-opencv-and-movidius-ncs-on-the-raspberry-pi/
9/24/2019
7/10/2019
Deepstream의 Gst-nvinfer의 구조 와 TensorRT의 IPlugIn 기능
1. Deepstream의 GST-NVINFER 기본구조
GST-NVINFER의 역할은 TensorRT를 이용하여, Gstreamer에서 Inferece를 하는 역할이다.
주기능은 Object Detection 과 Classfication이 될 것이다.
TensorRT의 경우는 자세한 설명은, 별도의 NVIDIA TensorRT를 찾아보거나, 현재 정리된 Manual을 참조하자.
GST_NVINFER는 단지 TensorRT의 기능의 역할만 하는 것이 아니라, IPlugIn이라는 확장 Interface를 제공하고 있다.
이는 공유라이브러리와 연결하여, 이기능을 확장하여 사용이 가능하다고 한다. 주로, cumtom layer에 사용이 된다.
기본동작은 Gstremer의 Pipeline구조에 따라 아래와 같이 동작하며, 이 때 전달되는 매개체들을 알아두자.

일반 Gstreamer 처럼 Input Buffer가 들어오고, Output Buffer가 나가는 형식이며,
nvll_infer는 Low Leve Library(libnvill_infer)에서 float RGB or BGR planar data를 Network의 dimention에따라 처리한다고 한다.
Gst-nvInfer의 구조를 보면, 다른 Gst-PlugIn의 구조도 거의 비슷하기에 관련부분을 이해하기가 쉬워지며, 중요한 것은 TensorRT를 어떻게 넣고, 이를 적용하는 것 같다.
1.1 Gst-nvinfer 의 Properties
Gst Properties는 Gstreamer Command로 실행 했을 경우, 직접 넣을 수 있는 Argument라고 생각하면될 것 같다.
Source로 보면 g_object_set 함수를 이용하여 설정이 가능하며, 각각의 기능을 정확히 알아두자
아래의 config-file-path는 File을 이용하여 세부적으로 설정가능한데, 1.2에서 설명

1.2 Gst-nvinfer File Configuration Specifications
Gst-nvifer의 config file은 Key File Format으로 구성된다고 하는데, 아래의 사이트를 보거나, Config File을 보면 쉽게 이해간다.
[groupname]
Key=Value
https://specifications.freedesktop.org/desktop-entry-spec/latest/
예제의 config_infer_primary.txt File Format이 Key File Format이라고 생각하면된다.
Gst-nvinfer 의 Config 파일 크게 아래와 같이 구성되며 세부 설정은 Manual을 참조
Gst-nvinfer PlugIn만 이기능을 지원하며, 이 관련소스는 현재 Library로만 제공되어있기때문에 자세한 구조 및 Parsing 소스를 알수 없으며,
Manual 과 Sample 예제 Config를 참조하여 각 값을 보고 설정하고 테스트를 진행해야한다.
주기능은 Object Detection 과 Classfication이 될 것이다.
TensorRT의 경우는 자세한 설명은, 별도의 NVIDIA TensorRT를 찾아보거나, 현재 정리된 Manual을 참조하자.
GST_NVINFER는 단지 TensorRT의 기능의 역할만 하는 것이 아니라, IPlugIn이라는 확장 Interface를 제공하고 있다.
이는 공유라이브러리와 연결하여, 이기능을 확장하여 사용이 가능하다고 한다. 주로, cumtom layer에 사용이 된다.
기본동작은 Gstremer의 Pipeline구조에 따라 아래와 같이 동작하며, 이 때 전달되는 매개체들을 알아두자.

일반 Gstreamer 처럼 Input Buffer가 들어오고, Output Buffer가 나가는 형식이며,
nvll_infer는 Low Leve Library(libnvill_infer)에서 float RGB or BGR planar data를 Network의 dimention에따라 처리한다고 한다.
- Input
- Gst_Buffer
- Meta Data (NvStreamMeta)
- Caffe Model and Caffe Prototxt
- ONNX
- UFF file
상위 3,4,5 번 TensorRT의 지원되는 Platform부분을 보고, Parser를 보면 쉽게 이해가 간다.
- Output
- Gst_Buffer:
- Meta Data (NvStreamMeta)
- Infer Meta Data (NvDsMeta: NVInfer에 의해 생성된 classes 정보 및 bounding box정보
- Control Paramets
- Batch size
- Inference interval
- Clustering parameters
- Class threshold
- Bonding Box color
- Width and height of bounding box to filter boxes for downstream component
Gst-nvInfer의 구조를 보면, 다른 Gst-PlugIn의 구조도 거의 비슷하기에 관련부분을 이해하기가 쉬워지며, 중요한 것은 TensorRT를 어떻게 넣고, 이를 적용하는 것 같다.
1.1 Gst-nvinfer 의 Properties
Gst Properties는 Gstreamer Command로 실행 했을 경우, 직접 넣을 수 있는 Argument라고 생각하면될 것 같다.
Source로 보면 g_object_set 함수를 이용하여 설정이 가능하며, 각각의 기능을 정확히 알아두자
아래의 config-file-path는 File을 이용하여 세부적으로 설정가능한데, 1.2에서 설명

1.2 Gst-nvinfer File Configuration Specifications
Gst-nvifer의 config file은 Key File Format으로 구성된다고 하는데, 아래의 사이트를 보거나, Config File을 보면 쉽게 이해간다.
[groupname]
Key=Value
https://specifications.freedesktop.org/desktop-entry-spec/latest/
예제의 config_infer_primary.txt File Format이 Key File Format이라고 생각하면된다.
Gst-nvinfer 의 Config 파일 크게 아래와 같이 구성되며 세부 설정은 Manual을 참조
- [property] : 필수 설정이므로, 반드시 알아야 하며, 관련내용 Manual 참조
- [class-attrs-all] : 모든 class 를 위한 detection 설정
- [class-attrs-
] : 특정 class-id만을 별도 설정가능
Gst-nvinfer PlugIn만 이기능을 지원하며, 이 관련소스는 현재 Library로만 제공되어있기때문에 자세한 구조 및 Parsing 소스를 알수 없으며,
Manual 과 Sample 예제 Config를 참조하여 각 값을 보고 설정하고 테스트를 진행해야한다.
- Gst-nvinfer(1st GIE, TensorRT)의 설정
$ cd ~/deepstream_sdk_on_jetson/samples/configs/deepstream-app
$ cat config_infer_primary.txt
....
[property]
net-scale-factor=0.0039215697906911373
## caffe model
model-file=../../models/Primary_Detector/resnet10.caffemodel
## model의 Layer 구조 및 이름파악
proto-file=../../models/Primary_Detector/resnet10.prototxt
model-engine-file=../../models/Primary_Detector/resnet10.caffemodel_b30_int8.engine
labelfile-path=../../models/Primary_Detector/labels.txt
int8-calib-file=../../models/Primary_Detector/cal_trt4.bin
batch-size=30
## 0=FP32, 1=INT8, 2=FP16 mode
network-mode=1
## 상위 labels의 class 종류가 4개
num-detected-classes=4
interval=0
gie-unique-id=1
## 0: Custom 4 : Resnet
parse-func=4

## 상위 proto-file의 output layer name , 즉 결과물을 보여주는 Layer 표시
output-blob-names=conv2d_bbox;conv2d_cov/Sigmoid

#parse-bbox-func-name=NvDsInferParseCustomResnet
#custom-lib-path=/home/nvidia/deepstream_sdk_on_jetson/sources/libs/nvdsparsebbox/libnvdsparsebbox.so

## DBSCAN or  OpenCV groupRectangles for grouping detected object  (군집화)
#enable-dbscan=1

[class-attrs-all]
threshold=0.2
group-threshold=1
## Set eps=0.7 and minBoxes for enable-dbscan=1
eps=0.2
#minBoxes=3
roi-top-offset=0
roi-bottom-offset=0
detected-min-w=0
detected-min-h=0
detected-max-w=0
detected-max-h=0

## Per class configuration
#[class-attrs-2]
#threshold=0.6
#eps=0.5
#group-threshold=3
#roi-top-offset=20
#roi-bottom-offset=10
#detected-min-w=40
#detected-min-h=40
#detected-max-w=400
#detected-max-h=800
- [propertyp] 숙지정보
- model-file: Caffe의 기본 Model 사용
- proto-file: Caffe에서 제공하는 Layer Graph 인것 같음
- model-engine-file:TensorRT용 Model Engine이며, 상위 model-file 기반으로 처음생성
- labelfile-path: 현재 제공되어지는 Label File
- network-mode: FP32/INT8/FP16기반으로 생성가능 이를 설정
- batch-szie: 들어오는 buffer의 수 (Frame/Object) , 현재 Frame이라고 생각하면됨
- num-detected-classes: Label의 갯수와 맞추면됨
- parse-func : [0 custom] [4: resnet] 세부사항은 Manual
- 상위 파란색으로 막아진 기능은
#parse-bbox-func-name=NvDsInferParseCustomResnet
#custom-lib-path=/home/nvidia/deepstream_sdk_on_jetson/sources/libs/nvdsparsebbox/libnvdsparsebbox.so
현재 /libs/libnvdsparsebox 기능으로 기본 Binary 설치가 안되었으며, 역할은 bounding box parsing 기능이며,
사용하고 싶다면, parse-func =0 변경과 함께source/libs/libnvdparsebox/libnvdsparsebbox.so 생성후 설정 (아래의 IPlugIn에서 다시언급)
상위 옵션 중에 DBSCAN이 존재하는데, 군집화를 하기위해서 사용하는 것 같으며, OpenCV 역시 비슷할 것 같다. (상위 EPS 설정과 같이 함)
https://bcho.tistory.com/1205
다양한 예제 (for Telsa version)
https://github.com/NVIDIA-AI-IOT/redaction_with_deepstream/blob/master/configs/pgie_config_fd_lpd.txt
1.3 deepstream-app 의 Config
deepstream-app 에서만 사용되는 Config File 이며, 이 구조도 상위 구조와 동일하며, 다만 다른 점은 Gst-nvinfer Properties 의 Gst-nvinfer File Configuration 값을 덮어쓰는 것이 가능하다.
이 파일의 구조는 이전에 분석한 부분의 Parser에서 각각 값을 얻고 값을 별도로 저장을 한다.(여기서 부터는 소스로 확인가능)
이전의 Config File은 Primary-GIE (TensorRT) 설정이며, 아래의 Config에서 중복설정을 하여, 덮어쓰는 것이 가능하다.
이외에 [messsage-broker] 및 [message-conv]도 지원할것 같으나, 현재 소스는 미지원이다.
(deepstrem_config_file_parser.c/h 소스참조)
1st GIE(Gst-nvinfer)의 설정을 보면, [primary-gie] 를 보면 이 설정은 config_infer_primary.txt와 중복이 되며, 재정의 하는 것이 가능하므로, 이 값으로 설정가능.
재미있는 것은 Gstreamer 처럼 상위 정보들이 순서대로 동작될 것이라고는 생각하지 말아야하며, 소스를 분석해서 동작방식을 알아야한다.
상위정보들은 오직 config만 해당하므로, 전체 Pipeline 구조는 소스에서 확인을 해야한다.
Deepstream SDK Manual 참조
2. DeepStream 기본소스분석
상위에서 설명한 각각의 GStreamer 구조와 DeepStream의 Properties 부분을 파악해보자.
3. Gst-nvinfer(TensorRT)의 IPlugin 확장기능
TensorRT의 Custom layer를 위한 확장기능으로 동작하는 방식은 IPlugin Interface를 연결하여 만들고, 본인이 원하는 Layer를 공유라이브러리로 구현하면된다고한다.
이 기능을 테스트하기위해서는 각각의 Framwork의 Model과 관련 Label 정보가 필요하며, 이는 기존의 TensorRT 예제에서 가져오고 테스트를 진행한다.
그러므로, 기존에 사용했던 TensorRT 부분을 확인하고 가자.

https://docs.nvidia.com/deeplearning/sdk/tensorrt-support-matrix/index.html#layers-matrix
https://docs.nvidia.com/deeplearning/sdk/tensorrt-support-matrix/index.html#hardware-precision-matrix
https://docs.nvidia.com/deeplearning/sdk/tensorrt-developer-guide/index.html#plugin-api-desc
3.1 IPlugin 관련 소스 확인 및 기본적인 이해 와 분석
Deepstream 3.0 SDK에서 Gst-nvinfer(TensorRT)는 IPluginV2 and IPluginCreator interface를 지원하며 DeepStream SDK Manual의 5장참조하자.
상위 2장의 전체 Deepstream SDK 3.0 Source에서 IPlugin 부분들을 보면될 것 같다.
Gst-nvinfer에서 config file에서 key로 설정하여 본인이 만든 공유 library loading 방식이며, bbox(boundbox)를 다 독자적으로 구현을 했다.
현재 주 사용하는 목적은 현재로는 bbox 구현으로만 보이지만, 본인이 원하면, 다른것으로도 구현이 가능할 것 같다.
Output layer를 기반으로 본인이 얻고자하는 Data를 가공하여 이를 만들면 되겠지만, 역시 등록해야하는 함수 Key가 필요하기때문에 제한적일 것 같다.
TensorRT는 C++기반의 Library Engine이며, 아래와 같이 Class를 제공하더라도 어디에 속했는지가 중요하므로, 각각의 Manual을 볼때 주의하도록하자.
Class List
https://docs.nvidia.com/deeplearning/sdk/tensorrt-api/c_api/annotated.html
IPluginFactory Class의 제공하는 Main Class들
DeepStream SDK Manual 의 5.0 IPLUGIN INTERFACE 부분 참조
IPluginCreator or IPluginFactory Interface를 사용하기위해 반드시 독립적인 custom library(공유 Library)를 구현해야하며, 이 Library는 Gst-nvinfer 의 custom-lib-path key로 설정이 가능하다.
이 예가 lib/nvdsparsebox 이며 Gst-nvinfer에 상위 설정을 적용하며, 이 Library를 Plugin가능하다.
현재는 UFF와 Caffer만 지원가능한 것 같고, ONMX의 경우는 언급이 없으며, 예제도 아직없다.
지원을 한다고 하는데, 지금은 왠지 동작 안될 것 같다.
nvinfer1
nvinfer1::IPluginV2 Class Reference
https://docs.nvidia.com/deeplearning/sdk/tensorrt-api/c_api/classnvinfer1_1_1_i_plugin_v2.html
nvinfer1::IPluginCreator Class Reference
https://docs.nvidia.com/deeplearning/sdk/tensorrt-api/c_api/classnvinfer1_1_1_i_plugin_creator.html
nvinfer1::IPluginFactory Class Reference
https://docs.nvidia.com/deeplearning/sdk/tensorrt-api/c_api/classnvinfer1_1_1_i_plugin_factory.html
이때 사용되어지는 모듈들이 Layer를 찾기위해서 Parser를 사용하며, 상위 nvinfer도 같이 사용하는 것 같다.
nvuffparser and nvcaffeparser1
nvuffparser::IPluginFactory Class Reference
https://docs.nvidia.com/deeplearning/sdk/tensorrt-api/c_api/classnvuffparser_1_1_i_plugin_factory.html
nvcaffeparser1::IPluginFactory Class Reference
https://docs.nvidia.com/deeplearning/sdk/tensorrt-api/c_api/classnvcaffeparser1_1_1_i_plugin_factory.html
세부내용은Deepstream SDK Manual참조
TensorRT의 IPlugIN의 C++ 기능
https://docs.nvidia.com/deeplearning/sdk/tensorrt-api/c_api/classnvinfer1_1_1_i_plugin.html
TensorRT의 IPlugIN Python API기능
https://docs.nvidia.com/deeplearning/sdk/tensorrt-api/python_api/infer/Plugin/pyPlugin.html
Extending TensorRT With Custom Layers
https://docs.nvidia.com/deeplearning/sdk/tensorrt-developer-guide/index.html#extending
3.2 IPlugIn FasterRCNN 기능확인 (Caffe 기반)
DeepStream SDK의 포함된 FasterRCNN(objectDetector_FasterRCNN)을 Build하여, 각각의 Sample 영상을 확인하자.
CaffeModel은 인터넷에서 아래와 같이 사이트에서 찾고, config 파일 기준으로 환경을 설정해주자.
https://docs.openvinotoolkit.org/2018_R5/_samples_object_detection_demo_README.html
두개의 영상 느리며, 실시간으로 사용하기가 힘들것으로 보이며, 현재 FP32엔진으로 사용
CMD-Gstreamer에 Gst-nvinfer 설정은 가능하지만 metadata 처리를 위한 Callback Function이 없기에 아래와 같이 OSD에 Class를 표시 못하고 Detection만 가능
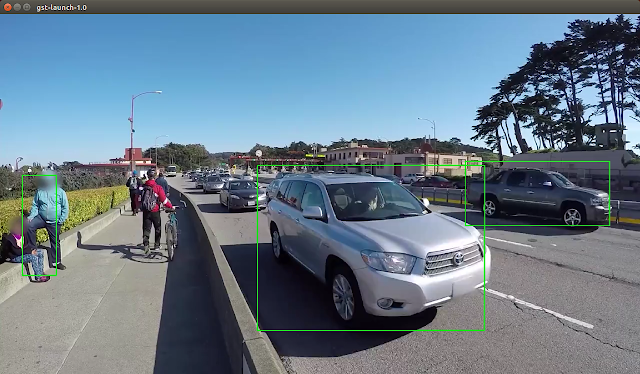
deepstream-app 기존처럼 동작하지만, PERF의 7 ~8 FPS로 동작되어 느림 (실시간은 힘듦)

3.3 IPlugIn SSD 기능확인 (Tensorflow 기반)
Deepstream SDK에 동일하게 UFFSSD(objectDetector_SSD)를 부분을 Build를 진행하고, Tensorflow에서 Training 된 *.PB파일을 받아 이를 UFF로 변경 후에
이를 상위 objectDetector_SSD를 이용하여 동영상을 확인하자.
UFF Model: x86에서 Tensorflow PB파일을 받아 UFF로 변환을 하고 이를 가져와야한다
Label File: TensorRT Sampel에서 가져옴
Stream의 metadata처리하여 OSD에 이를 적용하는부분 때문에 두 실행결과가 다르다.
결과적으로, metadata 처리를 위한 callback function들은 작성을 해야겠다.
CMD-Gstreamer 실행 , 이전 Faster RCNN과 속도는 비교가 안되며, 실시간으로 가능
(상위와 동일하게 Callback Function이 동작하지 않으므로, OSD Label 표시가 안됨)

deepstream-app 돌려서 OSD에서 각 Class가 구분되며, 실시간으로 FPS 30으로 동작가능확인

3.4 TensorRT의 기능 재확인
TensorRT의 기능 확인
이를 테스트 한지 오래되어 아래와 같이 TensorRT 부분을 재확인
TensorRT-UFF Convert Python API
https://docs.nvidia.com/deeplearning/sdk/tensorrt-api/python_api/uff/uff.html
TensorRT Python and Python API
https://docs.nvidia.com/deeplearning/sdk/tensorrt-api/python_api/index.html
https://docs.nvidia.com/deeplearning/sdk/tensorrt-api/#python
convert-to-uff 상위의 python API로 제공 혹은 tf_to_trt.py 제공하지만, x86기반만 가능
https://devtalk.nvidia.com/default/topic/1025246/jetson-tx2/where-is-convert-to-uff/
TensorRT x86 Install Guide (convert-to-uff 설치확인)
https://docs.nvidia.com/deeplearning/sdk/tensorrt-install-guide/index.html
관련소스
https://github.com/NVIDIA-AI-IOT/tf_to_trt_image_classification
Tensorflow 와 TensorRT Chatbot 예제
https://github.com/AastaNV/ChatBot
사용하고 싶다면, parse-func =0 변경과 함께source/libs/libnvdparsebox/libnvdsparsebbox.so 생성후 설정 (아래의 IPlugIn에서 다시언급)
- DBSCAN (Density-based spatial clustering of applications with noise)
상위 옵션 중에 DBSCAN이 존재하는데, 군집화를 하기위해서 사용하는 것 같으며, OpenCV 역시 비슷할 것 같다. (상위 EPS 설정과 같이 함)
- enable-dbscan
- eps=0.2
https://bcho.tistory.com/1205
- 관심영역 ROI(Region of Interest) 관련설정
- roi-top-offset=0 : ROI의 Frame Top에서 부터 OFFSET
- roi-bottom-offset=0 : ROI의Frame Bottom에서 부터 OFFSET
- TensorRT Engine
- model-engine-file
- 주의사항
- batch-size
- network-mode
다양한 예제 (for Telsa version)
https://github.com/NVIDIA-AI-IOT/redaction_with_deepstream/blob/master/configs/pgie_config_fd_lpd.txt
1.3 deepstream-app 의 Config
deepstream-app 에서만 사용되는 Config File 이며, 이 구조도 상위 구조와 동일하며, 다만 다른 점은 Gst-nvinfer Properties 의 Gst-nvinfer File Configuration 값을 덮어쓰는 것이 가능하다.
이 파일의 구조는 이전에 분석한 부분의 Parser에서 각각 값을 얻고 값을 별도로 저장을 한다.(여기서 부터는 소스로 확인가능)
이전의 Config File은 Primary-GIE (TensorRT) 설정이며, 아래의 Config에서 중복설정을 하여, 덮어쓰는 것이 가능하다.
Object Tracking
아래의 Tracker 부분 참조
- Manual의 Configuration Groups (Manual 참조)
Group
|
Configuration
|
application
|
Configuration settings that are not related to a specific component.
|
tiled-display
|
Settings that configure tiled display in the application.
|
source
|
Settings that specify source properties. There can be multiple sources, with one configuration group for each source. The groups must be named [source0], [source1], and so on.
|
streammux
|
Settings that specify the properties and modify the behavior of the streammux component.
|
primary-gie
|
Settings that specify the properties and modify the behavior of the primary GIE.
|
secondary-gie
|
Settings that specify the properties and modify the behavior of the secondary GIE. There may be multiple secondary GIEs, with one configuration group for each GIE. These groups must be named [secondary-gie0], [secondary-gie1], etc.
|
tracker
|
Settings that specify the properties and modify the behavior of the object tracker.
|
osd
|
Settings that specify the properties and modify the behavior of the on-screen display (OSD) component which overlays text and rectangles on the frame.
|
sink
|
Settings that specify the properties and modify the behavior of the sink components, which represent outputs such as displays or files for rendering, encoding, and file saving. The pipeline may contain multiple sinks, with one configuration group for each sink. The groups must be named [sink0], [sink1], etc.
|
tests
|
Settings for diagnostics and debugging. This configuration group is experimental.
|
- 이외의 group 설정
이외에 [messsage-broker] 및 [message-conv]도 지원할것 같으나, 현재 소스는 미지원이다.
(deepstrem_config_file_parser.c/h 소스참조)
- 4Ch Deepstream의 전체설정
1st GIE(Gst-nvinfer)의 설정을 보면, [primary-gie] 를 보면 이 설정은 config_infer_primary.txt와 중복이 되며, 재정의 하는 것이 가능하므로, 이 값으로 설정가능.
$ cd ~/deepstream_sdk_on_jetson/samples/configs/deepstream-app
$ cat source4_720p_dec_infer-resnet_tracker_sgie_tiled_display_int8.txt
[application]
enable-perf-measurement=1
perf-measurement-interval-sec=5
#gie-kitti-output-dir=streamscl

[tiled-display]
enable=1
rows=2
columns=2
width=1280
height=720

[source0]
enable=1
#Type - 1=CameraV4L2 2=URI 3=MultiURI
type=3
uri=file://../../streams/sample_720p.mp4
num-sources=4

[sink0]
enable=1
#Type - 1=FakeSink 2=EglSink 3=File 4=RTSPStreaming 5=Overlay
type=2
sync=1
display-id=0
offset-x=0
offset-y=0
width=0
height=0
overlay-id=1
source-id=0

[sink1]
enable=0
type=3
#1=mp4 2=mkv
container=1
#1=h264 2=h265 3=mpeg4
codec=1
sync=0
bitrate=2000000
output-file=out.mp4
source-id=0

[sink2]
enable=0
#Type - 1=FakeSink 2=EglSink 3=File 4=RTSPStreaming 5=Overlay
type=4
#1=h264 2=h265 3=mpeg4
## only h264 is supported right now.
codec=1
sync=0
bitrate=4000000
# set below properties in case of RTSPStreaming
rtsp-port=8554
udp-port=5400


[osd]
enable=1
border-width=1
text-size=15
text-color=1;1;1;1;
text-bg-color=0.3;0.3;0.3;1
font=Arial
show-clock=0
clock-x-offset=800
clock-y-offset=820
clock-text-size=12
clock-color=1;0;0;0

[streammux]
##Boolean property to inform muxer that sources are live
live-source=0
batch-size=4
##time out in usec, to wait after the first buffer is available
##to push the batch even if the complete batch is not formed
batched-push-timeout=40000
## Set muxer output width and height
width=1280
height=720

# config-file property is mandatory for any gie section.
# Other properties are optional and if set will override the properties set in
# the infer config file.
[primary-gie]
enable=1
model-engine-file=../../models/Primary_Detector/resnet10.caffemodel_b4_int8.engine
labelfile-path=../../models/Primary_Detector/labels.txt
batch-size=4
#Required by the app for OSD, not a plugin property
bbox-border-color0=1;0;0;1
bbox-border-color1=0;1;1;1
bbox-border-color2=0;0;1;1
bbox-border-color3=0;1;0;1
interval=0
gie-unique-id=1
config-file=config_infer_primary.txt

[tracker]
enable=1
tracker-width=640
tracker-height=368
#1 - KLT, 2 - IOU, other values are invalid
tracker-algorithm=1
iou-threshold=0.1

[secondary-gie0]
enable=1
model-engine-file=../../models/Secondary_VehicleTypes/resnet18.caffemodel_b16_int8.engine
labelfile-path=../../models/Secondary_VehicleTypes/labels.txt
batch-size=16
gie-unique-id=4
operate-on-gie-id=1
operate-on-class-ids=0;
config-file=config_infer_secondary_vehicletypes.txt

[secondary-gie1]
enable=1
model-engine-file=../../models/Secondary_CarColor/resnet18.caffemodel_b16_int8.engine
labelfile-path=../../models/Secondary_CarColor/labels.txt
batch-size=16
gie-unique-id=5
operate-on-gie-id=1
operate-on-class-ids=0;
config-file=config_infer_secondary_carcolor.txt

[secondary-gie2]
enable=1
model-engine-file=../../models/Secondary_CarMake/resnet18.caffemodel_b16_int8.engine
labelfile-path=../../models/Secondary_CarMake/labels.txt
batch-size=16
gie-unique-id=6
operate-on-gie-id=1
operate-on-class-ids=0;
config-file=config_infer_secondary_carmake.txt

[tests]
file-loop=0
재미있는 것은 Gstreamer 처럼 상위 정보들이 순서대로 동작될 것이라고는 생각하지 말아야하며, 소스를 분석해서 동작방식을 알아야한다.
상위정보들은 오직 config만 해당하므로, 전체 Pipeline 구조는 소스에서 확인을 해야한다.
- 기본으로 숙지해야할 정보들 정리
- [plug-in ]
- enable : 사용여부
- batch-size : data 갯수
- [tiled-display]
- row: 2 , columns: 2 일 경우 4 Channel 로 표시
- width, height : 본인이 설정하기 나름
- [source0)
- type=3 //MultiURI RTSP/FILE 동시 설정가능
- uri=rtsp://10.0.0.196:554/h264
- uri=file://../../streams/sample_720p.mp4
- num-sources: 4 # 4channel
- [sink0]
- sync: Indicates how the stream is to be rendered ( 0 = As fast as possible ,1 = Synchronously)
Deepstream SDK Manual 참조
2. DeepStream 기본소스분석
상위에서 설명한 각각의 GStreamer 구조와 DeepStream의 Properties 부분을 파악해보자.
- Deepstream의 SDK Source 전체구조 파악
$ cd ~/deepstream_sdk_on_jetson/sources

$ tree -t -L 2 .
.
├── apps                                //Deepstream Sample Application
│   ├── apps-common
│   └── sample_apps             // DeepStream Samples App
├── gst-plugins                        // DeepStream PlugIn
│   ├── gst-dsexample
│   ├── gst-nvmsgbroker
│   └── gst-nvmsgconv
├── libs                                  // Deepstream Plugin Lib
│   ├── kafka_protocol_adaptor
│   ├── nvdsparsebbox        //nvinfer의 IPlugIn (Gst-nvinfer 의 config file에서 Load가능)
│   ├── nvmsgconv
│   └── nvds_logger
├── objectDetector_FasterRCNN      // nvInfer의 IPlugIn  FasterRCNN
│   ├── config_infer_primary_fasterRCNN.txt
│   ├── deepstream_app_config_fasterRCNN.txt
│   ├── labels.txt
│   ├── README
│   └── nvdsinfer_custom_impl_fasterRCNN
├── objectDetector_SSD              // nvInfer의 IPlugIn  SSD
│   ├── config_infer_primary_ssd.txt
│   ├── deepstream_app_config_ssd.txt
│   ├── nvdsinfer_custom_impl_ssd
│   └── README
└── includes
    ├── gstnvdsinfer.h
    ├── gstnvdsmeta.h
    ├── gst-nvquery.h
    ├── gstnvstreammeta.h
    ├── nvbuffer.h
    ├── nvbuf_utils.h
    ├── nvdsinfer_custom_impl.h
    ├── nvdsinfer.h
    ├── nvds_logger.h
    ├── nvdsmeta.h
    ├── nvds_msgapi.h
    └── nvosd.h
- Deepstream의 Sampeapp의 Gstreamer PlugIn 구조파악
- deepstream-app : create_pipeline 분석가능하며, config file갯수/설정에따라 변경
- deepstream-test1-app : 나머지 3개는 이해하기가 쉬움
- deepstream-test2-app
- deepstream-test3-app
$ vi app/apps-common/includes/deepstream_config.h   // 전체 Gstreamer (DeepStream의 구조파악)
......
#define NVDS_ELEM_SRC_CAMERA_CSI "nvarguscamerasrc"
#define NVDS_ELEM_SRC_CAMERA_V4L2 "v4l2src"
#define NVDS_ELEM_SRC_URI "uridecodebin"

#define NVDS_ELEM_QUEUE "queue"
#define NVDS_ELEM_CAPS_FILTER "capsfilter"
#define NVDS_ELEM_TEE "tee"

#define NVDS_ELEM_PGIE "nvinfer"
#define NVDS_ELEM_SGIE "nvinfer"
#define NVDS_ELEM_TRACKER "nvtracker"

#define NVDS_ELEM_VIDEO_CONV "nvvidconv"
#define NVDS_ELEM_STREAM_MUX "nvstreammux"
#define NVDS_ELEM_STREAM_DEMUX "nvstreamdemux"
#define NVDS_ELEM_TILER "nvmultistreamtiler"
#define NVDS_ELEM_OSD "nvosd"
#define NVDS_ELEM_DSEXAMPLE_ELEMENT "dsexample"

#define NVDS_ELEM_MSG_CONV "nvmsgconv"
#define NVDS_ELEM_MSG_BROKER "nvmsgbroker"
........

$ grep -r gst_element_factory_make .   // Gstreamer 구조 파악
./apps/apps-common/src/deepstream_primary_gie_bin.c:      gst_element_factory_make (NVDS_ELEM_VIDEO_CONV, "primary_gie_conv");
./apps/apps-common/src/deepstream_primary_gie_bin.c:  bin->queue = gst_element_factory_make (NVDS_ELEM_QUEUE, "primary_gie_queue");
./apps/apps-common/src/deepstream_primary_gie_bin.c:      gst_element_factory_make (NVDS_ELEM_CAPS_FILTER, "primary_gie_caps");
./apps/apps-common/src/deepstream_primary_gie_bin.c:      gst_element_factory_make (NVDS_ELEM_PGIE, "primary_gie_classifier");
./apps/apps-common/src/deepstream_tracker_bin.c:      gst_element_factory_make (NVDS_ELEM_TRACKER, "tracking_tracker");
./apps/apps-common/src/deepstream_sink_bin.c:      bin->sink = gst_element_factory_make (NVDS_ELEM_SINK_EGL, elem_name);
./apps/apps-common/src/deepstream_sink_bin.c:      bin->sink = gst_element_factory_make (NVDS_ELEM_SINK_OVERLAY, elem_name);
./apps/apps-common/src/deepstream_sink_bin.c:          gst_element_factory_make (NVDS_ELEM_SINK_FAKESINK, elem_name);
./apps/apps-common/src/deepstream_sink_bin.c:        gst_element_factory_make (NVDS_ELEM_EGLTRANSFORM, elem_name);
./apps/apps-common/src/deepstream_sink_bin.c:  bin->queue = gst_element_factory_make (NVDS_ELEM_QUEUE, elem_name);
./apps/apps-common/src/deepstream_sink_bin.c:  bin->queue = gst_element_factory_make (NVDS_ELEM_QUEUE, elem_name);
./apps/apps-common/src/deepstream_sink_bin.c:  bin->transform = gst_element_factory_make (NVDS_ELEM_VIDEO_CONV, elem_name);
./apps/apps-common/src/deepstream_sink_bin.c:      bin->encoder = gst_element_factory_make (NVDS_ELEM_ENC_H264, elem_name);
./apps/apps-common/src/deepstream_sink_bin.c:      bin->encoder = gst_element_factory_make (NVDS_ELEM_ENC_H265, elem_name);
./apps/apps-common/src/deepstream_sink_bin.c:      bin->encoder = gst_element_factory_make (NVDS_ELEM_ENC_MPEG4, elem_name);
./apps/apps-common/src/deepstream_sink_bin.c:      bin->mux = gst_element_factory_make (NVDS_ELEM_MUX_MP4, elem_name);
./apps/apps-common/src/deepstream_sink_bin.c:      bin->mux = gst_element_factory_make (NVDS_ELEM_MKV, elem_name);
./apps/apps-common/src/deepstream_sink_bin.c:  bin->sink = gst_element_factory_make (NVDS_ELEM_SINK_FILE, elem_name);
./apps/apps-common/src/deepstream_sink_bin.c:  bin->queue = gst_element_factory_make (NVDS_ELEM_QUEUE, elem_name);
./apps/apps-common/src/deepstream_sink_bin.c:  bin->transform = gst_element_factory_make (NVDS_ELEM_VIDEO_CONV, elem_name);
./apps/apps-common/src/deepstream_sink_bin.c:      bin->encoder = gst_element_factory_make (NVDS_ELEM_ENC_H264, elem_name);
./apps/apps-common/src/deepstream_sink_bin.c:      gst_element_factory_make (NVDS_ELEM_CAPS_FILTER, elem_name);
./apps/apps-common/src/deepstream_sink_bin.c:  bin->rtph264pay = gst_element_factory_make ("rtph264pay", elem_name);
./apps/apps-common/src/deepstream_sink_bin.c:  bin->sink = gst_element_factory_make ("udpsink", elem_name);
./apps/apps-common/src/deepstream_sink_bin.c:  bin->queue = gst_element_factory_make (NVDS_ELEM_QUEUE, "sink_bin_queue");
./apps/apps-common/src/deepstream_sink_bin.c:  bin->tee = gst_element_factory_make (NVDS_ELEM_TEE, "sink_bin_tee");
./apps/apps-common/src/deepstream_dsexample.c:      gst_element_factory_make (NVDS_ELEM_QUEUE, "dsexample_queue");
./apps/apps-common/src/deepstream_dsexample.c:      gst_element_factory_make (NVDS_ELEM_DSEXAMPLE_ELEMENT, "dsexample0");
..............
- Deepstream 의 상위의 1.3 deepstream-app Config 구조파악
$ tree -t apps/apps-common
apps/apps-common
├── includes
│   ├── deepstream_app.h
│   ├── deepstream_colors.h
│   ├── deepstream_common.h
│   ├── deepstream_config_file_parser.h         // 상위 1.3  deepstream-app config 의 GROUP
│   ├── deepstream_config.h                           // gstream plugin  (app-common *.c 참조 )
│   ├── deepstream_dsexample.h
│   ├── deepstream_gie.h
│   ├── deepstream_metadata_pool.h
│   ├── deepstream_osd.h
│   ├── deepstream_perf.h
│   ├── deepstream_primary_gie.h
│   ├── deepstream_secondary_gie.h
│   ├── deepstream_sinks.h
│   ├── deepstream_sources.h
│   ├── deepstream_streammux.h
│   ├── deepstream_tiled_display.h
│   └── deepstream_tracker.h
└── src
    ├── deepstream_common.c
    ├── deepstream_config_file_parser.c                 // 상위 1.3  deepstream-app config의 GROUP
    ├── deepstream_dsexample.c
    ├── deepstream_metadata_pool.c
    ├── deepstream_osd_bin.c
    ├── deepstream_perf.c
    ├── deepstream_primary_gie_bin.c
    ├── deepstream_secondary_gie_bin.c
    ├── deepstream_sink_bin.c                      // Gstreamer output
    ├── deepstream_source_bin.c                 // Gstreamer Input
    ├── deepstream_streammux.c                 // Video 영상 Mux 기능
    ├── deepstream_tiled_display_bin.c
    ├── deepstream_tracker_bin.c                  //  Tracker 관련 기능,  KLT or IOU
    ├── deepstream_primary_gie_bin.o
    ├── deepstream_tracker_bin.o
    ├── deepstream_config_file_parser.o
    ├── deepstream_metadata_pool.o
    ├── deepstream_source_bin.o
    ├── deepstream_common.o
    ├── deepstream_perf.o
    ├── deepstream_sink_bin.o
    ├── deepstream_dsexample.o
    ├── deepstream_osd_bin.o
    ├── deepstream_secondary_gie_bin.o
    ├── deepstream_tiled_display_bin.o
    └── deepstream_streammux.o

$ cat apps/apps-common/includes/deepstream_config_file_parser.h   // 1.3 참조, 이 곳에 선언된 GROUP가준으로 Gst Properies의 Config를 작성가능
......
#define CONFIG_GROUP_SOURCE "source"
#define CONFIG_GROUP_OSD "osd"
#define CONFIG_GROUP_PRIMARY_GIE "primary-gie"
#define CONFIG_GROUP_SECONDARY_GIE "secondary-gie"
#define CONFIG_GROUP_TRACKER "tracker"
#define CONFIG_GROUP_SINK "sink"
#define CONFIG_GROUP_TILED_DISPLAY "tiled-display"
#define CONFIG_GROUP_DSEXAMPLE "ds-example"
#define CONFIG_GROUP_STREAMMUX "streammux"
......

$ cat apps/apps-common/src/deepstream_config_file_parser.c   // 1.3 참조,  이 곳에 선언된 GROUP의 각각의 Properies 설정부터 관련기능 확인가능
......
#define CONFIG_GROUP_ENABLE "enable"

#define CONFIG_GROUP_APP "application"
#define CONFIG_GROUP_APP_ENABLE_PERF_MEASUREMENT "enable-perf-measurement"
#define CONFIG_GROUP_APP_PERF_MEASUREMENT_INTERVAL "perf-measurement-interval-sec"
#define CONFIG_GROUP_APP_GIE_OUTPUT_DIR "gie-kitti-output-dir"

#define CONFIG_GROUP_TESTS "tests"
#define CONFIG_GROUP_TESTS_FILE_LOOP "file-loop"

#define CONFIG_GROUP_SOURCE_ENABLE "enable"
#define CONFIG_GROUP_SOURCE_TYPE "type"
#define CONFIG_GROUP_SOURCE_CAMERA_WIDTH "camera-width"
#define CONFIG_GROUP_SOURCE_CAMERA_HEIGHT "camera-height"
#define CONFIG_GROUP_SOURCE_CAMERA_FPS_N "camera-fps-n"
#define CONFIG_GROUP_SOURCE_CAMERA_FPS_D "camera-fps-d"
#define CONFIG_GROUP_SOURCE_CAMERA_CSI_SID "camera-csi-sensor-id"
#define CONFIG_GROUP_SOURCE_CAMERA_V4L2_DEVNODE "camera-v4l2-dev-node"
#define CONFIG_GROUP_SOURCE_URI "uri"
#define CONFIG_GROUP_SOURCE_LATENCY "latency"
#define CONFIG_GROUP_SOURCE_NUM_SOURCES "num-sources"
#define CONFIG_GROUP_SOURCE_INTRA_DECODE "intra-decode-enable"

#define CONFIG_GROUP_STREAMMUX_WIDTH "width"
#define CONFIG_GROUP_STREAMMUX_HEIGHT "height"
#define CONFIG_GROUP_STREAMMUX_BATCH_SIZE "batch-size"
#define CONFIG_GROUP_STREAMMUX_BATCHED_PUSH_TIMEOUT "batched-push-timeout"
#define CONFIG_GROUP_STREAMMUX_LIVE_SOURCE "live-source"

#define CONFIG_GROUP_OSD_MODE "osd-mode"
#define CONFIG_GROUP_OSD_BORDER_WIDTH "border-width"
#define CONFIG_GROUP_OSD_BORDER_COLOR "border-color"
#define CONFIG_GROUP_OSD_TEXT_SIZE "text-size"
#define CONFIG_GROUP_OSD_TEXT_COLOR "text-color"
#define CONFIG_GROUP_OSD_TEXT_BG_COLOR "text-bg-color"
#define CONFIG_GROUP_OSD_FONT "font"
#define CONFIG_GROUP_OSD_CLOCK_ENABLE "show-clock"
#define CONFIG_GROUP_OSD_CLOCK_X_OFFSET "clock-x-offset"
#define CONFIG_GROUP_OSD_CLOCK_Y_OFFSET "clock-y-offset"
#define CONFIG_GROUP_OSD_CLOCK_TEXT_SIZE "clock-text-size"
#define CONFIG_GROUP_OSD_CLOCK_COLOR "clock-color"

//현재 GIE에서 설정가능한 Properties 들이며, 세부사용법은 Manual
#define CONFIG_GROUP_GIE_BATCH_SIZE "batch-size"
#define CONFIG_GROUP_GIE_MODEL_ENGINE "model-engine-file"
#define CONFIG_GROUP_GIE_CONFIG_FILE "config-file"
#define CONFIG_GROUP_GIE_LABEL "labelfile-path"
#define CONFIG_GROUP_GIE_UNIQUE_ID "gie-unique-id"
#define CONFIG_GROUP_GIE_ID_FOR_OPERATION "operate-on-gie-id"
#define CONFIG_GROUP_GIE_BBOX_BORDER_COLOR "bbox-border-color"
#define CONFIG_GROUP_GIE_BBOX_BG_COLOR "bbox-bg-color"
#define CONFIG_GROUP_GIE_CLASS_IDS_FOR_OPERATION "operate-on-class-ids"
#define CONFIG_GROUP_GIE_INTERVAL "interval"
#define CONFIG_GROUP_GIE_RAW_OUTPUT_DIR "infer-raw-output-dir"
.............

이 기능들은 각각의 GROUP인 parse_xxx 함수에 의해 호출되며, GIE인 경우 parse_gie가 된다.
그리고, 상위의 Gst Properites의 Config 파일로 읽어 각 Group의 Config 변수에 저장되어지며, GIE의 경우 NvDsGieConfig 저장
3. Gst-nvinfer(TensorRT)의 IPlugin 확장기능
TensorRT의 Custom layer를 위한 확장기능으로 동작하는 방식은 IPlugin Interface를 연결하여 만들고, 본인이 원하는 Layer를 공유라이브러리로 구현하면된다고한다.
이 기능을 테스트하기위해서는 각각의 Framwork의 Model과 관련 Label 정보가 필요하며, 이는 기존의 TensorRT 예제에서 가져오고 테스트를 진행한다.
그러므로, 기존에 사용했던 TensorRT 부분을 확인하고 가자.

- 필요사항
- Framework의 pre-trained Model (Caffe, UFF (Tensorflow) )
- lable or prototxt file ( Framework에 의존적임)
- Deepstream 에서 제공되어지는 기본예제들
- nvinfer의 IPlugIn FasterRCNN (Caffe)
- nvinfer의 IPlugIn SSD (Tensorflow)
- TensorRT Layer 특징과 Presion 정보 (PlugIn Layer)
https://docs.nvidia.com/deeplearning/sdk/tensorrt-support-matrix/index.html#layers-matrix
https://docs.nvidia.com/deeplearning/sdk/tensorrt-support-matrix/index.html#hardware-precision-matrix
- TensorRT Layer 전체 Index
- TensorRT Plugin Layer 와 API
https://docs.nvidia.com/deeplearning/sdk/tensorrt-developer-guide/index.html#plugin-api-desc
3.1 IPlugin 관련 소스 확인 및 기본적인 이해 와 분석
Deepstream 3.0 SDK에서 Gst-nvinfer(TensorRT)는 IPluginV2 and IPluginCreator interface를 지원하며 DeepStream SDK Manual의 5장참조하자.
상위 2장의 전체 Deepstream SDK 3.0 Source에서 IPlugin 부분들을 보면될 것 같다.
Gst-nvinfer에서 config file에서 key로 설정하여 본인이 만든 공유 library loading 방식이며, bbox(boundbox)를 다 독자적으로 구현을 했다.
현재 주 사용하는 목적은 현재로는 bbox 구현으로만 보이지만, 본인이 원하면, 다른것으로도 구현이 가능할 것 같다.
Output layer를 기반으로 본인이 얻고자하는 Data를 가공하여 이를 만들면 되겠지만, 역시 등록해야하는 함수 Key가 필요하기때문에 제한적일 것 같다.
- TensorRT의 IPlugInV2 예제 소스
- libs/nvdsparsebox: bound box 구현
- ObjectDetector_FasterRCNN: bound box 구현
- ObjectDetector_SSD: bound box 구현
TensorRT는 C++기반의 Library Engine이며, 아래와 같이 Class를 제공하더라도 어디에 속했는지가 중요하므로, 각각의 Manual을 볼때 주의하도록하자.
- TensorRT의 Main Class List
- nvcaffeparser1
- nvinfer1
- nvonnxparser
- nvuffparser
Class List
https://docs.nvidia.com/deeplearning/sdk/tensorrt-api/c_api/annotated.html
- nvdsinfer_custom_impl.h
- NvDsInferPluginFactoryCaffeGet
- NvDsInferPluginFactoryCaffeDestroy
- NvDsInferPluginFactoryUffGet
- NvDsInferPluginFactoryUffDestroy
IPluginFactory Class의 제공하는 Main Class들
- nvinfer1::IPluginFactory : TensorRT
- nvuffparser1::IPluginFactory : UFF Parser
- nvuffparser1::IPluginFactoryExt : UFF Parser
- nvcaffeparser1::IPluginFactory : Caffe Parser
- nvcaffeparser1::IPluginFactoryExt : Caffe Parser
- nvcaffeparser1::IPluginFactoryV2 : Caffe Parser
DeepStream SDK Manual 의 5.0 IPLUGIN INTERFACE 부분 참조
IPluginCreator or IPluginFactory Interface를 사용하기위해 반드시 독립적인 custom library(공유 Library)를 구현해야하며, 이 Library는 Gst-nvinfer 의 custom-lib-path key로 설정이 가능하다.
이 예가 lib/nvdsparsebox 이며 Gst-nvinfer에 상위 설정을 적용하며, 이 Library를 Plugin가능하다.
- 1stGIE Config File
$ cat deepstream_sdk_on_jetson/samples/configs/deepstream-app/config_infer_primary.txt
## 1st GIE는 오직 4개만 분류가능
num-detected-classes=4
## Array of output layer  names , 세미콜론을 구분
output-blob-names=conv2d_bbox;conv2d_cov/Sigmoid
...
# 0:custom 1:GoogleNet 2:NVIDIA Type0 3:NVIDIA Type1 4: ResNet
parse-func=4
##  //libs/nvsparsebox/nvdsparsebbox.cpp 에 함수가 구현됨
#parse-bbox-func-name=NvDsInferParseCustomResnet
##   IPlugin 연결 (Gst-nvinfer 이를 dlopen 연결)
#custom-lib-path=/home/nvidia/deepstream_sdk_on_jetson/sources/libs/nvdsparsebbox/libnvdsparsebbox.so

$ cat deepstream_sdk_on_jetson/sources/objectDetector_FasterRCNN/config_infer_primary_fasterRCNN.txt
..

# 1st GIE는 오직 21 개만 분류가능
num-detected-classes=21
# Array of output layer  names , 세미콜론을 구분
output-blob-names=bbox_pred;cls_prob;rois

...
# 0:custom 1:GoogleNet 2:NVIDIA Type0 3:NVIDIA Type1 4: ResNet
parse-func=0
parse-bbox-func-name=NvDsInferParseCustomFasterRCNN
custom-lib-path=nvdsinfer_custom_impl_fasterRCNN/libnvdsinfer_custom_impl_fasterRCNN.so

$ cat deepstream_sdk_on_jetson/sources/objectDetector_SSD/config_infer_primary_ssd.txt

## 0=FP32, 1=INT8, 2=FP16 mode
network-mode=0

##1st GIE는 오직 91 개만 분류가능
num-detected-classes=91

## Array of output layer  names , 세미콜론을 구분
output-blob-names=MarkOutput_0

...
## 0:custom 1:GoogleNet 2:NVIDIA Type0 3:NVIDIA Type1 4: ResNet
parse-func=0
## bbox 구현된 function
parse-bbox-func-name=NvDsInferParseCustomSSD
custom-lib-path=nvdsinfer_custom_impl_ssd/libnvdsinfer_custom_impl_ssd.so
현재는 UFF와 Caffer만 지원가능한 것 같고, ONMX의 경우는 언급이 없으며, 예제도 아직없다.
지원을 한다고 하는데, 지금은 왠지 동작 안될 것 같다.
- nvdsplugin_xxx.cpp : ( IPluginV2 , IPluginCreator )
nvinfer1
nvinfer1::IPluginV2 Class Reference
https://docs.nvidia.com/deeplearning/sdk/tensorrt-api/c_api/classnvinfer1_1_1_i_plugin_v2.html
nvinfer1::IPluginCreator Class Reference
https://docs.nvidia.com/deeplearning/sdk/tensorrt-api/c_api/classnvinfer1_1_1_i_plugin_creator.html
nvinfer1::IPluginFactory Class Reference
https://docs.nvidia.com/deeplearning/sdk/tensorrt-api/c_api/classnvinfer1_1_1_i_plugin_factory.html
- nvdsparsebbox_xxx.cpp
이때 사용되어지는 모듈들이 Layer를 찾기위해서 Parser를 사용하며, 상위 nvinfer도 같이 사용하는 것 같다.
nvuffparser and nvcaffeparser1
nvuffparser::IPluginFactory Class Reference
https://docs.nvidia.com/deeplearning/sdk/tensorrt-api/c_api/classnvuffparser_1_1_i_plugin_factory.html
nvcaffeparser1::IPluginFactory Class Reference
https://docs.nvidia.com/deeplearning/sdk/tensorrt-api/c_api/classnvcaffeparser1_1_1_i_plugin_factory.html
세부내용은Deepstream SDK Manual참조
- Deepstream SDK 3.0의 FasterRCNN 과 SSD 의 소스
$ cd ~/deepstream_sdk_on_jetson/sources/objectDetector_FasterRCNN/nvdsinfer_custom_impl_fasterRCNN
$ ls
factoryFasterRCNN.h        libnvdsinfer_custom_impl_fasterRCNN.so  nvdsinitinputlayers_fasterRCNN.cpp  nvdsparsebbox_fasterRCNN.cpp
factoryFasterRCNNLegacy.h  Makefile                                nvdsiplugin_fasterRCNN.cpp          nvdssample_fasterRCNN_common.h

$ cd ~/deepstream_sdk_on_jetson/sources/objectDetector_SSD/nvdsinfer_custom_impl_ssd
$ ls
libnvdsinfer_custom_impl_ssd.so  Makefile  nvdsiplugin_ssd.cpp  nvdsparsebbox_ssd.cpp
TensorRT의 IPlugIN의 C++ 기능
https://docs.nvidia.com/deeplearning/sdk/tensorrt-api/c_api/classnvinfer1_1_1_i_plugin.html
TensorRT의 IPlugIN Python API기능
https://docs.nvidia.com/deeplearning/sdk/tensorrt-api/python_api/infer/Plugin/pyPlugin.html
Extending TensorRT With Custom Layers
https://docs.nvidia.com/deeplearning/sdk/tensorrt-developer-guide/index.html#extending
3.2 IPlugIn FasterRCNN 기능확인 (Caffe 기반)
DeepStream SDK의 포함된 FasterRCNN(objectDetector_FasterRCNN)을 Build하여, 각각의 Sample 영상을 확인하자.
- Deepstram FasterRCNN 준비작업
CaffeModel은 인터넷에서 아래와 같이 사이트에서 찾고, config 파일 기준으로 환경을 설정해주자.
https://docs.openvinotoolkit.org/2018_R5/_samples_object_detection_demo_README.html
$ cd ~/deepstream_sdk_on_jetson/sources/objectDetector_FasterRCNN

$ ls   //README 참고하고, 두개의 Config가 존재
config_infer_primary_fasterRCNN.txt  deepstream_app_config_fasterRCNN.txt  labels.txt  nvdsinfer_custom_impl_fasterRCNN  README

$ cd nvdsinfer_custom_impl_fasterRCNN/
$ make    //  libnvdsinfer_custom_impl_fasterRCNN.so 생성확인

$ cd ..

//download VGG16_faster_rcnn_final.caffemodel
$ wget https://dl.dropboxusercontent.com/s/o6ii098bu51d139/faster_rcnn_models.tgz?dl=0

$ mv 'faster_rcnn_models.tgz?dl=0' faster_rcnn_models.tgz

$ tar zxvf faster_rcnn_models.tgz
faster_rcnn_models/
faster_rcnn_models/ZF_faster_rcnn_final.caffemodel
faster_rcnn_models/VGG16_faster_rcnn_final.caffemodel

$ ln -s faster_rcnn_models/VGG16_faster_rcnn_final.caffemodel VGG16_faster_rcnn_final.caffemodel

$ cp /usr/src/tensorrt/data/faster-rcnn/faster_rcnn_test_iplugin.prototxt .
- FastRCNN의 CMD Gstreamer 와 deepstream-app 비교 영상확인
$ pwd
/home/nvidia/deepstream_sdk_on_jetson/sources/objectDetector_FasterRCNN

$ gst-launch-1.0 filesrc location=../../samples/streams/sample_720p.mp4 ! \
        decodebin ! nvinfer config-file-path= config_infer_primary_fasterRCNN.txt ! \
        nvvidconv ! nvosd ! nvegltransform ! nveglglessink

$ deepstream-app -c deepstream_app_config_fasterRCNN.txt
두개의 영상 느리며, 실시간으로 사용하기가 힘들것으로 보이며, 현재 FP32엔진으로 사용
CMD-Gstreamer에 Gst-nvinfer 설정은 가능하지만 metadata 처리를 위한 Callback Function이 없기에 아래와 같이 OSD에 Class를 표시 못하고 Detection만 가능

deepstream-app 기존처럼 동작하지만, PERF의 7 ~8 FPS로 동작되어 느림 (실시간은 힘듦)

3.3 IPlugIn SSD 기능확인 (Tensorflow 기반)
Deepstream SDK에 동일하게 UFFSSD(objectDetector_SSD)를 부분을 Build를 진행하고, Tensorflow에서 Training 된 *.PB파일을 받아 이를 UFF로 변경 후에
이를 상위 objectDetector_SSD를 이용하여 동영상을 확인하자.
- Deepstream SSD 작업준비사항
UFF Model: x86에서 Tensorflow PB파일을 받아 UFF로 변환을 하고 이를 가져와야한다
Label File: TensorRT Sampel에서 가져옴
$ cd ~/deepstream_sdk_on_jetson/sources/objectDetector_SSD

$ ls   //README 참고하고, 두개의 Config가 존재
config_infer_primary_ssd.txt  deepstream_app_config_ssd.txt  nvdsinfer_custom_impl_ssd  README


$ cd nvdsinfer_custom_impl_ssd/
$ make    //  libnvdsinfer_custom_impl_ssd.so 생성확인
$ cd  ..

//$ cat  /usr/src/tensorrt/samples/sampleUffSSD/README
//download ssd_inception_v2_coco_2017_11_17.tar.gz
$ wget  http://download.tensorflow.org/models/object_detection/ssd_inception_v2_coco_2017_11_17.tar.gz

$ tar zxvf ssd_inception_v2_coco_2017_11_17.tar.gz
ssd_inception_v2_coco_2017_11_17/
ssd_inception_v2_coco_2017_11_17/model.ckpt.index
ssd_inception_v2_coco_2017_11_17/model.ckpt.meta
ssd_inception_v2_coco_2017_11_17/frozen_inference_graph.pb
ssd_inception_v2_coco_2017_11_17/model.ckpt.data-00000-of-00001
ssd_inception_v2_coco_2017_11_17/saved_model/
ssd_inception_v2_coco_2017_11_17/saved_model/saved_model.pb
ssd_inception_v2_coco_2017_11_17/saved_model/variables/
ssd_inception_v2_coco_2017_11_17/checkpoint

//$ cp   /usr/src/tensorrt/samples/sampleUffSSD/config.py  .                    (config.py)
//$ convert-to-uff --input-file frozen_inference_graph.pb -O NMS -p config.py   (x86에서 변환)

$ mv frozen_inference_graph.uff sample_ssd_relu6.uff

$ cp /usr/src/tensorrt/data/ssd/ssd_coco_labels.txt .
- SSD CMD GStreamer와 deepstream-app 비교 영상확인
Stream의 metadata처리하여 OSD에 이를 적용하는부분 때문에 두 실행결과가 다르다.
결과적으로, metadata 처리를 위한 callback function들은 작성을 해야겠다.
$ pwd
/home/nvidia/deepstream_sdk_on_jetson/sources/objectDetector_SSD

$ gst-launch-1.0 filesrc location=../../samples/streams/sample_720p.mp4 ! \
        decodebin ! nvinfer config-file-path= config_infer_primary_ssd.txt ! \
        nvvidconv ! nvosd ! nvegltransform ! nveglglessink

$ deepstream-app -c deepstream_app_config_ssd.txt
CMD-Gstreamer 실행 , 이전 Faster RCNN과 속도는 비교가 안되며, 실시간으로 가능
(상위와 동일하게 Callback Function이 동작하지 않으므로, OSD Label 표시가 안됨)

deepstream-app 돌려서 OSD에서 각 Class가 구분되며, 실시간으로 FPS 30으로 동작가능확인

- RTSP (IP Camera 설정으로 변경)
$ pwd
/home/nvidia/deepstream_sdk_on_jetson/sources/objectDetector_SSD

$ cp deepstream_app_config_ssd.txt  deepstream_app_rtsp.txt

$ vi deepstream_app_rtsp.txt

[source0]
...
#uri=file://../../samples/streams/sample_720p.mp4
uri=rtsp://10.0.0.196:554/h264

[sink0]
..
sync=0


[tracker]         //이부분 IOU 변경
..
tracker-algorithm=2

다른 batch-size도 변경해도 됨

$ deepstream-app -c  deepstream_app_rtsp.txt
3.4 TensorRT의 기능 재확인
TensorRT의 기능 확인
- SampleFasterRCNN확인 (Caffe Model 사용)
- SampleUFFSSD 확인 (UFF Format 현재 거의 Tensorflow)
이를 테스트 한지 오래되어 아래와 같이 TensorRT 부분을 재확인
$ ls /usr/src/tensorrt/samples  // TensorRT의 전체 Sample Source 확인
common     Makefile         sampleCharRNN     sampleGoogleNet  sampleINT8API  sampleMNIST     sampleMovieLens  sampleOnnxMNIST  sampleSSD       sampleUffSSD
getDigits  Makefile.config  sampleFasterRCNN  sampleINT8       sampleMLP      sampleMNISTAPI  sampleNMT        samplePlugin     sampleUffMNIST  trtexec

$ ls /usr/src/tensorrt/samples/sampleFasterRCNN  //FasterRCNN Source 및 README 확인
factoryFasterRCNN.h  Makefile  README.txt  sampleFasterRCNN.cpp

$ ls /usr/src/tensorrt/samples/sampleUffSSD  //sampleUffSSD Source 및 README 확인
BatchStreamPPM.h  config.py  Makefile  README.txt  sampleUffSSD.cpp


$ ls /usr/src/tensorrt/bin/    // TensorRT의 Binary 확인
chobj/                    sample_fasterRCNN         sample_int8_api_debug     sample_mnist_api_debug    sample_onnx_mnist         sample_uff_mnist
dchobj/                   sample_fasterRCNN_debug   sample_int8_debug         sample_mnist_debug        sample_onnx_mnist_debug   sample_uff_mnist_debug
download-digits-model.py  sample_googlenet          sample_mlp                sample_movielens          sample_plugin             sample_uff_ssd
giexec                    sample_googlenet_debug    sample_mlp_debug          sample_movielens_debug    sample_plugin_debug       sample_uff_ssd_debug
sample_char_rnn           sample_int8               sample_mnist              sample_nmt                sample_ssd                trtexec
sample_char_rnn_debug     sample_int8_api           sample_mnist_api          sample_nmt_debug          sample_ssd_debug          trtexec_debug

$ ls /usr/src/tensorrt/data/faster-rcnn/
000456.ppm  000542.ppm  001150.ppm  001763.ppm  004545.ppm  faster_rcnn_test_iplugin.prototxt

$ ls /usr/src/tensorrt/data/ssd/
bus.ppm  dog.ppm  ssd_coco_labels.txt
TensorRT-UFF Convert Python API
https://docs.nvidia.com/deeplearning/sdk/tensorrt-api/python_api/uff/uff.html
TensorRT Python and Python API
https://docs.nvidia.com/deeplearning/sdk/tensorrt-api/python_api/index.html
https://docs.nvidia.com/deeplearning/sdk/tensorrt-api/#python
convert-to-uff 상위의 python API로 제공 혹은 tf_to_trt.py 제공하지만, x86기반만 가능
https://devtalk.nvidia.com/default/topic/1025246/jetson-tx2/where-is-convert-to-uff/
https://docs.nvidia.com/deeplearning/sdk/tensorrt-install-guide/index.html
관련소스
https://github.com/NVIDIA-AI-IOT/tf_to_trt_image_classification
Tensorflow 와 TensorRT Chatbot 예제
https://github.com/AastaNV/ChatBot
6/27/2019
TensorRT 5.0 (Jetson AGX Xavier)
1. NVIDIA DEEP LEARNING SOFTWARE
가장 중요한 사이트 같으며, 며칠사이에 못보던 것들이 늘어, 이를 일일히 정리하는 것은 의미가 없을 것 같어 링크만 연결한다. (못보고 지나친건지?)
추후 이 기술들이 어떻게 통합될지도 현재 잘 모르겠으며, 변화 중이라 이 사항들은 개발관련 것만 알아두도록 하자.
https://developer.nvidia.com/deep-learning-software
1.1 TensorRT의 inference 최적화
 ( X축은 처리량(throughput), Y축은 응답시간(Latency) ,상위 숫자는 Batch Size)
GPU 와 CPU를 비교를 해보면, Batch Size가 두배씩 커질때마다 Latency만 비교해 보면 GPU는 크게 차이는 나지는 않지만, CPU는 많이 차이가 난다.
(GPU의 중요성)
최근에 찾은자료로 TensorRT Engine 관련내용으로 비록 오랜된 자료지만, 충분히 볼만한 것 같다.
출처:
https://www.slideshare.net/deview/232-dl-inference-optimization-using-tensor-rt-1-119162975
2. Jetson AGX Xavier 의 TensorRT
Jetson TX2의 TensorRT와 거의 유사하지만, 다른점은 DLA은 HW적 지원과 GPU의 성능이 다르므로, 관련 지원사항을 반드시 확인해야한다.
그리고 더불어 AGX Xavier에서는 TensorRT 이외 Vision Accelerator 가 존재하므로, 이 것이 Visionwork 혹은 OpenCV 기능 지원가능한지 파악을 해야겠다.
OpenVX기능을 Vision Accelerator라고 하는 것 같음
현재 문서로봐서는 VisionWork에서만 지원이 되는 것 같은데, 세부소스를 보고 분석한 다음 좀 파악을 해야할 것 같다.
HW적으로 TensorCore도 지원을 해준다고 한다.
그리고 더불어 TensorRT의 Manual update되고 있으므로, 관련기술들을 이해하기가 쉬워지는 것 같다.
ONNX Model로 TensorRT를 사용한다면, 아래와 같이 동작

세부내용은 아래문서를 참조
출처:
https://devblogs.nvidia.com/speed-up-inference-tensorrt/
2.1 TensorRT Release 정보 및 Version
TensorRT 5.0.3 Release
https://docs.nvidia.com/deeplearning/sdk/tensorrt-release-notes/tensorrt-5.html#rel_5-0-3
TensorRT 5.x.x Release
https://docs.nvidia.com/deeplearning/sdk/tensorrt-release-notes/tensorrt-5.html#tensorrt-5
2.2 TensorRT Install Guide
TensorRT를 사용하기 위해서 설치해야할 부분 (X86전용 Manual이므로 참조만 )
https://docs.nvidia.com/deeplearning/sdk/tensorrt-install-guide/index.html
Jetson TX2에서 설치한 Package 설명 (상위 Manual 기반)
https://ahyuo79.blogspot.com/2019/05/jetpack-42.html
2.3 TensorRT의 주요기능
TensorRT Engine의 구성은 C++로 구현이되었으며, 현재 Python API도 지원이 가능하다고 한다. 하지만 기본이 C++ 이므로 이점을 잊지말아야한다.
TensorRT의 Layers
https://docs.nvidia.com/deeplearning/sdk/tensorrt-developer-guide/index.html#layers
TensorRT의 Key Interface 설명
https://docs.nvidia.com/deeplearning/sdk/tensorrt-developer-guide/index.html#api
https://docs.nvidia.com/deeplearning/sdk/tensorrt-api/c_api/classnvinfer1_1_1_i_network_definition.html
Builder (IBuilder, C++ API)
https://docs.nvidia.com/deeplearning/sdk/tensorrt-api/c_api/classnvinfer1_1_1_i_builder.html
Engine( ICudaEngine, C++ API )
https://docs.nvidia.com/deeplearning/sdk/tensorrt-api/c_api/classnvinfer1_1_1_i_cuda_engine.html
2.4 TensorRT의 C++/Python API
우선 아래의 사이트에서 C++로 TensorRT를 작성하는 예제를 이해를 해보자.
우선 TensorRT Inference Engine을 실행하기 위해서는 IExecutionContext Object필요하며,
IExecutionContext를 만들기 위해서는 상위 ICudaEngine(Engine) 을 생성해야한다고 한다.
IExecutionContext (C++API)
https://docs.nvidia.com/deeplearning/sdk/tensorrt-api/c_api/classnvinfer1_1_1_i_execution_context.html


https://docs.nvidia.com/deeplearning/sdk/tensorrt-developer-guide/index.html#create_network_c
https://docs.nvidia.com/deeplearning/sdk/tensorrt-developer-guide/index.html#create_network_python
 https://docs.nvidia.com/deeplearning/sdk/tensorrt-developer-guide/index.html#import_model_c
https://docs.nvidia.com/deeplearning/sdk/tensorrt-developer-guide/index.html#import_model_python
 https://docs.nvidia.com/deeplearning/sdk/tensorrt-developer-guide/index.html#build_engine_c
https://docs.nvidia.com/deeplearning/sdk/tensorrt-developer-guide/index.html#build_engine_python
 https://docs.nvidia.com/deeplearning/sdk/tensorrt-developer-guide/index.html#serial_model_c
https://docs.nvidia.com/deeplearning/sdk/tensorrt-developer-guide/index.html#serial_model_python
 https://docs.nvidia.com/deeplearning/sdk/tensorrt-developer-guide/index.html#perform_inference_c
https://docs.nvidia.com/deeplearning/sdk/tensorrt-developer-guide/index.html#perform_inference_python
createInferRuntime(gLogger)는 아래의 iRuntime를 생성할 수 있다고 한다.

이는 DeserializeCudaEngine을 실행하면서 실제 실행을 진행한다고 하는데, 상위를 보면 Serialized를 했을 경우인것 만 같다.
(Engine은 Serialize로 File 저장)
https://docs.nvidia.com/deeplearning/sdk/tensorrt-developer-guide/index.html#serial_model_c
https://docs.nvidia.com/deeplearning/sdk/tensorrt-developer-guide/index.html#serial_model_python
iRuntime
https://docs.nvidia.com/deeplearning/sdk/tensorrt-api/c_api/classnvinfer1_1_1_i_runtime.html
TensorRT C++ API
세부내용아래참조
https://docs.nvidia.com/deeplearning/sdk/tensorrt-developer-guide/index.html#c_topics
TensorRT API (C++ API/ Python API)
https://docs.nvidia.com/deeplearning/sdk/tensorrt-api/index.html
3. TensorRT 의 Sample
기존 Jetson TX2와 거의 동일하며, 차이라면, 상위에서 설명한 DLA가 trtexec 에서 HW적으로 지원을 해준다는 것이다.
아래의 소스를 다 검토해보는 시간이 없기에, 이전에 Jetson TX2에서 실행해본 것을 참조하고 넘어가자.
Xavier TensorRT Sample
https://developer.ridgerun.com/wiki/index.php?title=Xavier/Deep_Learning/TensorRT/Building_Examples
TensorRT Sample Guide
https://docs.nvidia.com/deeplearning/sdk/tensorrt-sample-support-guide/index.html
3.1 DIGITS(the Deep Learning GPU Training System)
DIGITS가 아래의 Deep Learning GPU Training System이며, 숫자(DIGITS)하고 혼동하지말자
이 부분은 Training 관련부분이기때문에 이곳에서 생략하고, 추후에 사용할 경우 자세히 읽고 사용방법을 알아보자.
https://docs.nvidia.com/deeplearning/digits/digits-installation/index.html
DIGITS Source ( DIGITS Server 운영)
https://github.com/NVIDIA/DIGITS/releases
NVIDIA GPU Cloud와 사용가능한 것 같으며, 이전에 파악했던것으로 NVIDIA GPU Gloud는 ARM은 미지원으로 Training 위주로 사용되어진것으로 알고 있다.
(추후 GPU Cloud 접속후 지속적으로확인)
그리고 더불어 NVIDIA Docker 역시 ARM은 미지원인것으로 알고 있는데, 추후 확인하자.
https://developer.nvidia.com/digits
https://github.com/NVIDIA/DIGITS/blob/master/docs/ModelStore.md
https://github.com/NVIDIA/DIGITS/tree/master/docs
DIGIST SERVER 관련 Manual
https://docs.nvidia.com/deeplearning/digits/digits-installation/index.html#startingserver
현재 Training System 부분의 Server가 없으므로 무용지물
3.2 TensorRT의 DLA(Deep Learning Accelerator)
이전의 Jetson TX2의 SW적으로 지원하던 gieexec와 trtexec기능이 Xavier에서는 HW적으로 DLA로 지원가능하며,
상위 Sample에서도 README 글을 읽어보면 지원이 가능하다.
TensorRT의 DLA 사용법
https://docs.nvidia.com/deeplearning/sdk/tensorrt-developer-guide/index.html#dla_topic
TensorRT의 DLA 실제 사용예제
https://devtalk.nvidia.com/default/topic/1041768/jetson-agx-xavier/tensorrt-5-docs-and-examples-solved-/
TensorRT의 DLA 가 지원하는 Layers
https://docs.nvidia.com/deeplearning/sdk/tensorrt-developer-guide/index.html#dla_layers
Xavier 관련 한글사이트 발견
https://goodtogreate.tistory.com/entry/TensorRT%EC%9D%B4%EC%9A%A9%ED%95%9C-Xavier-DLA-NVDLA-%EC%8B%A4%ED%96%89
성능설정 부분 Jetson TX2와 거의 동일
https://goodtogreate.tistory.com/entry/Jetson-AGX-Xavier-%EB%8F%99%EC%9E%91-%EB%AA%A8%EB%93%9C-%EB%B3%80%EA%B2%BD-%EB%B0%8F-TensorFlowGPU-%EC%84%A4%EC%B9%98%EC%99%80-%EC%8B%A4%ED%96%89-%EA%B7%B8%EB%A6%AC%EA%B3%A0-%EC%84%B1%EB%8A%A5-%EB%B6%84%EC%84%9D
4. Visionworks sample
Visionworks는 Khronos OpenVX 지원을 하고 있다고 한다. Sample 예제들은 Jetson TX2의 예제들과 거의 비슷하다.
현재 HW적으로, Xavier는 Vision 관련부분이 지원하므로, 성능문제라면, Visionworks를 사용해야할지 모르겠다.
OpenVX
https://www.khronos.org/openvx/
https://developer.ridgerun.com/wiki/index.php?title=Xavier/JetPack_4.1/Components/VisionWorks
가장 중요한 사이트 같으며, 며칠사이에 못보던 것들이 늘어, 이를 일일히 정리하는 것은 의미가 없을 것 같어 링크만 연결한다. (못보고 지나친건지?)
추후 이 기술들이 어떻게 통합될지도 현재 잘 모르겠으며, 변화 중이라 이 사항들은 개발관련 것만 알아두도록 하자.
- Mixed precision in AI frameworks (Automatic Mixed Precision)
- Deep Learning Primitives (cuDNN)
- Input Data Processing (DALI)
- Multi-GPU Communication (NCCL)
- Deep Learning Inference Engine (TensorRT)
- Deep Learning for Video Analytics (DeepStream SDK)
- Optical Flow for Video Inference (Optical Flow SDK)
- High level SDK for tuning domain specific DNNs (Transfer Learning Toolkit)
- AI enabled Annotation for Medical Imaging (AI-Assisted Annotation SDK)
- Deep Learning GPU Training System (DIGITS)
- Linear Algebra (cuBLAS)
- Sparse Matrix Operations (cuSPARSE)
https://developer.nvidia.com/deep-learning-software
1.1 TensorRT의 inference 최적화

GPU 와 CPU를 비교를 해보면, Batch Size가 두배씩 커질때마다 Latency만 비교해 보면 GPU는 크게 차이는 나지는 않지만, CPU는 많이 차이가 난다.
(GPU의 중요성)
최근에 찾은자료로 TensorRT Engine 관련내용으로 비록 오랜된 자료지만, 충분히 볼만한 것 같다.
출처:
https://www.slideshare.net/deview/232-dl-inference-optimization-using-tensor-rt-1-119162975
2. Jetson AGX Xavier 의 TensorRT
Jetson TX2의 TensorRT와 거의 유사하지만, 다른점은 DLA은 HW적 지원과 GPU의 성능이 다르므로, 관련 지원사항을 반드시 확인해야한다.
그리고 더불어 AGX Xavier에서는 TensorRT 이외 Vision Accelerator 가 존재하므로, 이 것이 Visionwork 혹은 OpenCV 기능 지원가능한지 파악을 해야겠다.
OpenVX기능을 Vision Accelerator라고 하는 것 같음
현재 문서로봐서는 VisionWork에서만 지원이 되는 것 같은데, 세부소스를 보고 분석한 다음 좀 파악을 해야할 것 같다.
HW적으로 TensorCore도 지원을 해준다고 한다.
그리고 더불어 TensorRT의 Manual update되고 있으므로, 관련기술들을 이해하기가 쉬워지는 것 같다.
ONNX Model로 TensorRT를 사용한다면, 아래와 같이 동작
- ONNX Model import 하고 Build TensorRT Engine 생성하여, Serialized Engine 생성
- Inference 로 사용될 경우, Deserialize Engine을 진행하고 이를 Inference 수행

세부내용은 아래문서를 참조
출처:
https://devblogs.nvidia.com/speed-up-inference-tensorrt/
2.1 TensorRT Release 정보 및 Version
- TensorRT Version 및 Package 확인
$  dpkg -l | grep TensorRT     // TensorRT의 Version Check
ii  libnvinfer-dev                             5.0.3-1+cuda10.0                             arm64        TensorRT development libraries and headers
ii  libnvinfer-samples                         5.0.3-1+cuda10.0                             all          TensorRT samples and documentation
ii  libnvinfer5                                5.0.3-1+cuda10.0                             arm64        TensorRT runtime libraries
ii  tensorrt                                   5.0.3.2-1+cuda10.0                           arm64        Meta package of TensorRT
TensorRT 5.0.3 Release
https://docs.nvidia.com/deeplearning/sdk/tensorrt-release-notes/tensorrt-5.html#rel_5-0-3
TensorRT 5.x.x Release
https://docs.nvidia.com/deeplearning/sdk/tensorrt-release-notes/tensorrt-5.html#tensorrt-5
2.2 TensorRT Install Guide
TensorRT를 사용하기 위해서 설치해야할 부분 (X86전용 Manual이므로 참조만 )
https://docs.nvidia.com/deeplearning/sdk/tensorrt-install-guide/index.html
Jetson TX2에서 설치한 Package 설명 (상위 Manual 기반)
https://ahyuo79.blogspot.com/2019/05/jetpack-42.html
2.3 TensorRT의 주요기능
TensorRT Engine의 구성은 C++로 구현이되었으며, 현재 Python API도 지원이 가능하다고 한다. 하지만 기본이 C++ 이므로 이점을 잊지말아야한다.
TensorRT의 Layers
https://docs.nvidia.com/deeplearning/sdk/tensorrt-developer-guide/index.html#layers
- TensorRT의 Key Interface
- Network Definition: Network Layer를 직접 추가하고 이를 설정가능한 interface
- Builder: Builder는 Network Definition에서 최적화된 Engine 부터 다른 최적화기능 Interface 제공
- Engine : Inference를 실행할수 있는 Engine 생성하는 Interface
- Caffe Parser : Caffe Model의 Parser 기능
- UFF Parser : UFF Model의 Parser 기능
- ONNX Parser : ONNX Model Parser 기능
TensorRT의 Key Interface 설명
https://docs.nvidia.com/deeplearning/sdk/tensorrt-developer-guide/index.html#api
- Network Definition/Builder/Engine C++ API
https://docs.nvidia.com/deeplearning/sdk/tensorrt-api/c_api/classnvinfer1_1_1_i_network_definition.html
Builder (IBuilder, C++ API)
https://docs.nvidia.com/deeplearning/sdk/tensorrt-api/c_api/classnvinfer1_1_1_i_builder.html
Engine( ICudaEngine, C++ API )
https://docs.nvidia.com/deeplearning/sdk/tensorrt-api/c_api/classnvinfer1_1_1_i_cuda_engine.html
2.4 TensorRT의 C++/Python API
우선 아래의 사이트에서 C++로 TensorRT를 작성하는 예제를 이해를 해보자.
우선 TensorRT Inference Engine을 실행하기 위해서는 IExecutionContext Object필요하며,
IExecutionContext를 만들기 위해서는 상위 ICudaEngine(Engine) 을 생성해야한다고 한다.
IExecutionContext (C++API)
https://docs.nvidia.com/deeplearning/sdk/tensorrt-api/c_api/classnvinfer1_1_1_i_execution_context.html
- Engine 만드는 법은 두가지 방법 중 하나로 생성가능
- User Model에서 직접 Network Definition을 생성, 이 경우 Engine은 옵션으로 Serialize하여 나중에 사용을 위해서 저장
- disk에서 Serizilized Engine을 읽어서 실행하는 경우로 이게 성능이 좋다고하며, Model을 Pasreing하는 단계 이후에 가능
- 1번째방법

https://docs.nvidia.com/deeplearning/sdk/tensorrt-developer-guide/index.html#create_network_c
https://docs.nvidia.com/deeplearning/sdk/tensorrt-developer-guide/index.html#create_network_python
- 2번째방법

https://docs.nvidia.com/deeplearning/sdk/tensorrt-developer-guide/index.html#import_model_python
- Creating the TensorRT Engine

https://docs.nvidia.com/deeplearning/sdk/tensorrt-developer-guide/index.html#build_engine_python
- Creating the TensorRT Engine

https://docs.nvidia.com/deeplearning/sdk/tensorrt-developer-guide/index.html#serial_model_python
- Creating an execution context

https://docs.nvidia.com/deeplearning/sdk/tensorrt-developer-guide/index.html#perform_inference_python
- Creating TensorRT runtime
createInferRuntime(gLogger)는 아래의 iRuntime를 생성할 수 있다고 한다.
이는 DeserializeCudaEngine을 실행하면서 실제 실행을 진행한다고 하는데, 상위를 보면 Serialized를 했을 경우인것 만 같다.
(Engine은 Serialize로 File 저장)
https://docs.nvidia.com/deeplearning/sdk/tensorrt-developer-guide/index.html#serial_model_c
https://docs.nvidia.com/deeplearning/sdk/tensorrt-developer-guide/index.html#serial_model_python
iRuntime
https://docs.nvidia.com/deeplearning/sdk/tensorrt-api/c_api/classnvinfer1_1_1_i_runtime.html
TensorRT C++ API
세부내용아래참조
https://docs.nvidia.com/deeplearning/sdk/tensorrt-developer-guide/index.html#c_topics
TensorRT API (C++ API/ Python API)
https://docs.nvidia.com/deeplearning/sdk/tensorrt-api/index.html
3. TensorRT 의 Sample
기존 Jetson TX2와 거의 동일하며, 차이라면, 상위에서 설명한 DLA가 trtexec 에서 HW적으로 지원을 해준다는 것이다.
아래의 소스를 다 검토해보는 시간이 없기에, 이전에 Jetson TX2에서 실행해본 것을 참조하고 넘어가자.
$ cd /usr/src/tensorrt/samples   // Jetson TX2 의 Sample 과 거의유사함
$ ls
common     Makefile         sampleCharRNN     sampleGoogleNet  sampleINT8API  sampleMNIST     sampleMovieLens  sampleOnnxMNIST  sampleSSD       sampleUffSSD
getDigits  Makefile.config  sampleFasterRCNN  sampleINT8       sampleMLP      sampleMNISTAPI  sampleNMT        samplePlugin     sampleUffMNIST  trtexec

$ sudo make -j4    // Build Sample , Jetson TX2와 동일

$ cd  /usr/src/tensorrt/bin   // 실행해보면, model을 못찾는데,  이것이 tensorrt 내에도 없다. Jetpack.4.1.1 말고 추후 4.2에서 테스트

$ ls
chobj                     sample_fasterRCNN        sample_int8_api_debug  sample_mnist_api_debug  sample_onnx_mnist        sample_uff_mnist
dchobj                    sample_fasterRCNN_debug  sample_int8_debug      sample_mnist_debug      sample_onnx_mnist_debug  sample_uff_mnist_debug
download-digits-model.py  sample_googlenet         sample_mlp             sample_movielens        sample_plugin            sample_uff_ssd
giexec                    sample_googlenet_debug   sample_mlp_debug       sample_movielens_debug  sample_plugin_debug      sample_uff_ssd_debug
sample_char_rnn           sample_int8              sample_mnist           sample_nmt              sample_ssd               trtexec
sample_char_rnn_debug     sample_int8_api          sample_mnist_api       sample_nmt_debug        sample_ssd_debug         trtexec_debug
Xavier TensorRT Sample
https://developer.ridgerun.com/wiki/index.php?title=Xavier/Deep_Learning/TensorRT/Building_Examples
TensorRT Sample Guide
https://docs.nvidia.com/deeplearning/sdk/tensorrt-sample-support-guide/index.html
3.1 DIGITS(the Deep Learning GPU Training System)
DIGITS가 아래의 Deep Learning GPU Training System이며, 숫자(DIGITS)하고 혼동하지말자
이 부분은 Training 관련부분이기때문에 이곳에서 생략하고, 추후에 사용할 경우 자세히 읽고 사용방법을 알아보자.
https://docs.nvidia.com/deeplearning/digits/digits-installation/index.html
DIGITS Source ( DIGITS Server 운영)
https://github.com/NVIDIA/DIGITS/releases
NVIDIA GPU Cloud와 사용가능한 것 같으며, 이전에 파악했던것으로 NVIDIA GPU Gloud는 ARM은 미지원으로 Training 위주로 사용되어진것으로 알고 있다.
(추후 GPU Cloud 접속후 지속적으로확인)
그리고 더불어 NVIDIA Docker 역시 ARM은 미지원인것으로 알고 있는데, 추후 확인하자.
https://developer.nvidia.com/digits
https://github.com/NVIDIA/DIGITS/blob/master/docs/ModelStore.md
https://github.com/NVIDIA/DIGITS/tree/master/docs
DIGIST SERVER 관련 Manual
https://docs.nvidia.com/deeplearning/digits/digits-installation/index.html#startingserver
- Xavier의 DIGITS Model Download 기능
현재 Training System 부분의 Server가 없으므로 무용지물
$ cd /usr/src/tensorrt/bin     // DIGIT 의 기능
$ ls
download-digits-model.py  giexec  trtexec

// Jetson TX2와 동일 상위 참조 , 상위 python 실행을 위해 기본설치
$ sudo apt-get install -y python-pip python-dev  // python2    상위소스가 python 2이므로 이것만설치
$ sudo apt-get install -y python3-pip python3-dev // python3  , 다른 소스는 python3 이므로 설치
$ pip install wget

$ pip install requests

$ python download-digits-model.py
usage: download-digits-model.py [-h] [-n HOSTNAME] [-p PORT] output_file
download-digits-model.py: error: too few arguments

$ python download-digits-model.py -h           // 상위 DIGITS Source는 보면, Server 돌리는 것이며, 이 python은 Local에서 DIGITS Server 주소와 연결하는 기능같다.
usage: download-digits-model.py [-h] [-n HOSTNAME] [-p PORT] output_file

Download a DIGITS model tarball

positional arguments:
  output_file           output file (should end with .zip, .tar, .tar.gz or
                        .tar.bz2)

optional arguments:
  -h, --help            show this help message and exit
  -n HOSTNAME, --hostname HOSTNAME
                        hostname for the DIGITS server [default=127.0.0.1]
  -p PORT, --port PORT  port for the DIGITS server [default=80]
3.2 TensorRT의 DLA(Deep Learning Accelerator)
이전의 Jetson TX2의 SW적으로 지원하던 gieexec와 trtexec기능이 Xavier에서는 HW적으로 DLA로 지원가능하며,
상위 Sample에서도 README 글을 읽어보면 지원이 가능하다.
$ cd /usr/src/tensorrt/bin // DLA 의 기능 $ ls download-digits-model.py giexec trtexec $ ./trtexec // 옵션 과 사용법도 거의 유사 Mandatory params: --deploy=Caffe deploy file OR --uff= UFF file OR --onnx= ONNX Model file Mandatory params for UFF: --uffInput= ,C,H,W Input blob name and its dimensions for UFF parser (can be specified multiple times) --output= Output blob name (can be specified multiple times) Mandatory params for Caffe: --output= Output blob name (can be specified multiple times) Optional params: --input= Input blob name (can be specified multiple times) --model= Caffe model file (default = no model, random weights used) --batch=N Set batch size (default = 1) --device=N Set cuda device to N (default = 0) --iterations=N Run N iterations (default = 10) --avgRuns=N Set avgRuns to N - perf is measured as an average of avgRuns (default=10) --percentile=P For each iteration, report the percentile time at P percentage (0<=P<=100, with 0 representing min, and 100 representing max; default = 99.0%) --workspace=N Set workspace size in megabytes (default = 16) --fp16 Run in fp16 mode (default = false). Permits 16-bit kernels --int8 Run in int8 mode (default = false). Currently no support for ONNX model. --verbose Use verbose logging (default = false) --engine= Engine file to serialize to or deserialize from --calib= Read INT8 calibration cache file. Currently no support for ONNX model. --useDLACore=N Specify a DLA engine for layers that support DLA. Value can range from 0 to n-1, where n is the number of DLA engines on the platform. --allowGPUFallback If --useDLACore flag is present and if a layer can't run on DLA, then run on GPU. --useSpinWait Actively wait for work completion. This option may decrease multi-process synchronization time at the cost of additional CPU usage. (default = false)
TensorRT의 DLA 사용법
https://docs.nvidia.com/deeplearning/sdk/tensorrt-developer-guide/index.html#dla_topic
TensorRT의 DLA 실제 사용예제
https://devtalk.nvidia.com/default/topic/1041768/jetson-agx-xavier/tensorrt-5-docs-and-examples-solved-/
TensorRT의 DLA 가 지원하는 Layers
https://docs.nvidia.com/deeplearning/sdk/tensorrt-developer-guide/index.html#dla_layers
Xavier 관련 한글사이트 발견
https://goodtogreate.tistory.com/entry/TensorRT%EC%9D%B4%EC%9A%A9%ED%95%9C-Xavier-DLA-NVDLA-%EC%8B%A4%ED%96%89
성능설정 부분 Jetson TX2와 거의 동일
https://goodtogreate.tistory.com/entry/Jetson-AGX-Xavier-%EB%8F%99%EC%9E%91-%EB%AA%A8%EB%93%9C-%EB%B3%80%EA%B2%BD-%EB%B0%8F-TensorFlowGPU-%EC%84%A4%EC%B9%98%EC%99%80-%EC%8B%A4%ED%96%89-%EA%B7%B8%EB%A6%AC%EA%B3%A0-%EC%84%B1%EB%8A%A5-%EB%B6%84%EC%84%9D
- TensorRT의 최적화 와 Profile 방법 (NSIGHT 이용 및 TensorRT의 batch등등)
4. Visionworks sample
Visionworks는 Khronos OpenVX 지원을 하고 있다고 한다. Sample 예제들은 Jetson TX2의 예제들과 거의 비슷하다.
현재 HW적으로, Xavier는 Vision 관련부분이 지원하므로, 성능문제라면, Visionworks를 사용해야할지 모르겠다.
OpenVX
https://www.khronos.org/openvx/
$  /usr/share/visionworks/sources/install-samples.sh ~/
$ cd ~/VisionWorks-1.6-Samples/
$ make -j4 # add dbg=1 to make debug build

$ cd  ~/VisionWorks-1.6-Samples/bin/aarch64/linux/release
$ ls
nvx_demo_feature_tracker        nvx_demo_motion_estimation  nvx_sample_nvgstcamera_capture   nvx_sample_opengl_interop
nvx_demo_feature_tracker_nvxcu  nvx_demo_stereo_matching    nvx_sample_object_tracker_nvxcu  nvx_sample_player
nvx_demo_hough_transform        nvx_demo_video_stabilizer   nvx_sample_opencv_npp_interop

$ ./nvx_demo_feature_tracker  // Jetson TX2 와 거의 비슷하다.

$ cd  ~/VisionWorks-SFM-0.90-Samples/bin/aarch64/linux/release
nvx_sample_sfm
https://developer.ridgerun.com/wiki/index.php?title=Xavier/JetPack_4.1/Components/VisionWorks
6/07/2019
TensorRT 5.0 와 DeepStream 기능
1. TensorRT 와 DeepStream
DeepStream는 NVIDIA에서 제공하는 Gstreamer의 확장으로, TensorRT의 기능을 포함 Gstreamer기능이라고 생각하면 되겠다.
Jetson Board 비교
http://connecttech.com/xavier-tx2-comparison/
DeepStream SDK 내용
http://on-demand.gputechconf.com/gtc-cn/2018/pdf/CH8307.pdf
NVIDIA Tesla T4의 기능소개
상위문서를 보면, NVIDIA T4 가 나오는데, NGC(Nvidia GPU Cloud)를 이용하여 동작되는 것으로 보면, ARM용은 아니며, x86용 기반으로 동작되는 기기 인 것 같다.
https://www.nvidia.com/ko-kr/data-center/tesla-t4/
2. DeepStream 의 기능
전체구조를 보면, 쉽게 IP Camera or 보안장비에 연결되어 RTSP로 영상데이터를 받아 이를 Gstream의 중간 기능에,
DeepStream는 NVIDIA에서 제공하는 Gstreamer의 확장으로, TensorRT의 기능을 포함 Gstreamer기능이라고 생각하면 되겠다.
Gstreamer 에 AI Inference 하기 위해서 별도의 Gstreamer Plugin을 추가하여 개발한 것이다.
DeepStream이 완전지원이 된다면, 사용자는 손쉽게 Gsteamer 처럼 파이프라인만 구축하고 실행을 하면 되기 때문에 상당히 매력적인 기능이다.
현재 Jetson TX2의 경우 JetPack 4.2 용 TensorRT 5.0 의 DeepStream은 아직 제공하고 있지 않으며, Jetpack 3.2 TensorRT 4.0 기준용 Version로 제공을 하고 있다.
TensorRT 5.0의 경우 Jetson AGX Xavier 에서만 제공하고 있다.
DeepStream SDK Download
https://developer.nvidia.com/embedded/deepstream-on-jetson-downloads
1.1 Jetson TX2 와 Jetson AGX Xavier 비교
DeepStream 에서 주요기능은 TensorRT의 역할일 것이며, 나머지는 Gstreamer와 거의 동일하기 때문에 크게 신경을 쓰지 않아도 될 것 같다.
가장 주목해서 봐야할 기능은 DLA(Deep Learning Accelerator)의 기능이 될 것이며, 이것은 TensorRT의 기능이다.
현재 Jetson TX2에서도 TensorRT에서 DLA(gieexec or trtexec)는 지원을 하고 있지만, 아래의 비교를 보면,
현재 Jetson TX2의 경우 JetPack 4.2 용 TensorRT 5.0 의 DeepStream은 아직 제공하고 있지 않으며, Jetpack 3.2 TensorRT 4.0 기준용 Version로 제공을 하고 있다.
TensorRT 5.0의 경우 Jetson AGX Xavier 에서만 제공하고 있다.
- Jetson TX2 : DeepStream 1.5 까지 지원 (현재)
- Jetson AGX Xavier : DeepStream 3.0 지원 (최근에 지원)
DeepStream SDK Download
https://developer.nvidia.com/embedded/deepstream-on-jetson-downloads
1.1 Jetson TX2 와 Jetson AGX Xavier 비교
DeepStream 에서 주요기능은 TensorRT의 역할일 것이며, 나머지는 Gstreamer와 거의 동일하기 때문에 크게 신경을 쓰지 않아도 될 것 같다.
가장 주목해서 봐야할 기능은 DLA(Deep Learning Accelerator)의 기능이 될 것이며, 이것은 TensorRT의 기능이다.
현재 Jetson TX2에서도 TensorRT에서 DLA(gieexec or trtexec)는 지원을 하고 있지만, 아래의 비교를 보면,
Jetson TX2는 HW 미지원이고 Jetson AGX Xavier는 HW 지원 이다
Jetson AGX Xavier에서 다음으로 봐야할 기능이 Vison Accelerator 일 것 같으며 는 OpenCV or VisionWork처럼 HW적으로 지원해줄 것 같은데,
Jetson AGX Xavier에서 다음으로 봐야할 기능이 Vison Accelerator 일 것 같으며 는 OpenCV or VisionWork처럼 HW적으로 지원해줄 것 같은데,
아직 써보지 못해서 뭐라고 말은 못하겠다.
기존에 사용되어지는 CUDA기반의 VisionWork/OpenCV가 별도의 엔진이 존재하는 것인지 좀 의문스럽다.
추후 Jetson AGX Xavier를 사용 할 기회가 있다면 사용 해본 후에 관련내용을 다시 정리해보자.
두개의 GPU기능을 보면 차이가 많이나며, Tensor 처리부분도 역시 차이가 많이 난다.
기존에 사용되어지는 CUDA기반의 VisionWork/OpenCV가 별도의 엔진이 존재하는 것인지 좀 의문스럽다.
추후 Jetson AGX Xavier를 사용 할 기회가 있다면 사용 해본 후에 관련내용을 다시 정리해보자.
두개의 GPU기능을 보면 차이가 많이나며, Tensor 처리부분도 역시 차이가 많이 난다.
- Jetson TX2 와 Jetson AGX Xavier 비교
- GPU 성능: 아키텍쳐 변경 및 Clock 과 TensorCores ( AI Interence 할 경우)
- DL Accelerator: AI Interence 할 경우, TensorRT
- Vision Accelerator: 비디오 입력시 , 영상처리
| Feature | Jetson™ TX2 | Jetson™ AGX Xavier |
|---|---|---|
| GPU | 256 Core Pascal @ 1.3GHz | 512 Core Volta @ 1.37GHz 64 Tensor Cores |
| DL Accelerator | - | (2x) NVDLA |
| Vision Accelerator | - | (2x) 7-way VLIW Processor |
| CPU | 6 core Denver and A57 @ 2GHz (2x) 2MB L2 | 8 core Carmel ARM CPU @ 2.26GHz (4x) 2MB L2 + 4MB L3 |
| Memory | 8GB 128 bit LPDDR4 58.4 GB/s | 16GB 256-bit LPDDR4x @ 2133MHz 137 GB/s |
| Storage | 32GB eMMC | 32GB eMMC |
| Video Encode | (2x) 4K @30 HEVC | (4x) 4Kp60 / (8x) 4Kp30 HEVC |
| Video Decode | (2x) 4K @30 12 bit support | (2x) 8Kp30 / (6x) 4Kp60 12 bit support |
| Camera | 12 lanes MIPI CSI-2 D-PHY 1.2 30Gbps | 16 lanes MIPI CSI-2 | 8 lanes SLVS-EC D-PHY 40Gbps / C-PHY 109Gbps |
| PCI Express | 5 lanes PCIe Gen 2 1x4 + 1x1 | 2x1 + 1x4 | 16 lanes PCIe Gen 4 1x8 + 1x4 + 1x2 + 2x1 |
| Mechanical | 50mm x 87mm 400 pin connector | 100mm x 87mm 699 pin connector |
| Power | 7.5W / 15W | 10W / 15W / 30W |
Jetson Board 비교
http://connecttech.com/xavier-tx2-comparison/
DeepStream SDK 내용
http://on-demand.gputechconf.com/gtc-cn/2018/pdf/CH8307.pdf
NVIDIA Tesla T4의 기능소개
상위문서를 보면, NVIDIA T4 가 나오는데, NGC(Nvidia GPU Cloud)를 이용하여 동작되는 것으로 보면, ARM용은 아니며, x86용 기반으로 동작되는 기기 인 것 같다.
https://www.nvidia.com/ko-kr/data-center/tesla-t4/
2. DeepStream 의 기능
전체구조를 보면, 쉽게 IP Camera or 보안장비에 연결되어 RTSP로 영상데이터를 받아 이를 Gstream의 중간 기능에,
TensorRT(Inference Engine)를 추가하여 영상 분석과 Detection 및 Tracking 기능을 주로 추가하여 합성되는 기능이다.

DeepStream SW의 구조를 봐도 상위 설명과 크게 다르지 않으며, 아래의 구조를 보면 쉽게 이해간다.
주요기능이 TRT(TensorRT)를 어떻게 Gstream PiPe에 효율적으로 넣을 것인가가 핵심기능이 될 것 같다.
개인적으로 문제가 될 부분을 미리 예상해보자면

NVIDIA Deep Stream SDK
https://developer.nvidia.com/deepstream-sdk
https://devblogs.nvidia.com/intelligent-video-analytics-deepstream-sdk-3-0/
https://devblogs.nvidia.com/accelerate-video-analytics-deepstream-2/?ncid=so-int-dmsk20ntllh-43648

DeepStream SW의 구조를 봐도 상위 설명과 크게 다르지 않으며, 아래의 구조를 보면 쉽게 이해간다.
주요기능이 TRT(TensorRT)를 어떻게 Gstream PiPe에 효율적으로 넣을 것인가가 핵심기능이 될 것 같다.
개인적으로 문제가 될 부분을 미리 예상해보자면
- Toltal Latency 문제 : 파이프라인이 길어져서 발생되는 총 Latency 문제
- Gstream 객체간의 Latency : 즉 Pipe Line에서도 각 객체의 Latency가 다를 것이며, 이에관련된 Buffer 처리문제
- TensorRT 적용부분: Gstream에서 이 부분에서 Buffer문제와 빠른 동작이 요구될터인데, HW적으로 어떻게 지원될지가 궁금하다.

NVIDIA Deep Stream SDK
https://developer.nvidia.com/deepstream-sdk
- NVIDIA Tesla T4 기반의 DeepStream SDK 3.0
https://devblogs.nvidia.com/intelligent-video-analytics-deepstream-sdk-3-0/
- DeepStream SDK 2.0
https://devblogs.nvidia.com/accelerate-video-analytics-deepstream-2/?ncid=so-int-dmsk20ntllh-43648
- DeepStream 기반의 Github
피드 구독하기:
글
(
Atom
)