12/30/2014

GNU binutils 관련 정리

Linux 에서 App을 사용하다 보면 Debug이 필요할 때 있다.
이때 GCC에서 기본적으로 제공하는 Binutils 이다.

  • GNU Binutils
binutil 은 Cross Compiler를 직접 만들어 보신분들은 다 알거라고 생각든다. 
보통 Cross Compiler를 직접 GCC 기반으로 빌드해서 만드다고 하면, 가장먼저해야 할게 Binutil 빌드 작업이다.  
예전에는 GCC에 포함이 안되어진 것인데, 요즘은 직접 Cross Compiler를 빌드해서 만들어 본적이 없으니, 확인을 못하겠다. 
아래링크를 보니, 요즘 gprof도 같이 들어가는 것 같다. 
  https://en.wikipedia.org/wiki/GNU_Binutils


나의 경우는 주로 사용되는 것은 debug 확인용을 위해서 주로 사용되는 것이 readelf 인 것 같다.
  1. 사용되어지는 동적 Library 사용여부 확인 
  2. 심볼Table 확인  
  3. 이외 

  • readelf 기본 활용
아래와 같이 일반 symbol table을 분석하는 것이 편하며, dynmic symbol은 동적으로 연결되어 동작한다.
$ readelf -s ./bin/ti816x/bin/dvr_rdk_demo_mcfw_api.out   //쉽게 검색

$ readelf -s ./bin/ti816x/bin/dvr_rdk_demo_mcfw_api.out | grep  FILE

$ readelf -Ws ./bin/ti816x/bin/dvr_rdk_demo_mcfw_api.out | grep  FUNC   //Type 별로 검색 (길이제한해제)

$ readelf -Ws ./bin/ti816x/bin/dvr_rdk_demo_mcfw_api.out | grep  OBJECT //Type 별로 검색

$ readelf -S /usr/bin/ls   //각 Section 확인 (.got/.data/.text/...) 

$ readelf -l /usr/bin/ls   //각 Section 과 Segment Mapping 된것 확인(MMU에서 사용하기위해) 

$ readelf -x /usr/bin/ls   //각 Section Binary Dump  

  • ldd 기본활용 및 Linker 확장 
$ readelf -d /usr/bin/ls   | grep xxx  // ELF에서 LinkingLoader가 연결할 Shared Library 확인 

$ ldd ./bin/ls   | grep xxx  // ELF 동적연결된 so 파일 확인 및 PATH 확인 

/* 
결론적으로 readelf로 확인하는게 편하지만, ldd로 왜 더 나오는지는 완벽히는 이해가 되지 않지만, 
readelf -d 는 app이 필요한 것을 보여준다고 한다.
ldd 의 경우는 linkingloader가 필요한 것을 보여준다고 한다. 
문제가 생기면, LD_LIBRARY_PATH export로 확장하자 
*/

$ echo $LD_LIBRARY_PATH  // 만약 문제있다면, export로 확장

ldd 와 readelf 관련사항 
나와 같은 삽질을 해서 여기다 링크로 추가 
  

GCC Color 출력 (GCC 4.9이후 버전)
  https://xaizek.github.io/2015-10-25/enable-colorization-of-gcc-output/

  • readelf -h 기본정보확인 
http://forum.falinux.com/zbxe/index.php?document_srl=781536&mid=lecture_tip
$ readelf
Usage: readelf  elf-file(s)
 Display information about the contents of ELF format files
 Options are:
  -a --all               Equivalent to: -h -l -S -s -r -d -V -A -I    //모르면, -a 전체확인 
  -h --file-header       Display the ELF file header
  -l --program-headers   Display the program headers
     --segments          An alias for --program-headers
  -S --section-headers   Display the sections' header
     --sections          An alias for --section-headers
  -g --section-groups    Display the section groups
  -t --section-details   Display the section details
  -e --headers           Equivalent to: -h -l -S
  -s --syms              Display the symbol table      //symbols 전체확인 
     --symbols           An alias for --syms
  --dyn-syms             Display the dynamic symbol table   //다른 so 파일에 있음  
  -n --notes             Display the core notes (if present)
  -r --relocs            Display the relocations (if present)
  -u --unwind            Display the unwind info (if present)
  -d --dynamic           Display the dynamic section (if present)
  -V --version-info      Display the version sections (if present)
  -A --arch-specific     Display architecture specific information (if any)
  -c --archive-index     Display the symbol/file index in an archive
  -D --use-dynamic       Use the dynamic section info when displaying symbols
  -x --hex-dump=
                         Dump the contents of section name as bytes
  -p --string-dump=
                         Dump the contents of section name as strings
  -R --relocated-dump=
                         Dump the contents of section name as relocated bytes
  -z --decompress        Decompress section before dumping it
  -w[lLiaprmfFsoRtUuTgAckK] or
  --debug-dump[=rawline,=decodedline,=info,=abbrev,=pubnames,=aranges,=macro,=frames, //Debug 정보인, DWARF 확인가능 
               =frames-interp,=str,=loc,=Ranges,=pubtypes,
               =gdb_index,=trace_info,=trace_abbrev,=trace_aranges,
               =addr,=cu_index,=links,=follow-links]
                         Display the contents of DWARF debug sections
  --dwarf-depth=N        Do not display DIEs at depth N or greater
  --dwarf-start=N        Display DIEs starting with N, at the same depth
                         or deeper
  --ctf=                 Display CTF info from section 
  --ctf-parent=
                         Use section  as the CTF parent

  --ctf-symbols=
                         Use section  as the CTF external symtab

  --ctf-strings=
                         Use section  as the CTF external strtab

  -I --histogram         Display histogram of bucket list lengths
  -W --wide              Allow output width to exceed 80 characters     //symbols 길이 
  @file                Read options from file
  -H --help              Display this information
  -v --version           Display the version number of readelf


  • readelf 기본메뉴얼 
http://linuxcommand.org/man_pages/readelf1.html


  • ELF format 구조 
일반적으로 a.out format 과 coff format 는 동적링킹이 안되어져서 거의 사용이 안되어진다.
Linux의 경우, ELF의 경우에만 가능하며, 더불어 Debuging 정보인 DWARF도 포함가능
다들 알거라고 생각해서 아래에 간단히 링크로 연결  
  https://ko.wikipedia.org/wiki/ELF_%ED%8C%8C%EC%9D%BC_%ED%98%95%EC%8B%9D
  https://en.wikipedia.org/wiki/Executable_and_Linkable_Format


  • 이외 objdump 이용 
$ objdump -d   filename   // --disassemble  되면서 각 쉽게 Entry Point 확인가능하며 Debug시 보통 같이 나오는 것을 확인가능           

$ objdump -s /bin/ls    // binary dump 로 실제 Data 확인

  https://m.blog.naver.com/PostView.nhn?blogId=s2kiess&logNo=220066239893&proxyReferer=https%3A%2F%2Fwww.google.com%2F
  https://talkingaboutme.tistory.com/791
  https://talkingaboutme.tistory.com/795?category=478749

12/16/2014

Linux sys file system Simple 예제 (커널테스트용으로 작성)

1. Kernel 내부의 sys filesystem 로 Debug  

Kernel에서 내가 원하는 부분정보를 얻고,  설정을 변경하기 위해서 테스트용 sys filesystem을 추가구현해보도록 한다.

  • Kernel 의 sys file system module 의 예제 
링크된 sys file system module의 예제를 참고하여 기본구현
sysfs_create_group를 unregister 하기 위해서 sysfs_remove_group 써야한다고 하는데 이부분은 미확인
  http://www.linuxquestions.org/questions/linux-embedded-and-single-board-computer-78/sysfs-class-registration-942098/


상위소스와 같이 각각의 show_xx 함수와 store_xx 함수를 정의하여 attribute를 구성하여 추가한다.

  • device_attribute 로 sys file system 확장 (SDCard)
/sys/block/sdx/device/scsi_disk/xxx/cache_type
/sys/block/sdx/device/scsi_disk/xxx/FUA

/*
 *  /sys/device  이외에도 다양하게 제공 bus_attribute
 *
 *  sys filesystem의 portstate 추가 
 *      read  function : xx_show_xx   이미 이함수들이 추가되어있음 
 *      write function : xx_store_xx  이미 이함수들이 추가되어있음 
 */

static struct device_attribute sd_disk_attrs[] = {
 __ATTR(cache_type, S_IRUGO|S_IWUSR, sd_show_cache_type, sd_store_cache_type),
 __ATTR(FUA, S_IRUGO, sd_show_fua, NULL),
 __ATTR(allow_restart, S_IRUGO|S_IWUSR, sd_show_allow_restart, sd_store_allow_restart),
 __ATTR(manage_start_stop, S_IRUGO|S_IWUSR, sd_show_manage_start_stop, sd_store_manage_start_stop),
 __ATTR(protection_type, S_IRUGO, sd_show_protection_type, NULL),
 __ATTR(protection_mode, S_IRUGO, sd_show_protection_mode, NULL),
 __ATTR(app_tag_own, S_IRUGO, sd_show_app_tag_own, NULL),
 __ATTR(thin_provisioning, S_IRUGO, sd_show_thin_provisioning, NULL),
 __ATTR_NULL,

};

/*
 *  상위구현 된 부분에 본인이 추가할 부분 추가  
 *  sd_show_cache_type  sd_store_cache_type
 *   
 */
.........
.........

static struct class sd_disk_class = {
 .name  = "scsi_disk",
 .owner  = THIS_MODULE,
 .dev_release = scsi_disk_release,
 .dev_attrs = sd_disk_attrs,
};


MMC_DEV_ATTR 와  DEVICE_ATTR 로 변경되어 사용됨
  https://elixir.bootlin.com/linux/v4.10.17/source/drivers/mmc
  https://elixir.bootlin.com/linux/v4.10.17/source/drivers/mmc/core/sd.c


  • class_attribute를 이용하여 sys filesytem 확장 
/sys/class/rtl8370m/portstate 추가

/*
 *  /sys/class/rtl8370m/portstate
 *
 *  sys filesystem의 portstate 추가 
 *      read  function : portstate_show
 *      write function : portstate_store
 */
static struct class_attribute class_attr[] = {
 __ATTR(portstate, S_IWUSR | S_IRUGO, portstate_show, portstate_store),
 __ATTR_NULL
 };

/*
 * 별도로 본인이 보고 싶고 설정하고 싶은 두 함수를 설정
 *
 */

static ssize_t portstate_show(struct class *cls, char *buf)
{
   char *x[] = {"Enabled", "Disabled"}; 
   printk("portstate_show\n");
   return sprintf(buf, "%s\n", x[0]);
}

static ssize_t portstate_store(struct class *cls, const char *buf, size_t count)
{
   printk("portstate_store \n");
   return 1;
}

.......

/*  /sys/class/rtl8370m    */

static struct class rtl8370m_drv = {
 .name = "rtl8370m",    
 .owner = THIS_MODULE,
 .class_attrs =(struct class_attribute *) &class_attr,
};


  • sys file 을 이용한 GPIO 
  https://www.kernel.org/doc/Documentation/gpio/sysfs.txt
  http://infoarts.tistory.com/21
  https://www.kernel.org/doc/Documentation/i2c/dev-interface


  • 기본 CHARTER DRIVER 예제들
  http://parkjunehyun.tistory.com/m/post/248
  http://www.opensourceforu.com/2011/08/io-control-in-linux/


  • Udev Rule 관련설정
  https://kernel.googlesource.com/pub/scm/linux/hotplug/udev/+/1ed38f41749dde482e164e692255b60c38b5d876/etc/udev/rules.d/60-persistent-storage.rules
  http://www.troot.co.kr/tc/1958


12/04/2014

VLAN 관련내용

1. VLAN이란

VLAN( Virtual LAN )이란?
네트웍 노드들의 물리적인 위치와는 상관없이 다수의 노드들을 브로드케스트 도메인으로 세그먼트하는 방법으로 그룹을 구성하는 것을 의미한다.

(브로드케스트 도메인을 VLAN 도메인으로 그룹핑하여, 원하는 VLAN에게만 브로드케스트 가능)
이로서 네트웍상의 자원과 사용자들을 여러 작업그룹으로 분리하여, 세그먼트간의 트래픽을 현저하게 줄일수 있다.
VLAN은 네트웍 자원사용을 오직 인증된 사용자만이 이용할수 있도록 함으로써 네트웍 보안사항을 향상시킨다.

결국. VLAN은 네트웍 자원 엑세스를 제한함으로써 보안을 향상시키고, 브로트캐스트 도메인의 크기를 줄여서 브로드캐스트 트래픽량을 줄이는 효과가 발생하고
결과적으로는 전체 네트웍 성능을 보다 향상시키게되는 것이다.


1.1 VLAN 구성

VLAN을 구성하는 방법은 여러가지가 있다. 스위치의 포트를 기준, 디바이스들의 MAC주소 기준 또는 사용자가 정의한 IP주소 그외 프로토콜, 응용프로그램별로 VLAN을 구성할 수 있다


ref.
http://kin.naver.com/qna/detail.nhn?d1id=1&dirId=108&docId=65196845&qb=dmxhbg==&enc=utf8&section=kin&rank=1&search_sort=0&spq=0&pid=S4qrGsoRR1GssaUrkv0sssssssV-125897&sid=VIqr4AoUU14AAFXrRN0


1.2  VLAN의 기본개념 및 Trunk, VTP.

http://4network.tistory.com/entry/vlan
http://itstudent.tistory.com/11
http://onecellboy.tistory.com/278


1.3  STP 필요성

Switch가 두개가 연결이 될 경우, Broadcast가 발생할 경우, Looping이 이 발생하고, 이를 Broadcast Storm이라고 부릅니다.

이 Looping문제를 해결하기위해서 Connection 구조를  Loop가 되지 않도록 Tree 구조로
변경을 합니다. ( Tree 는 확장트리 )

http://ko.wikipedia.org/wiki/%EC%8B%A0%EC%9E%A5_%ED%8A%B8%EB%A6%AC_%ED%94%84%EB%A1%9C%ED%86%A0%EC%BD%9C 
http://4network.tistory.com/entry/Spanning-Tree-Protocol%EC%9D%80-%EC%99%9C-%ED%95%84%EC%9A%94%ED%95%9C%EA%B0%80
http://4network.tistory.com/entry/STP%EB%8A%94-%EA%B8%B0%EC%A4%80%EC%A0%90%EC%9D%B4-%EC%9E%88%EC%96%B4%EC%95%BC-%ED%95%9C%EB%8B%A4


기본용어설명 VLAN

https://www.urz.uni-heidelberg.de/Netzdienste/docext/3com/superstack/3_0/3500/3i3afmTOC.html


VID와 trunk 개념 Image

trunk는 switch간에 연결을 위해서 필요.

http://imagesearch.naver.com/search.naver?sm=ext&viewloc=0&where=idetail&rev=31&query=vlan&ie=utf8&aq=0&spq=0&nx_search_query=vlan&nx_and_query=&nx_sub_query=&nx_search_hlquery=&nx_search_fasquery=&datetype=0&startdate=0&enddate=0&start=1&img_id=blog32465698%7C75%7C40108727490_8


- EFID, Enhanced FID,  Priority
- VINX VSEL


RTL8370M and DM8167

pnx8493
https://code.google.com/p/rt-n56u/source/browse/uboot/rt-n56u/drivers/rtl8367.c

11/30/2014

Linux USB Host URB 분석

1. USB Host에서 URB Monitor

USB URB Debugging하기 위해서는 Host 에서 URB를 Capture 동작이 되며, 반드시 HCD와 함께 같이 동작해야한다. 


1.1 USB Kernel Message 및 Device Descriptor 분석 

  • Kernel Message 확인  
USB Request Blocks (URBs) 보다는 USB Descriptor 를 분석하고 관련 USB Driver의 debug message들을 분석하여 기본동작을 확인하자 

$ cat /proc/kmsg
$ dmeg 

  • USB Device Descriptor 분석 과 Kernel Message 분석법  
우선적으로 USB Hots에서 각 Device 의 Descriptor를 우선적으로 분석해야한다.
  https://ahyuo79.blogspot.com/2017/10/linux-usb-1.html


1.2 USB Host 의 usbmon 동작구조 이해  

아래의 TI문서를 읽어보면 아래와 같이 usbmon이라는 HCD와 연결되어 동작되어 debugging할수 있게 되어있다.


USB Host에서 Kernel 의 usbmon  세부사용법
  http://elinux.org/images/1/17/USB_Debugging_and_Profiling_Techniques.pdf
  https://drive.google.com/open?id=0B_ehveuLi8MVZ3lHYU11QVViUEk


  • HCD 와 usbmon 같이 동작되는 구조 
USB Host Mode에서 usbmon 과 동작할 경우 
  1. Binary File은 /dev/usbmonx 로 생성되어 확인가능
  2. Text 정보는 /sys/kernel/debug 로 확인 가능 (Kernel Config에서 별도 설정)

  • URB Binary 분석방법-A (좌측) 
/dev/usbmonx를 tcpdump를 이용하여 dump를 하고, 이를  wireshark로 분석하는 것이다.


  • URB Text 분석방법-B (우측)
/sys/kernel/debug/usb/usbmon/Xu를 이용하여 vusb-anlayzer라는 linux에서 돌아가는 프로그램을 이용하는 것이다.


1.3 Kernel 설정 변경 

  • Kernel Config 설정 
# usbmon 기능 과 Kernel Debug 기능 on 
....
CONFIG_USB_MON=m
...
CONFIG_DEBUG_FS=y
...

  • USB Host의 EHCI의 IRQ 에서 URQ 전송 
ehci_irq () 주요 파일 urq로 core로 DMA로 전송 status 로 HW 정보들을 알수 있다.
#define  STS_ASS  (1<<15 ...="" access="" advance="" also="" any="" are="" as="" async="" bits="" change="" completion="" define="" detect="" error="" errors="" flags="" frame="" interrupted="" intr_enable="" list="" normal="" not="" on="" over="" overflow="" pci="" periodic="" port="" pre="" reason="" reclamation="" reserved="" rolled="" running="" schedule="" short="" some="" status="" sts_="" sts_err="" sts_fatal="" sts_flr="" sts_halt="" sts_iaa="" sts_int="" sts_pcd="" sts_pss="" sts_recl="" such="" these="">


2. Linux에서 usbmon 기반으로 wireshark 분석 

Window와 Linux의 각 Driver를 보면 아래와 같다.
  • Window : USBPcap  ( Wireshark에서 기본제공)
  • Linux     : usbmon (/dev/usbmonx , Kernel에서 제공해야함)

Linux에서 USB의 기본적인 Descriptor들은 아래의 명령으로 쉽게 확인가능

$ cat /sys/kernel/debug/usb/devices  
or 
$ lsusb 

하지만, URB를 모니터를 하기위해서는 Linux Kernel에서 CONFIG_USB_MON 설정필요하며,  Linux Kernel에서 설정이되면 /dev/usbmonX 생성이 되며
이를 기반으로 USB의 URB 모니터 즉 Capture가 가능하다

Kernel Config usbmon 
  https://www.kernel.org/doc/Documentation/usb/usbmon.txt


  • USB URB Capture 방법 
$ mount -t debugfs none_debugs /sys/kernel/debug  // mount가 기본으로 거의되어있음
$ modprobe usbmon  // module로 했을 경우 

$ ls /sys/kernel/debug/usb/usbmon
 0s  0u  1s  1t  1u  2s  2t  2u  3s  3t  3u  4s  4t  4u

$ cat /sys/kernel/debug/usb/usbmon/0u > /tmp/1.mon.out // 모든 USB Bus Capture

$ cat /sys/kernel/debug/usb/usbmon/3u > /tmp/1.mon.out  // URB를 Capture 추정 추후 Wireshark와 연동을 해봐야 알것같음 

USB Host 에서 usbmon 이용하여 tcpdump로 capture하는법 
  https://ahyuo79.blogspot.com/2014/11/usb-host-gadget-debug-2.html

Linux에서 USB Capture를 위한 Setup 방법
  https://wiki.wireshark.org/CaptureSetup/USB

Linux에서 Bluetooth Capture를 위한 Setup 방법
  https://wiki.wireshark.org/CaptureSetup/Bluetooth

  • HOST OS 별로 USB 지원을 확인가능 
아직 USB의 RNDIS를 이용하여 사용하는 기능은 확인을 해보지 못했다.
글을 읽다보면, 기본 OS를 Linux로 사용하고, Virtual로 Window를 설치한 다음 이용하는 기능같다.

  https://wiki.wireshark.org/CaptureSetup/NetworkMedia
  http://desowin.org/usbpcap/capture_limitations.html

11/26/2014

USB Driver의 기본구조 및 Linux 관련 Driver

1. USB의 Pin과 종류 

  • USB의 Pin Type 
USB Type A 와 B로 나누어지며,  기본 USB 1.0은 4 Pin이 기본이며, 이 후 OTG가 지원이 되면서,
Micro USB A/B 부터 5Pin으로 변경되어 ID Pin을 필요


  • USB의 기본 4 Pinout
Type-A and -B pinout
PinNameWire color[a]Description
1VBUSRed orOrange+5 V
2D−White orGoldData−
3D+GreenData+
4GNDBlack orBlueGround


  • USB 의 5 Pinout (OTG이후)
Mini/Micro-A and -B pinout
PinNameWire color[a]Description
1VBUSRed+5 V
2D−WhiteData−
3D+GreenData+
4IDNo wireOn-The-Go ID distinguishes cable ends:
  • "A" plug (host): connected to GND
  • "B" plug (device): not connected
5GNDBlackSignal ground


USB는 일반 USB Pin을 제외하고 5 Pin이며, 이때 새로 생긴 것이 OTG (On-The-Go)  Pin이다.
이는 HOST가 될수 있으며, Device가 될수도 있기때문에 이 Pin은 중요한다.


  • 자세한 내용은 Wiki 참조
  https://en.wikipedia.org/wiki/USB
  http://processors.wiki.ti.com/index.php/DM81xx_AM38XX_USB_User_Guide


2. USB Host Driver의 구조 

USB는 아래와 같이 USB Version에 따라 지원되는 기능이 달라지며 자세한 내용은 아래의 링크를 참조하자.

  • USB Host Controller 기본구조 
  1. OHCI (Open Host Controller Interface) 
    1. 처음 만들어진 USB 1.0 / 1.1 표준 USB Host Controller 이며, fireworks device를 위해 사용되어진다고하는데, 최근 Linux Kernel에 존재함 
  2. UHCI(Universal Host Controller Interface)
    1.  USB 1.x 부터 인텔에 의해 만들어져서 로얄티가 있다고 하며, 아직도 Linux에 소스가 존재함

OHCI 와 UHCI 관련내용

  • USB Host Controller 확장구조 ( USB2.0 / USB3.0)
  1. EHCI (Enhanced Host Controller Interface)
    1. USB 2.0 지원을 위한 표준이며 보통 Linux Kernel에 존재한다.  
  2. xHCI (Extensible Host Controller Interface)
    1. USB 3.0 지원을 한다고 하며, OHCI/UHCI/EHCI를 대체를 한다고 아직 사용을 못해봤다. 

Chip Maker마다 다르겠지만, 기본 자사 USB Host Controller Driver(OHCI)EHCI를 조합으로 사용을 하는 것으로 보이며, 
각 Chip Maker의 USB Host Controller가 OHCI or UCHI를 선택해서 사용하는 것 같은데, 로얄티 문제로 주로 OHCI기반으로 구성하는 것 같다.  


USB Device 의 Class Descriptor 와 USB Class Driver 와 연결
  https://ahyuo79.blogspot.com/2014/11/class-descriptor.html


  • USB CDC for LTE 관련 Driver 
  https://wiki.openwrt.org/doc/recipes/3gdongle
  http://tpholic.com/xe/?mid=ibmqna&page=2&document_srl=6593791
  https://www.linuxquestions.org/questions/linux-newbie-8/how-do-i-define-ttyusb0-423976/
  https://www.olimex.com/forum/index.php?topic=558.0
  http://www.makelinux.net/ldd3/chp-13-sect-4
USB File System 의 이용
  http://www.hep.by/gnu/kernel/usb/usbfs.html
  https://stackoverflow.com/questions/25793399/mount-usbfs-on-linux-3-10-kernel


2.1 USB Host Module 동작 

아래와 같이 USB는 Interface Descriptor와 Probe가 가장 중요하므로, 아래와 같이 각 기능을 확인을 해보자.

요즘은 USB Driver를 모듈 만들어 modprobe를 이용하여 vendor, product 정보를 넣고 올린다. (udevd 이용)

USB의 Host의 USB Device Module기본동작은 다음과 같다
  1. Device/Interface Descriptor를 분석하여 맞게 Driver Loading 
  2. Interface driver는 보통 Probe에서 다른 Interface driver로 연결
  3. Endpoint Descriptor를 분석하여 URB를 Host와 Device가 통신할 것인지 분석. 
최종의 Driver는 Endpoint Descriptor 기준으로 URB
URB는 USB Request Block으로 Endpoint Descriptor의 기초로 만들어지면, 이 DATA 구조로 Host와 Device는 통신을 하게된다.


  • Probe의 역할
Probe는 가장 중요한 역할을 하며, 각각의 Interface를 분석하며, 다른 Driver를 호출한다.
물론 최종 Interface Driver가 존재하며, 이곳에서 Endpoint Descriptor와 URB관련 부분이 존재한다.


2.2 USB Host의 Core File의 기능 

  • USB HCD Core Files
Linux Version 마다 다르겠지만, drivers/usb/core 위치한 driver들이 각 명령을 Control 하고 제어를 담당한다 
  1. USB의 기본적인 Control ( GET_DESCRIPTOR ...)
  2. USB의 URB 전송 및 제어 
  3. Hub Class 
  4. 다른 USB Driver Probe 제어 (Device/Interface Descriptor 기준)
  http://elixir.free-electrons.com/linux/v2.6.28.1/source/drivers/usb/core/hcd.c#L428
  http://elixir.free-electrons.com/linux/v2.6.28/source/drivers/usb/core/usb.c#L606


  • USB Device Driver 등록 (Module의 관리)
  1. usb_register_driver는 모든 USB Driver가 등록하고 이를 관리. (Linked List)
  2. usb_register_driver 내에는 usb_probe_interface 가지고 있으며,module내의 probe별도 
  3. usb_probe_interface는 USB match 관련부분 등록된 USB Driver를 호출 전 관리 
  http://elixir.free-electrons.com/linux/v2.6.28/source/drivers/usb/core/driver.c


  • 간혹 open() 에서 사용되는 usb_find_interface로 Interface driver를 찾음
  http://elixir.free-electrons.com/linux/v2.6.28/source/drivers/usb/core/usb.c#L163


2.3 USB Host Module 기본구조

module_init/module_exit 할때 각각의 module을 usb_register_driver 등록 및 해제한다.


  • 기본 USB Module 
  http://elixir.free-electrons.com/linux/v3.13-rc1/source/drivers/usb/usb-skeleton.c


2.4 USB Host 연결된 Module Example 

아래의 Driver를 Probe를 간단히 분석해보면, probe에서 다시 usbnet_probe를 호출하여 결국 usbnet_probe를 사용하여

Endpoint가 결정되고, URB 부분이 완성된다.

  http://elixir.free-electrons.com/linux/v3.13-rc1/source/drivers/net/usb/qmi_wwan.c#L794
  http://elixir.free-electrons.com/linux/v3.13-rc1/source/drivers/net/usb/usbnet.c#L1543

  • 관련 Linux Driver 문서 
  http://www.makelinux.net/ldd3/chp-13-sect-4


USB_DEVICE (Venid, ProductID)
struct usb_device_id
usb_register(&pen_driver);
device_register (&port->dev);


  • Debug는 USB Host에서 Probe시 Interface의 정보기술


 xxxx_probe(struct usb_interface *intf, const struct usb_device_id *prod)
{
 printk("intf No:%d Ty:%d Cl:%d SC:%d Pr:%d\n"
   ,intf->cur_altsetting->desc.bInterfaceNumber
   ,intf->cur_altsetting->desc.bDescriptorType
   ,intf->cur_altsetting->desc.bInterfaceClass
   ,intf->cur_altsetting->desc.bInterfaceSubClass
   ,intf->cur_altsetting->desc.bInterfaceProtocol
 ); //jhlee

}


  • inlclude/linux/usb.h

struct usb_interface {
 /* array of alternate settings for this interface,
  * stored in no particular order */
 struct usb_host_interface *altsetting;

 struct usb_host_interface *cur_altsetting; /* the currently
      * active alternate setting */
 unsigned num_altsetting; /* number of alternate settings */

 int minor;   /* minor number this interface is
      * bound to */
 enum usb_interface_condition condition;  /* state of binding */
 struct device dev;  /* interface specific device info */
 struct class_device *class_dev;
};
...
struct usb_host_interface {
 struct usb_interface_descriptor desc;

 /* array of desc.bNumEndpoint endpoints associated with this
  * interface setting.  these will be in no particular order.
  */
 struct usb_host_endpoint *endpoint;

 char *string;  /* iInterface string, if present */
 unsigned char *extra;   /* Extra descriptors */
 int extralen;
};


  • inlclude/linux/usb_ch9.h

/* USB_DT_INTERFACE: Interface descriptor */
struct usb_interface_descriptor {
 __u8  bLength;
 __u8  bDescriptorType;

 __u8  bInterfaceNumber;
 __u8  bAlternateSetting;
 __u8  bNumEndpoints;
 __u8  bInterfaceClass;
 __u8  bInterfaceSubClass;
 __u8  bInterfaceProtocol;
 __u8  iInterface;
} __attribute__ ((packed));


  http://elixir.free-electrons.com/linux/v4.3.3/source/include/uapi/linux/usb/cdc.h#L17
  http://elixir.free-electrons.com/linux/v3.17.5/source/drivers/net/usb/qmi_wwan.c#L845


3. USB OTG의 Gadget (Device) 구조 

USB Device의 구조는 설명했듯이 기본적인 USB에서 제공하는 각 Descriptor를 제공을해줘야한다.
그리고 이의 설정에 맟추어 EndPoint 와 URB로 USB HOST와 통신이 가능하도록 해줘야한다.

기존에는 별도의 USB Device Chip을 사용하는 경우도 있으나, 현재 Linux에서는 OTG기반으로 USB Gadget(Device)를 사용가능하다 


USB Gadget의 Function ACM
  http://elixir.free-electrons.com/linux/v3.7.9/source/drivers/usb/gadget/f_acm.c


3.1 USB Gadget Driver  

OTG(On-The-Go) Mode로  사용할 경우, USB는 Device Mode와 Host Mode가 동시 동작이 가능하기 때문에,
Host 이외에 Linux에서는 Gadget이라는 것을 이용하여 USB Device Mode를 지원한다.

아래와 같이 USB Device Mode로 사용할 경우 각 Class Device를 대충 알아보자.
대표적인 것들이 Mass Storage , CDC 등 다양하게 이용이되며, Module 형태로 Kernel에서 기본적으로 제공을 해준다.

반드시 Kernel Version을 확인하자.
  https://www.kernel.org/doc/htmldocs/gadget/index.html

  • 각 개별 모듈의 위치 
      drivers/usb/gadget

  • 주요소스 분석 부분 
  1. Gadget Driver에서의  Descriptor의 정의 및 설정부분 
  2. Endpoint를 어떻게 기본 통신을 하는지 개념 
  3. 이 Endpoint 통신부분과 다른 Interface와 어떻게 연결되는지 관련부분 Driver들   

  • 관련내용 
  http://www.linux-usb.org/gadget/
  http://www.linux-usb.org/gadget/h2-otg.html
  http://www.usb.org/developers/docs/
  https://events.linuxfoundation.org/sites/events/files/slides/LinuxConNA2013-andrzej.pietrasiewicz-usb-gadget-configfs_0.pdf

  • 관련소스
  https://elixir.free-electrons.com/linux/v3.3/source/drivers/usb/gadget
  https://elixir.free-electrons.com/linux/v2.6.29.3/source/drivers/usb/gadget
  https://git.linuxtv.org/pinchartl/uvcvideo.git/tree/drivers/usb/gadget?h=uvcvideo-gadget


  • TI-Sitara Version 예제 
기본동작 방식은 module 형태로 동작하기 때문에, 아래와 같이 lsmod로 자신의 module점검을 해보자.

# lsmod
Module                  Size  Used by
sd_mod                 28383  2
usb_storage            47815  1
scsi_mod              135887  2 usb_storage,sd_mod
bc_example              7250  0
sha512_generic          9903  0
sha512_arm             12079  0
drbg                   13425  1
des_generic            17736  0
cbc                     2324  0
xfrm_user              22606  2
xfrm4_tunnel            2040  0
ipcomp                  2257  0
xfrm_ipcomp             4311  1 ipcomp
esp4                    6466  0
ah4                     5627  0
bluetooth             327425  2
af_key                 26406  0
xfrm_algo               6970  5 ah4,esp4,af_key,xfrm_user,xfrm_ipcomp
usb_f_acm               5404  1
u_serial               11555  3 usb_f_acm
usb_f_ecm               6620  1
g_multi                 6330  0
usb_f_mass_storage     37916  2 g_multi
usb_f_rndis            15406  2 g_multi
u_ether                13577  3 usb_f_ecm,usb_f_rndis,g_multi
libcomposite           44392  5 usb_f_acm,usb_f_ecm,usb_f_rndis,g_multi,usb_f_mass_storage
configfs               26917  6 usb_f_acm,usb_f_ecm,usb_f_rndis,libcomposite,usb_f_mass_storage
rpmsg_pru               4958  0
virtio_rpmsg_bus       12724  1 rpmsg_pru
musb_dsps               8235  0
musb_hdrc              71486  1 musb_dsps
udc_core               12063  2 musb_hdrc,libcomposite
usbcore               195911  2 musb_hdrc,usb_storage
pm33xx                  5577  0
snd_soc_simple_card     7712  0
ecb                     1909  0
pru_rproc              11796  2
pruss_intc              7163  3 pru_rproc
ti_emif_sram            6242  1 pm33xx
wkup_m3_ipc             8278  1 pm33xx
sha256_generic          9503  1
hmac                    2735  1
wkup_m3_rproc           3669  1
md5                     1897  0
pvrsrvkm              406903  5 bc_example
sha1_generic            2621  0
sha1_arm_neon           6261  0
sha1_arm                3862  1 sha1_arm_neon
omap_aes_driver        19488  0
pruss                  10892  1 pru_rproc
remoteproc             26901  4 pruss,wkup_m3_rproc,pru_rproc,wkup_m3_ipc
omap_sham              21513  0
virtio                  7742  2 remoteproc,virtio_rpmsg_bus
virtio_ring            12163  2 remoteproc,virtio_rpmsg_bus
wlcore_sdio             6771  0
omap_rng                4759  0
rng_core                7794  1 omap_rng
snd_soc_tlv320aic3x    48260  1
musb_am335x             1426  0
ti_am335x_tsc           6029  0
rtc_omap                8272  1
omap_wdt                4634  0
ti_am335x_tscadc        6290  1 ti_am335x_tsc
sch_fq_codel            8289  4
cryptodev              38007  2

USB Gadget u_serial는 USB ACM으로  usb_f_acm과 연결되어 동작 (USB to Serial)


11/24/2014

Linux USB Descriptor 분석방법-2

1. USB Host에서 USB 기본정보 파악

Linux Device에서 아래의 lsusb 명령어를 이용하여 USB Host의 기본정보를 파악해보자

  • USB Host에서 Device 확인 

# lsusb
Bus 002 Device 003: ID 090c:1000 Silicon Motion, Inc. - Taiwan (formerly Feiya Technology Corp.) 
Bus 001 Device 001: ID 1d6b:0002 Linux Foundation 
Bus 002 Device 002: ID 1a40:0101 Terminus Technology Inc. Hub
Bus 002 Device 001: ID 1d6b:0002 Linux Foundation 


  • USB Host에서 연결된 Device Layers 확인

# lsusb -t
/:  Bus 02.Port 1: Dev 1, Class=root_hub, Driver=musb-hdrc/1p, 480M
    |__ Port 1: Dev 2, If 0, Class=Hub, Driver=hub/4p, 480M
        |__ Port 2: Dev 3, If 0, Class=Mass Storage, Driver=usb-storage, 480M
/:  Bus 01.Port 1: Dev 1, Class=root_hub, Driver=musb-hdrc/1p, 480M


1.1 USB Host에서 Descriptor 분석 

  • MassStorage 의 예제 

#lsusb -v

Bus 002 Device 003: ID 090c:1000 Silicon Motion, Inc. - Taiwan (formerly Feiya Technology Corp.) 
Device Descriptor:
  bLength                18
  bDescriptorType         1
  bcdUSB               2.10
  bDeviceClass            0 
  bDeviceSubClass         0 
  bDeviceProtocol         0 
  bMaxPacketSize0        64
  idVendor           0x090c Silicon Motion, Inc. - Taiwan (formerly Feiya Technology Corp.)
  idProduct          0x1000 
  bcdDevice           11.00
  iManufacturer           1 Samsung
  iProduct                2 Flash Drive DUO
  iSerial                 3 0320815120014277
  bNumConfigurations      1
  Configuration Descriptor:
    bLength                 9
    bDescriptorType         2
    wTotalLength           32
    bNumInterfaces          1
    bConfigurationValue     1
    iConfiguration          0 
    bmAttributes         0x80
      (Bus Powered)
    MaxPower              300mA
    Interface Descriptor:
      bLength                 9
      bDescriptorType         4
      bInterfaceNumber        0
      bAlternateSetting       0
      bNumEndpoints           2
      bInterfaceClass         8 Mass Storage
      bInterfaceSubClass      6 SCSI
      bInterfaceProtocol     80 Bulk-Only
      iInterface              0 
      Endpoint Descriptor:
        bLength                 7
        bDescriptorType         5
        bEndpointAddress     0x01  EP 1 OUT
        bmAttributes            2
          Transfer Type            Bulk
          Synch Type               None
          Usage Type               Data
        wMaxPacketSize     0x0200  1x 512 bytes
        bInterval               0
      Endpoint Descriptor:
        bLength                 7
        bDescriptorType         5
        bEndpointAddress     0x82  EP 2 IN
        bmAttributes            2
          Transfer Type            Bulk
          Synch Type               None
          Usage Type               Data
        wMaxPacketSize     0x0200  1x 512 bytes
        bInterval               0
Binary Object Store Descriptor:
  bLength                 5
  bDescriptorType        15
  wTotalLength           22
  bNumDeviceCaps          2
  USB 2.0 Extension Device Capability:
    bLength                 7
    bDescriptorType        16
    bDevCapabilityType      2
    bmAttributes   0x00000006
      BESL Link Power Management (LPM) Supported
  SuperSpeed USB Device Capability:
    bLength                10
    bDescriptorType        16
    bDevCapabilityType      3
    bmAttributes         0x00
    wSpeedsSupported   0x000c
      Device can operate at High Speed (480Mbps)
      Device can operate at SuperSpeed (5Gbps)
    bFunctionalitySupport   2
      Lowest fully-functional device speed is High Speed (480Mbps)
    bU1DevExitLat           4 micro seconds
    bU2DevExitLat           4 micro seconds
.....


- 분석
Mass Storage의 경우 Interface Descriptor의 Class 만 설정을 했다.
물론 Vendor ID와 Product ID도 필수로 존재한다.


  • USB Hub 와 HID 예제 


#lsusb -v
Bus 001 Device 001: ID 1d6b:0002 Linux Foundation 2.0 root hub
Couldn't open device, some information will be missing
Device Descriptor:
  bLength                18
  bDescriptorType         1
  bcdUSB               2.00
  bDeviceClass            9 Hub
  bDeviceSubClass         0 Unused
  bDeviceProtocol         0 Full speed (or root) hub
  bMaxPacketSize0        64
  idVendor           0x1d6b Linux Foundation
  idProduct          0x0002 2.0 root hub
  bcdDevice            4.04
  iManufacturer           3 
  iProduct                2 
  iSerial                 1 
  bNumConfigurations      1
  Configuration Descriptor:
    bLength                 9
    bDescriptorType         2
    wTotalLength           25
    bNumInterfaces          1
    bConfigurationValue     1
    iConfiguration          0 
    bmAttributes         0xe0
      Self Powered
      Remote Wakeup
    MaxPower                0mA
    Interface Descriptor:
      bLength                 9
      bDescriptorType         4
      bInterfaceNumber        0
      bAlternateSetting       0
      bNumEndpoints           1
      bInterfaceClass         9 Hub
      bInterfaceSubClass      0 Unused
      bInterfaceProtocol      0 Full speed (or root) hub
      iInterface              0 
      Endpoint Descriptor:
        bLength                 7
        bDescriptorType         5
        bEndpointAddress     0x81  EP 1 IN
        bmAttributes            3
          Transfer Type            Interrupt
          Synch Type               None
          Usage Type               Data
        wMaxPacketSize     0x0004  1x 4 bytes
        bInterval              12

Bus 002 Device 002: ID 80ee:0021 VirtualBox USB Tablet
Couldn't open device, some information will be missing
Device Descriptor:
  bLength                18
  bDescriptorType         1
  bcdUSB               1.10
  bDeviceClass            0 (Defined at Interface level)
  bDeviceSubClass         0 
  bDeviceProtocol         0 
  bMaxPacketSize0         8
  idVendor           0x80ee VirtualBox
  idProduct          0x0021 USB Tablet
  bcdDevice            1.00
  iManufacturer           1 
  iProduct                3 
  iSerial                 0 
  bNumConfigurations      1
  Configuration Descriptor:
    bLength                 9
    bDescriptorType         2
    wTotalLength           34
    bNumInterfaces          1
    bConfigurationValue     1
    iConfiguration          0 
    bmAttributes         0x80
      (Bus Powered)
    MaxPower              100mA
    Interface Descriptor:
      bLength                 9
      bDescriptorType         4
      bInterfaceNumber        0
      bAlternateSetting       0
      bNumEndpoints           1
      bInterfaceClass         3 Human Interface Device
      bInterfaceSubClass      0 No Subclass
      bInterfaceProtocol      0 None
      iInterface              0 
        HID Device Descriptor:
          bLength                 9
          bDescriptorType        33
          bcdHID               1.10
          bCountryCode            0 Not supported
          bNumDescriptors         1
          bDescriptorType        34 Report
          wDescriptorLength      85
         Report Descriptors: 
           ** UNAVAILABLE **
      Endpoint Descriptor:
        bLength                 7
        bDescriptorType         5
        bEndpointAddress     0x81  EP 1 IN
        bmAttributes            3
          Transfer Type            Interrupt
          Synch Type               None
          Usage Type               Data
        wMaxPacketSize     0x0008  1x 8 bytes
        bInterval              10

Bus 002 Device 001: ID 1d6b:0001 Linux Foundation 1.1 root hub
Couldn't open device, some information will be missing
Device Descriptor:
  bLength                18
  bDescriptorType         1
  bcdUSB               1.10
  bDeviceClass            9 Hub
  bDeviceSubClass         0 Unused
  bDeviceProtocol         0 Full speed (or root) hub
  bMaxPacketSize0        64
  idVendor           0x1d6b Linux Foundation
  idProduct          0x0001 1.1 root hub
  bcdDevice            4.04
  iManufacturer           3 
  iProduct                2 
  iSerial                 1 
  bNumConfigurations      1
  Configuration Descriptor:
    bLength                 9
    bDescriptorType         2
    wTotalLength           25
    bNumInterfaces          1
    bConfigurationValue     1
    iConfiguration          0 
    bmAttributes         0xe0
      Self Powered
      Remote Wakeup
    MaxPower                0mA
    Interface Descriptor:
      bLength                 9
      bDescriptorType         4
      bInterfaceNumber        0
      bAlternateSetting       0
      bNumEndpoints           1
      bInterfaceClass         9 Hub
      bInterfaceSubClass      0 Unused
      bInterfaceProtocol      0 Full speed (or root) hub
      iInterface              0 
      Endpoint Descriptor:
        bLength                 7
        bDescriptorType         5
        bEndpointAddress     0x81  EP 1 IN
        bmAttributes            3
          Transfer Type            Interrupt
          Synch Type               None
          Usage Type               Data
        wMaxPacketSize     0x0002  1x 2 bytes
        bInterval             255


-분석
HID의 경우 Interface만 Class를 설정하지만,
HUB의 경우 Device와  Interface를 동시에 설정한다.


  • Device/Interface 의 Class 부분 체크 
  http://www.usb.org/developers/defined_class

  • lsusb 명령어
  http://linux.die.net/man/8/lsusb

  • lsusb porting
  https://www.raspberrypi.org/forums/viewtopic.php?f=33&t=185091
  http://www.beyondlogic.org/usbnutshell/usb5.shtml

11/23/2014

Linux USB Descriptor 분석방법-1

1.  Linux 에서 분석설정  

linux에서 분석하는 방법은 가장 기본적으로 사용하는 것

  1. proc 정보 
  2. kernel log 


1.1  proc 정보 (usb filesystem )

proc는 기본적으로 아래와 같이 usbfs 을 사용해야 아래와 같이 지원이 가능하다.
mount -t usbfs none /proc/bus/usb
물론 Kernel에서 USB Filesystem을 사용해야한다.

# vi /etc/fstab
none  /proc/bus/usb  usbfs  defaults  0  0


# cat /proc/bus/usb/devices  or 
# cat /sys/kernel/debug/usb/devices

   상위분석방법 및 설정
   https://www.kernel.org/doc/Documentation/usb/proc_usb_info.txt

1.2 Kernel Log


# dmesg  // Kernel log 
# cat /proc/kmsg 


1.3 lsusb tool 사용 

linux에서 제공하는 lsusb tool을 사용하는 것이다.

2. Linux의 Proc의 정보분석 

현재 Device Descriptor 와 Driver의 정보확인이 가능하며, 연결상태를 확인하는 좋은 정보이다.
이 정보만으로는 연결상태를 알수는 있지만, debugging을 한다면, 역시 Kernel message가 필요하다.

2.1 USB Host 확인예제 

아래와 같이 기본  hub정보가 나온다.

# cat /proc/bus/usb/devices  or 
# cat /sys/kernel/debug/usb/devices

T:  Bus=02 Lev=00 Prnt=00 Port=00 Cnt=00 Dev#=  1 Spd=480  MxCh= 1
B:  Alloc=  0/800 us ( 0%), #Int=  0, #Iso=  0
D:  Ver= 2.00 Cls=09(hub  ) Sub=00 Prot=01 MxPS=64 #Cfgs=  1
P:  Vendor=1d6b ProdID=0002 Rev= 4.04
S:  Manufacturer=Linux 4.4.32-gadde2ca9f8 musb-hcd
S:  Product=MUSB HDRC host driver
S:  SerialNumber=musb-hdrc.2.auto
C:* #Ifs= 1 Cfg#= 1 Atr=e0 MxPwr=  0mA
I:* If#= 0 Alt= 0 #EPs= 1 Cls=09(hub  ) Sub=00 Prot=00 Driver=hub
E:  Ad=81(I) Atr=03(Int.) MxPS=   4 Ivl=256ms

T:  Bus=01 Lev=00 Prnt=00 Port=00 Cnt=00 Dev#=  1 Spd=480  MxCh= 1
B:  Alloc=  0/800 us ( 0%), #Int=  0, #Iso=  0
D:  Ver= 2.00 Cls=09(hub  ) Sub=00 Prot=01 MxPS=64 #Cfgs=  1
P:  Vendor=1d6b ProdID=0002 Rev= 4.04
S:  Manufacturer=Linux 4.4.32-gadde2ca9f8 musb-hcd
S:  Product=MUSB HDRC host driver
S:  SerialNumber=musb-hdrc.1.auto
C:* #Ifs= 1 Cfg#= 1 Atr=e0 MxPwr=  0mA
I:* If#= 0 Alt= 0 #EPs= 1 Cls=09(hub  ) Sub=00 Prot=00 Driver=hub
E:  Ad=81(I) Atr=03(Int.) MxPS=   4 Ivl=256ms

sys filesystem을 사용한다면, 아래에 위치에 존재할 것이다.

# /sys/bus/usb/devices/usb* 


  • 상위내용 분석 

D: 와 P:  모두 Device Descriptor에서 가져오는정보이며, 각각의 중요 정보들을 분석해보자.

D: Cls=: Class / Sub=: Sub Class / Prot=: Protocol 을 나타낸다.
P: Vendor ID와 ProductID가 확인가능하다.
I: 의 경우는 Interface descriptor로 Driver의 연결과 상관 이 있으므로 중요하다. 

  1. if#=x :    bInterfaceNumber
  2. Alt=0 :    bAlternateSetting
  3. EPs=1 :   bNumEndpoints
  4. Cls=09:   bInterfaceClass
  5. Sub=00:  bInterfaceSubClass
  6. Prot=00:  bInterfaceProtocol
  7. Driver=hub : linux에 연결된 Driver


  https://linux.die.net/man/1/usb-devices

  • 의미 설명 및 분석 

T = Topology (etc.)
B = Bandwidth (applies only to USB host controllers, which are
    virtualized as root hubs)
D = Device descriptor info.
P = Product ID info. (from Device descriptor, but they won't fit
    together on one line)
S = String descriptors.
C = Configuration descriptor info. (* = active configuration)
I = Interface descriptor info.
E = Endpoint descriptor info.


자세한 내용은 아래의 문서를 반드시 참조하자
  https://www.kernel.org/doc/Documentation/usb/proc_usb_info.txt


2.2 USB Hub에서 확인예제2 

이것은 최근에 작성한 것이며, 특이한 것은 Vendor Specific으로 작성했기때문에
아래와 같이 넣었다.


T:  Bus=01 Lev=00 Prnt=00 Port=00 Cnt=00 Dev#=  1 Spd=480 MxCh= 1
B:  Alloc=  0/800 us ( 0%), #Int=  0, #Iso=  0
D:  Ver= 2.00 Cls=09(hub  ) Sub=00 Prot=01 MxPS=64 #Cfgs=  1
P:  Vendor=0000 ProdID=0000 Rev= 2.06
S:  Manufacturer=Linux 2.6.18_IPNC_TENC-3003_1.0.1 musb-hcd
S:  Product=MUSB HDRC host driver
S:  SerialNumber=musb_hdrc
C:* #Ifs= 1 Cfg#= 1 Atr=e0 MxPwr=  0mA
I:  If#= 0 Alt= 0 #EPs= 1 Cls=09(hub  ) Sub=00 Prot=00 Driver=hub
E:  Ad=81(I) Atr=03(Int.) MxPS=   2 Ivl=256ms

T:  Bus=01 Lev=01 Prnt=01 Port=00 Cnt=01 Dev#=  2 Spd=480 MxCh= 0
D:  Ver= 2.00 Cls=00(>ifc ) Sub=00 Prot=00 MxPS=64 #Cfgs=  1
P:  Vendor=05c6 ProdID=9025 Rev= 2.32
S:  Manufacturer=Android
S:  Product=Android
S:  SerialNumber=0123456789ABCDEF
C:* #Ifs= 6 Cfg#= 1 Atr=80 MxPwr=500mA
I:  If#= 0 Alt= 0 #EPs= 2 Cls=ff(vend.) Sub=ff Prot=ff Driver=option
E:  Ad=81(I) Atr=02(Bulk) MxPS= 512 Ivl=0ms
E:  Ad=01(O) Atr=02(Bulk) MxPS= 512 Ivl=0ms
I:  If#= 1 Alt= 0 #EPs= 2 Cls=ff(vend.) Sub=42 Prot=01 Driver=(none)
E:  Ad=82(I) Atr=02(Bulk) MxPS= 512 Ivl=0ms
E:  Ad=02(O) Atr=02(Bulk) MxPS= 512 Ivl=0ms
I:  If#= 2 Alt= 0 #EPs= 3 Cls=ff(vend.) Sub=00 Prot=00 Driver=option
E:  Ad=84(I) Atr=03(Int.) MxPS=  10 Ivl=32ms
E:  Ad=83(I) Atr=02(Bulk) MxPS= 512 Ivl=0ms
E:  Ad=03(O) Atr=02(Bulk) MxPS= 512 Ivl=0ms
I:  If#= 3 Alt= 0 #EPs= 3 Cls=ff(vend.) Sub=00 Prot=00 Driver=option
E:  Ad=86(I) Atr=03(Int.) MxPS=  10 Ivl=32ms
E:  Ad=85(I) Atr=02(Bulk) MxPS= 512 Ivl=0ms
E:  Ad=04(O) Atr=02(Bulk) MxPS= 512 Ivl=0ms
I:  If#= 4 Alt= 0 #EPs= 3 Cls=ff(vend.) Sub=ff Prot=ff Driver=(none)
E:  Ad=88(I) Atr=03(Int.) MxPS=   8 Ivl=32ms
E:  Ad=87(I) Atr=02(Bulk) MxPS= 512 Ivl=0ms
E:  Ad=05(O) Atr=02(Bulk) MxPS= 512 Ivl=0ms
I:  If#= 5 Alt= 0 #EPs= 2 Cls=08(stor.) Sub=06 Prot=50 Driver=usb-storage
E:  Ad=89(I) Atr=02(Bulk) MxPS= 512 Ivl=0ms
E:  Ad=06(O) Atr=02(Bulk) MxPS= 512 Ivl=125us


대충 분석해보면, 2번째 T: 부터 봐야한다.
D: 의 Class/SubClass/Protocol은 사용되지 않는다. (추후 Interface에서 사용)
총 6개의 Interface로 구성이 되고, 0~4까지는 Vendor Specific Driver이다.
5번은 Class에서 Mass Storage로 연결이 되어 Driver에 연결 

11/09/2014

Window USB 분석방법 (Device Descriptor)

1. Window 에서 분석 방법 

다양한 Descriptor 분석 및 패킷분석 Tool이 존재하며, 아직 다 사용해보지 못해
각각의 장단점을 모르겠다.
현재 Wireshark까지 지원하다고 하니, Widnow는 너무 다양하다.

  • Wireshark 
  Network만 지원이 되었지만, USB 분석도 지원이 가능하다.
  https://www.wireshark.org/download.html

  • Thesycon USB Descriptor Dumper
  USB 분석을할때 사용을 해봐야 알겠지만,  사이트에서 제공하는 것으로 봐서 유용하겠다.
  http://www.thesycon.de/eng/usb_descriptordumper.shtml

  • Libusb Program (Descriptor 분석)
  Linux의 Libusb와 비슷한 기능을 가진 것 같으며, 상당히 유용할 것 같다. 
  현재 Window에서 사용할 일이 없기에 Link만 

  http://blog.tcltk.co.kr/?p=888
  http://wiki.tcltk.co.kr/wiki.php/libusb
  https://sourceforge.net/p/libusb-win32/wiki/Home/

  • USB Sniffer For Window 
  정확하게 Descriptor 는 분석이 되는지는 모르겠으나, 
  Packet Sniffer 용도로 사용 되는 것 같다.
  https://sourceforge.net/projects/usbsnoop/


2.2 Window 에서 Driver 지원 및 설정파일 확인 

Window를 USB Host를 사용하는 경우 대표적인 USB Device의 Class Driver는 지원을 해준다.
그리고, 관련 Class Driver의 설정파일, 즉 (*.sys) 을 알아두자.
만약, 별도의 설치 Driver가 필요할 경우도 발생한다.

  https://msdn.microsoft.com/en-us/library/windows/hardware/ff538820(v=vs.85).aspx


11/02/2014

Device/Interface Descriptor 의 Class 와 Device Driver

1. Device/Interface Descriptor의 Class 

Device/Interface Descriptor는 Driver의 Loading과 밀접한 관계있으며,상위 두 Descriptors들은 아래 값에 따라 Class가 구분이 되어 Driver와 연관되어 동작된다.
경우에따라 본인이 Class를 제외하고 직접 정의를 하여서 구현을 해도 좋다.
  1. Class 
  2. SubClass 
  3. Protocol

  • USB Class Code 표 (반드시 확인) 
  http://www.usb.org/developers/defined_class

  • USB Device Class Documents
  http://www.usb.org/developers/docs/devclass_docs/


1.1 특별한 Class 

Class와 Subclass는 각 Driver를 연결할때 중요하지만 아래와 같은 경우 특별하다.

  • Base Class FEh (Application Specific)
      상위 표 참고
  • Base Class FFh (Vendor Specific)

이는 Vendor ID와 Product ID가 중요하며, 이에 따라 각 Driver가 연결이 된다.
각 Class는 어떻게 정의할 지는 본인이 정하자.


2. Class 와 Driver 

상위 USB Device Class에 정의가 되어있다고, 각 OS가 모든 Driver를 제공을 해주는 것은 아니다.
그러므로, 각각의 Class 별로 확인을 해야한다. 물론 가장 많이 사용되는 Driver들은 OS가 거의 모두 지원을 해준다.
하지만, 다양해지다 보니, 지원과 Vendor의 Driver 역시 존재한다.

2.1 HID (Human Interface Device) Class
    Keyboard, Mouse 및 기타 일반적인 Input Device 이며 대중적으로 많이 사용이 되어지는
    Input Device들을 지원한다.
    이를 이용하여, 다른 Input Device로도 설계가 가능하며 본인의 용도에 맞게 Descriptor를 만들면 될 것이다.

    ClassSubClassProtocol
    03h - HID00h - None
    01h - Boot Interface
    00h - None
    01h - Keyboard
    02h - Mouse
    • 관련예제 
      http://www.usblyzer.com/usb-human-interface-device-hid-class-decoder.htm


    2.2 Hub Class 
      USB Host에서 연결되는 USB Hub를 말하며, USB의 Bridge 역할을 하는 Hub를 사용하기 위한 Class이며,
      이에 관련된 부분을 Descriptors로 구성한다.

      ClassSubClassProtocol
      09h - Hub00h00h - Full-speed Hub
      01h - Hi-speed Hub with single TT
      02h - Hi-speed Hub with multiple TTs


        http://www.usblyzer.com/usb-hub-class-decoder.htm


      2.3 Mass Storage Class
        일반적으로 많이 사용이 되는 USB Storage를 말하며 Window에서는 FAT로 포맷해서 사용한다.
        대중적으로 많이 사용하기 때문에 일반적으로 거의 동일하게 사용이 되며, Linux에서 처음사용한다면, fdisk로 partition 을 먼저 나눈다음에, fat로 포맷을 한 후 사용하는 것이 맞다.
        USB Host에서는 일반적으로 udev를 이용하여 Auto mount 되는 shell script가 제공한다.

        ClassSubClassProtocol
        08h - MSC0x01 - Reduced Block Commands (RBC)
        0x02 - MMC (ATAPI)
        0x05 - SFF-8070i
        0x06 - SCSI transparent command set
        0x50 - Bulk-Only (BOT) Transport

          http://www.usblyzer.com/usb-mass-storage-class-msc-decoder.htm


        2.4 CDC(Communication Device Class)
          USB에서 통신을 하는 일반적인 방법을 말하며, Subclass에 종류가 많으며, 이에 따라서 통신방식도 달라진다.
          현재 USB를 이용하여 Network 및 다양하게 통신 중심으로 나누어지는 Class이기 때문에 반드시 알아둬야할 것이다.
          아래의 usb분석기도 모든 CDC 정보를 가지고 있지 않아 분석이 가능하지 않다.

          ClassSubClass
          02h - CDC01h - Direct Line Control Model
          02h - Abstract Control Model
          03h - Telephone Control Model
          04h - Multi-Channel Control Model
          05h - CAPI Control Model
          06h - Ethernet Networking Control Model
          07h - ATM Networking Control Model
          08h - Wireless Handset Control Model
          09h - Device Management
          0Ah - Mobile Direct Line Model
          0Bh - OBEX


            http://www.usblyzer.com/usb-communication-device-class-cdc-decoder.htm
            http://elixir.free-electrons.com/linux/v4.3.3/source/include/uapi/linux/usb/cdc.h#L17

          • Linux 에서 많이 사용되어지는 CDC Class 
            1. ACM(Abstract Control Model : 주로 RS-232로 사용)
            2. ECM (Ethernet Device Model)
            3. NCM (Network Control Model)
            4. RNDIS(Remote NDIS RNDIS) :  Ethernet Device이며, Host가 Window에서 많이 이용.
            5. MBIM(Mobile Broadband Interface Model) 


            • Driver Source를 확인
            1. drivers/net/usb/Kconfig  
            2. drivers/usb/net/Kconfig 
            3. driver/usb/serial/Kconfig  

              https://github.com/torvalds/linux/blob/master/drivers/net/usb/Kconfig

            • CDC-ACM (USB 위에 RS-232 Emulate한 예제)
            CDC-ACM은 RS-232으로도 통신이 가능하며, 다른 기능이 존재하는 것 같은데, 현재 주로 RS-232로 사용이 많이 되어진다.
            GPS Module로도 이용이 가능

              http://www.atmel.com/images/doc4322.pdf
              https://www.keil.com/pack/doc/mw/USB/html/group__usbh__cdcacm_functions.html

            • CDC- RNDIS의 예제
              http://blog.naver.com/PostView.nhn?blogId=inftee&logNo=60175694218

            **아래정보는 Vault Micro 제품의 CDC 관련 Driver 지원여부이며, 아래 사이트참조.

            • CDC- 기타기능 
            CDC ECM (Ethernet Devices), CDC EEM (Ethernet Emulation Devices) 부터 대용량 데이터 처리를 할 수 있도록 패킷 처리 방식을 개선한 CDC NCM (Network Control Model)까지 기능 별 사양을 정의하고 있다.

              https://en.wikipedia.org/wiki/Ethernet_over_USB


            • USB LTE 
            USB LTE는 Serial Interface (AT Command)와 PPP Interface (Data)로 구분이되어지며, Kernel에서 이를 지원을 해줘야한다.
            퀄컴은 QMI/Rmnet 이라는 Interface를 이용하여 wwan을 만들어 사용한다고한다.
            LG or GCT의 경우는 제조사별로 별도의 Interface driver가 존재한다고 한다.

            Vault Micro 제품
              http://vaultmicro.blogspot.kr/2013/04/usb-network-protocol.html

            WAN Inteface (Protocol)
              https://lede-project.org/docs/user-guide/wan_interface_protocols
              https://en.wikipedia.org/wiki/Wireless_WAN

              USB 3G Dongle

            Device Driver->USB support->USB Serial Converter support
              *   USB Serial Converter support                     (CONFIG_USB_SERIAL=y)
              *   USB driver for GSM and CDMA modems      (CONFIG_USB_SERIAL_OPTION=y)
                  drivers/usb/serial/usb-serial.c
                  drivers/usb/serial/option.c

              https://wiki.openwrt.org/doc/recipes/3gdongle

            Network Configuration

              https://wiki.debian.org/NetworkConfiguration


            2.5 UVC or USB Video Class 

              Host에서 이에 관련된 Class device driver가 필요하다.
              그리고, 주로 Webcam 같은 Video Stream을 전송하는 Device에서 사용이 되어지고 있다.
              이것역시 개별 Version이 있어 각 Version에 따라 성능과 지원기능이 다르므로, 각 Spec을 자세히 참고하자.

                https://docs.microsoft.com/ko-kr/windows-hardware/drivers/stream/usb-video-class-driver-overview
                https://en.wikipedia.org/wiki/USB_video_device_class
                https://en.wikipedia.org/wiki/List_of_USB_video_class_devices


              • Linux UVC Driver

                http://www.ideasonboard.org/uvc/
                https://git.linuxtv.org/pinchartl/uvcvideo.git/
                https://git.linuxtv.org/pinchartl/uvcvideo.git/tree/drivers/usb/gadget?h=uvcvideo-gadget
                https://git.linuxtv.org/


              • USB Video Class 1.5

                https://drive.google.com/open?id=0B_ehveuLi8MVSWh2dnRwQlp0dVk

              10/28/2014

              i p b frame

              http://blueheartscabin.blogspot.kr/2013/08/ipb.html

              http://www.streaminglearningcenter.com/articles/producing-h264-video-for-flash-an-overview.html?page=4

              http://www.axis.co.kr/img/product/brochure/wp_h264_kor_lo.pdf

              http://www.programering.com/a/MjNwcTMwATg.html

              http://www.mathcs.emory.edu/~cheung/Courses/558a/Syllabus/2-video/mpeg2.html

              I frame : key frame

              P - frame : 이전 I frame or 이전의 P frame을 정보를 사용하며 ,  P Frame은  전체 이미지가  바뀌는 것이 아니라, 이지지의 블럭들이 옆으로 이동하는 것을 움직이것을 것을 생각하여, 차이 값을  부호화 하여 기록 .


              B - Frame :  이전, 이후의 I- Frame 과 P Frame을 모두 사용  , P frame과의 차이는 단 반향 혹은 양방향이냐의 차이 .


              http://en.wikipedia.org/wiki/H.264/MPEG-4_AVC


              http://microdev.tistory.com/109
              http://microdev.tistory.com/110

              10/20/2014

              Linux debug Strace 사용 (추후 정리후 삭제)

              Strace Debug

              $ strace -h
              usage: strace [-CdffhiqrtttTvVwxxy] [-I n] [-e expr]...
                            [-a column] [-o file] [-s strsize] [-P path]...
                            -p pid... / [-D] [-E var=val]... [-u username] PROG [ARGS]
                 or: strace -c[dfw] [-I n] [-e expr]... [-O overhead] [-S sortby]
                            -p pid... / [-D] [-E var=val]... [-u username] PROG [ARGS]
              
              Output format:
                -a column      alignment COLUMN for printing syscall results (default 40)
                -i             print instruction pointer at time of syscall
                -o file        send trace output to FILE instead of stderr
                -q             suppress messages about attaching, detaching, etc.
                -r             print relative timestamp
                -s strsize     limit length of print strings to STRSIZE chars (default 32)
                -t             print absolute timestamp
                -tt            print absolute timestamp with usecs
                -T             print time spent in each syscall
                -x             print non-ascii strings in hex
                -xx            print all strings in hex
                -y             print paths associated with file descriptor arguments
                -yy            print ip:port pairs associated with socket file descriptors
              
              Statistics:
                -c             count time, calls, and errors for each syscall and report summary
                -C             like -c but also print regular output
                -O overhead    set overhead for tracing syscalls to OVERHEAD usecs
                -S sortby      sort syscall counts by: time, calls, name, nothing (default time)
                -w             summarise syscall latency (default is system time)
              
              Filtering:
                -e expr        a qualifying expression: option=[!]all or option=[!]val1[,val2]...
                   options:    trace, abbrev, verbose, raw, signal, read, write
                -P path        trace accesses to path
              
              Tracing:
                -b execve      detach on execve syscall
                -D             run tracer process as a detached grandchild, not as parent
                -f             follow forks
                -ff            follow forks with output into separate files
                -I interruptible
                   1:          no signals are blocked
                   2:          fatal signals are blocked while decoding syscall (default)
                   3:          fatal signals are always blocked (default if '-o FILE PROG')
                   4:          fatal signals and SIGTSTP (^Z) are always blocked
                               (useful to make 'strace -o FILE PROG' not stop on ^Z)
              
              Startup:
                -E var         remove var from the environment for command
                -E var=val     put var=val in the environment for command
                -p pid         trace process with process id PID, may be repeated
                -u username    run command as username handling setuid and/or setgid
              
              Miscellaneous:
                -d             enable debug output to stderr
                -v             verbose mode: print unabbreviated argv, stat, termios, etc. args
                -h             print help message
                -V             print version


              $ sudo cat /proc/550/maps  // 실행과 관련된 공유라이브러리 확인 
              $ sudo cat /proc/550/status  // Process 상태확인 
              $ readelf -h /proc/550/exe    // 실행파일 확인 
              $ readelf -s /proc/550/exe    // symbol table 확인     
              
              
              $ strace -p 550 -f -t
              ...........
              [pid   994] 11:25:13 pselect6(0, NULL, NULL, NULL, {0, 10000000}, NULL) = 0 (Timeout)
              [pid   994] 11:25:13 openat(AT_FDCWD, "/proc/irq/366/spurious", O_RDONLY) = 31
              [pid   994] 11:25:13 fstat(31, {st_mode=S_IFREG|0444, st_size=0, ...}) = 0
              [pid   994] 11:25:13 fstat(31, {st_mode=S_IFREG|0444, st_size=0, ...}) = 0
              [pid   994] 11:25:13 read(31, "count 180\nunhandled 0\nlast_unhan"..., 1024) = 42
              ...............
              
              $ strace -p 550 -f -tt
              [pid   994] 11:30:52.563464 fstat(31, {st_mode=S_IFREG|0444, st_size=0, ...}) = 0
              [pid   994] 11:30:52.563761 fstat(31, {st_mode=S_IFREG|0444, st_size=0, ...}) = 0
              [pid   994] 11:30:52.564047 read(31, "count 180\nunhandled 0\nlast_unhan"..., 1024) = 42
              
              $ strace -cp 550 -f
              strace: Process 550 attached with 4 threads
              ^Cstrace: Process 550 detached
              strace: Process 743 detached
              strace: Process 994 detached
              strace: Process 995 detached
              % time     seconds  usecs/call     calls    errors syscall
              ------ ----------- ----------- --------- --------- ----------------
               98.67    0.488000        1132       431           pselect6
                0.94    0.004653          12       382           sendto
                0.13    0.000666           2       382           openat
                0.10    0.000495           1       382           close
                0.09    0.000457           1       764           fstat
                0.06    0.000310           1       382           read
                0.00    0.000000           0         4         2 futex
              ------ ----------- ----------- --------- --------- ----------------
              100.00    0.494581                  2727         2 total


              http://www.brendangregg.com/perf.html
              https://brunch.co.kr/@alden/12

              http://linuxspot.tistory.com/253

              http://man7.org/linux/man-pages/man1/strace.1.html

              10/19/2014

              USB Device Descriptor 기본구조

              1. USB의 Descriptor 의 역할 

              Descriptor의 역할은 Host와 Device 사이에 DATA를 어떻게 주고 받을 것인지, Interface를
              어떻게 설정할지 데이타의 흐름을 어떻게 설정하지 등 구체적인 설정하는 것이다.

              이 정보는 USB Device가 가지고 있어야 하며, USB Host는 이에 맞게 Driver를 연결해야한다.
              1. Device Descriptor  (Host에서는 이를 Device로 인식)
              2. Configuration Descriptor (Device의 상태 및 설정)
              3. Interface Descriptor  ( 실제 연결되는 Interface Driver 연결, HID,CDC, Mass Storage)
              4. Endpoint Descriptor ( 전송방식과 전송방향 ,데이타구조 정의)

              • 일반적인 USB Device ( Class Device )
              대표적인 USB Host에는 기본적으로 많이 사용이 되는 Class Device Driver 들이 존재하며 Device가 연결될때 이 Class Device Driver 연결한다.
              USB 범용으로 사용되는 Class Device Driver는 윈도우에서도 동일하게 지원을 하고 있다.

              • 개별정의 USB Device 
              만약 별도의 USB Device가 본인이 직접 설정하여 Descriptor 구성을 한다면 USB Host에서 별도의 Device Driver는 만들어 구성했지만,
              이전에는 직접 이렇게 했는데, 요즘 거의 이렇게까지 할일이 거의 없으며, 표준 Class Device Driver 에 연결하여 사용한다.


                http://www.jungo.com/st/support/documentation/windriver/10.2.1/wdusb_manual.mhtml/wd_usb_arch.html

              2. USB의 Device Descriptors의 구조 

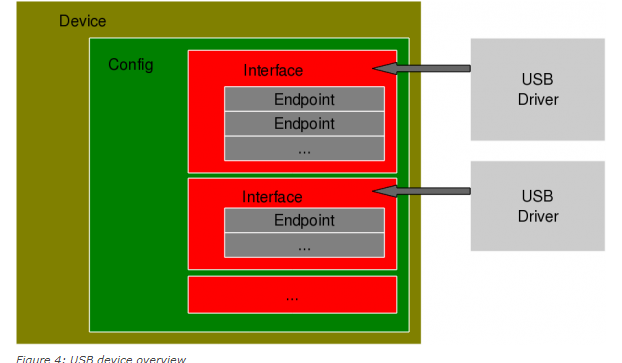
              Device -> Coifnguration-> Interface -> Endpoint Tree 형태로 구성이 되어있으며, 각각의 Descriptor 에 하단의 Descritor의 갯수를 정의하여, 각 구성이 가능하다.


              Configuration Descriptor 는 각각의 Interface Descriptor 가지고 있으며, 이는Host에서  Device Driver 에서 Device/Interface의 Class 정보를 가지고 
              각 Class Device Driver를 구동을 하여 실행이 가능하다. 


              3. USB Descriptor 의 Table 구성 

              실제 USB Device의 Descriptor의 구성을 살펴보자.

              • Device Descriptor 
              USB Device 의 최상위에 있는 Descriptor로 Vendor 정보와 Class 정보를 가지고 있다.

              0bLength1NumberSize of the Descriptor in Bytes (18 bytes)
              1bDescriptorType1ConstantDevice Descriptor (0x01)
              2bcdUSB2BCDUSB Specification Number which device complies too.
              4bDeviceClass1ClassClass Code (Assigned by USB Org)
              If equal to Zero, each interface specifies it’s own class code
              If equal to 0xFF, the class code is vendor specified.
              Otherwise field is valid Class Code.
              5bDeviceSubClass1SubClassSubclass Code (Assigned by USB Org)
              6bDeviceProtocol1ProtocolProtocol Code (Assigned by USB Org)
              7bMaxPacketSize1NumberMaximum Packet Size for Zero Endpoint. Valid Sizes are 8, 16, 32, 64
              8idVendor2IDVendor ID (Assigned by USB Org)
              10idProduct2IDProduct ID (Assigned by Manufacturer)
              12bcdDevice2BCDDevice Release Number
              14iManufacturer1IndexIndex of Manufacturer String Descriptor
              15iProduct1IndexIndex of Product String Descriptor
              16iSerialNumber1IndexIndex of Serial Number String Descriptor
              17bNumConfigurations1IntegerNumber of Possible Configurations

              중요하게 봐야 할 부분

              1. ID / Vendor ID: 정해진 값으로 Device 제조사에 의해 결정  
              2. ID / Product: 정해진 값으로 Device 제조사에 의해 결정 
              3. Class/Sub Class/Protocol : 

              VendorID 신청 


              • Configuration Descriptor 

              0bLength1NumberSize of Descriptor in Bytes
              1bDescriptorType1ConstantConfiguration Descriptor (0x02)
              2wTotalLength2NumberTotal length in bytes of data returned
              4bNumInterfaces1NumberNumber of Interfaces
              5bConfigurationValue1NumberValue to use as an argument to select this configuration
              6iConfiguration1IndexIndex of String Descriptor describing this configuration
              7bmAttributes1BitmapD7 Reserved, set to 1. (USB 1.0 Bus Powered)
              D6 Self Powered
              D5 Remote Wakeup
              D4..0 Reserved, set to 0.
              8bMaxPower1mAMaximum Power Consumption in 2mA units

              • Interface Descriptor 
              가장 중요한 Interface Descriptor 이며, 이는 곳 Driver와 관계가 되니 잘봐야한다.

              0bLength1NumberSize of Descriptor in Bytes (9 Bytes)
              1bDescriptorType1ConstantInterface Descriptor (0x04)
              2bInterfaceNumber1NumberNumber of Interface
              3bAlternateSetting1NumberValue used to select alternative setting
              4bNumEndpoints1NumberNumber of Endpoints used for this interface
              5bInterfaceClass1ClassClass Code (Assigned by USB Org)
              6bInterfaceSubClass1SubClassSubclass Code (Assigned by USB Org)
              7bInterfaceProtocol1ProtocolProtocol Code (Assigned by USB Org)
              8iInterface1IndexIndex of String Descriptor Describing this interface


              USB의 Class 정보
                https://www.usb.org/defined-class-codes

              Interface Decirptor
                https://www.beyondlogic.org/usbnutshell/usb5.shtml#InterfaceDescriptors

              • Endpoint Descriptor 

              0bLength1NumberSize of Descriptor in Bytes (7 bytes)
              1bDescriptorType1ConstantEndpoint Descriptor (0x05)
              2bEndpointAddress1EndpointEndpoint Address
              Bits 0..3b Endpoint Number.
              Bits 4..6b Reserved. Set to Zero
              Bits 7 Direction 0 = Out, 1 = In (Ignored for Control Endpoints)
              3bmAttributes1BitmapBits 0..1 Transfer Type
                00 = Control
                01 = Isochronous
                10 = Bulk
                11 = Interrupt
              Bits 2..7 are reserved. If Isochronous endpoint,
              Bits 3..2 = Synchronisation Type (Iso Mode)

                00 = No Synchonisation
                01 = Asynchronous
                10 = Adaptive
                11 = Synchronous
              Bits 5..4 = Usage Type (Iso Mode)
                00 = Data Endpoint
                01 = Feedback Endpoint
                10 = Explicit Feedback Data Endpoint
                11 = Reserved
              4wMaxPacketSize2NumberMaximum Packet Size this endpoint is capable of sending or receiving
              6bInterval1NumberInterval for polling endpoint data transfers. Value in frame counts. Ignored for Bulk & Control Endpoints. Isochronous must equal 1 and field may range from 1 to 255 for interrupt endpoints.

              각 Endpoint 마다 Transer Type을 정의하고 Endpoint를 2 (In/Out)개 혹은 그 이상으로 정의하여 각각의 Stream Pipe 구성한다.


              • USB Transfer Type은 총 4가지 종류
              1. Control Transfers: Control 하기위해 사용되며 Host에서 Device에게 명령전달
              2. Interrupt Transfers: 작은용량의 Data를 비동기적으로 받을경우 사용 
              3. Isochronous Transfers: 시간에 제한되어지는 Device 사용되며, 대표적으로 telephony
              4. Bulk Transfers: 많은용량으로 사용할 경우 사용하며, 대표적으로 Mass Storage 


              Endpoint의 통신방식
                http://www.beyondlogic.org/usbnutshell/usb4.shtml
                http://www.jungo.com/st/support/documentation/windriver/10.2.1/wdusb_manual.mhtml/USB_data_transfer_types.html

              • String Descriptor 

              0bLength1NumberSize of Descriptor in Bytes
              1bDescriptorType1ConstantString Descriptor (0x03)
              2wLANGID[0]2numberSupported Language Code Zero
              (e.g. 0x0409 English - United States)
              4wLANGID[1]2numberSupported Language Code One
              (e.g. 0x0c09 English - Australian)
              nwLANGID[x]2numberSupported Language Code x
              (e.g. 0x0407 German - Standard)


              0bLength1NumberSize of Descriptor in Bytes
              1bDescriptorType1ConstantString Descriptor (0x03)
              2bStringnUnicodeUnicode Encoded String


              • 더 자세한 내용은 아래사이트 (상위내용은 아래에서 참고)
              USB Descriptor의 구조
                http://www.beyondlogic.org/usbnutshell/usb5.shtml

              USB의 SETUP Packet
                http://www.beyondlogic.org/usbnutshell/usb6.shtml