Jetson TX2의 Jetpack 4.2에서 제공해주는 python 2가 아닌 다른 python3 sample 이며,이를 테스트를 하고자 한다.
UFF는 Format인 것은 알겠는데, SSD가 뭔지를 몰라서 아래와 같이 찾아봤다.
- SSD ( Single Shot MultiBox Detector)관련사항
https://ai.google/research/pubs/pub44872
http://openresearch.ai/t/ssd-single-shot-multibox-detector/74
결론적으로 동작은 Tensorflow의 모델을 SSD Model을 가져와서 UFF로 저장 후 TensorRT로 변환하고 이를 동작하는 개념이다.
이전 Yolo 테스트와 유사하며, 기능도 거의 유사하다.
README를 보면, SSD는 Object Detection에서 많이 사용되는 모델이라고 하며, SSD는 크게 두가지로 나뉘어지며, 특징추출과 detection 부분이라고 한다.
- convolutional feature extractor like VGG, ResNet, Inception (현재 Inception_v2 사용)
- detection part
이외에도 NVIDIA에서는 SSD 관련 example을 제공해주고 있으며, 이를 전부 다 테스트를 진행을 못할 것 같아 아래만 테스트 진행
- Python3 -UFF_SSD Example
$ cd /usr/src/tensorrt/samples/python
$ ls
common.py   end_to_end_tensorflow_mnist  introductory_parser_samples  uff_custom_plugin  yolov3_onnx
common.pyc  fc_plugin_caffe_mnist        network_api_pytorch_mnist    uff_ssd

$ cd uff_ssd

$ ls
CMakeLists.txt  detect_objects.py  images  plugin  README.md  requirements.txt  utils  voc_evaluation.py

$ cat requirements.txt
numpy
Pillow
pycuda
requests
tensorflow-gpu

//  README에서 요구하는 Package 설치진행

$ sudo pip install -r requirements.txt    //tensorflow-gpu version 정의 문제로 찾지못함
$ python3 -m pip install -r requirements.txt   // tensorflow-gpu version 정의 문제로 찾지못함
Collecting numpy (from -r requirements.txt (line 1))
Collecting Pillow (from -r requirements.txt (line 2))
Collecting pycuda (from -r requirements.txt (line 3))
  Using cached https://files.pythonhosted.org/packages/4d/29/5a3eb66c2f1a4adc681f6c8131e9ed677af31b0c8a78726d540bd44b3403/pycuda-2019.1.tar.gz
Collecting requests (from -r requirements.txt (line 4))
  Using cached https://files.pythonhosted.org/packages/51/bd/23c926cd341ea6b7dd0b2a00aba99ae0f828be89d72b2190f27c11d4b7fb/requests-2.22.0-py2.py3-none-any.whl
Collecting tensorflow-gpu (from -r requirements.txt (line 5))
  Could not find a version that satisfies the requirement tensorflow-gpu (from -r requirements.txt (line 5)) (from versions: )
No matching distribution found for tensorflow-gpu (from -r requirements.txt (line 5))

// requirement의 tensorflow의 version 명시를 진행하지 않아 설치진행을 못하는 것 같음
// pip를 진행을 해보면, Collecting 다음에 Building 으로 진행이 되어야 설치진행, 그래서 상위 Package 전부 미설치됨, 별도 설치진행

$ pip or pip3 search //명령으로 찾으면 tensorflow-gpu (1.13.1) 발견, 혹시 몰라 NVIDIA Site 재확인 (공식버전이 있음)

$ python3 -m pip install Pillow numpy pycuda requests  // requirment의 Module들을 별도 설치 진행
python3는 현재 상위 requirment가 하나도 설치가 진행되지 않았으며, 관련부분은 별도설치진행
- python3 Tensorflow-GPU 별도설치
그래서 NVIDIA의 공식 사이트에서 확인하고 관련사항 확인
$ python3 --version  // python3 version 확인
Python 3.6.7
//  NVIDIA tensorflow-gpu official version install
$ sudo apt-get install libhdf5-serial-dev hdf5-tools // tensorlfow 에서 필요
$ pip3 install --extra-index-url https://developer.download.nvidia.com/compute/redist/jp/v42 tensorflow-gpu==1.13.1+nv19.5 --user    //  official release of TensorFlow for Jetson TX2
How To Install Tensorflow-GPU
https://devtalk.nvidia.com/default/topic/1038957/jetson-tx2/tensorflow-for-jetson-tx2-/
https://developer.nvidia.com/embedded/downloads#?search=tensorflow
https://docs.nvidia.com/deeplearning/frameworks/install-tf-jetsontx2/index.html
NVIDIA DeepLearning Frameworks
https://developer.nvidia.com/deep-learning-frameworks
Jetson Package Download
https://developer.nvidia.com/embedded/downloads
Jetson How to install Tensorflow Document
https://docs.nvidia.com/deeplearning/dgx/install-tf-jetsontx2/index.html
- Python3 -UFF_SSD Build
$ pwd
/usr/src/tensorrt/samples/python/uff_ssd

$ sudo  mkdir -p build
$ cd build
$ sudo cmake ..
$ sudo make
$ ls
CMakeCache.txt  CMakeFiles  cmake_install.cmake  libflattenconcat.so  Makefile
$ cd ..
$ pwd
/usr/src/tensorrt/samples/python/uff_ssd
- UFF_SSD 위해 이미지 복사 및 테스트
- download pretrained ssd_inception_v2_coco_2017_11_17 (tensorflow object detetion API)
- 이 모델을 TensorRT로 변환되고 Model version 이름이 추가됨
- TensorRT inference engine 빌드 후 File로 저장 한다.
- TensorRT의 Optimization에서 frozen graph가 추가되며, 이는 Time consumimg 측정
세부내용은 README.md 를 확인하자.
$ sudo cp ../yolov3_onnx/dog.jpg .
$ sudo cp ../yolov3_onnx/cat.jpg .

$ vi detect_objects.py //TensorRT로 동작 (UFF->TensorRT Format)
import os
import ctypes
import time
import sys
import argparse

import numpy as np
from PIL import Image
import tensorrt as trt

import utils.inference as inference_utils # TRT/TF inference wrappers
import utils.model as model_utils # UFF conversion
import utils.boxes as boxes_utils # Drawing bounding boxes
import utils.coco as coco_utils # COCO dataset descriptors
from utils.paths import PATHS # Path management
...............

$ sudo python3 detect_objects.py dog.jpg  // download ssd_inception_v2_coco_2017_11_17.tar.gz
Preparing pretrained model
Downloading /usr/src/tensorrt/samples/python/uff_ssd/utils/../workspace/models/ssd_inception_v2_coco_2017_11_17.tar.gz
Download progress [==================================================] 100%
Download complete
Unpacking /usr/src/tensorrt/samples/python/uff_ssd/utils/../workspace/models/ssd_inception_v2_coco_2017_11_17.tar.gz
Extracting complete
Removing /usr/src/tensorrt/samples/python/uff_ssd/utils/../workspace/models/ssd_inception_v2_coco_2017_11_17.tar.gz
Model ready
WARNING:tensorflow:From /usr/lib/python3.6/dist-packages/graphsurgeon/StaticGraph.py:123: FastGFile.__init__ (from tensorflow.python.platform.gfile) is deprecated and will be removed in a future version.
Instructions for updating:
Use tf.gfile.GFile.
WARNING: To create TensorRT plugin nodes, please use the `create_plugin_node` function instead.
UFF Version 0.5.5
=== Automatically deduced input nodes ===
[name: "Input"
op: "Placeholder"
attr {
  key: "dtype"
  value {
    type: DT_FLOAT
  }
}
attr {
  key: "shape"
  value {
    shape {
      dim {
        size: 1
      }
      dim {
        size: 3
      }
      dim {
        size: 300
      }
      dim {
        size: 300
      }
    }
  }
}
]
=========================================

Using output node NMS
Converting to UFF graph
Warning: No conversion function registered for layer: NMS_TRT yet.
Converting NMS as custom op: NMS_TRT
Warning: No conversion function registered for layer: FlattenConcat_TRT yet.
Converting concat_box_conf as custom op: FlattenConcat_TRT
Warning: No conversion function registered for layer: GridAnchor_TRT yet.
Converting GridAnchor as custom op: GridAnchor_TRT
Warning: No conversion function registered for layer: FlattenConcat_TRT yet.
Converting concat_box_loc as custom op: FlattenConcat_TRT
No. nodes: 563
UFF Output written to /usr/src/tensorrt/samples/python/uff_ssd/utils/../workspace/models/ssd_inception_v2_coco_2017_11_17/frozen_inference_graph.uff
UFF Text Output written to /usr/src/tensorrt/samples/python/uff_ssd/utils/../workspace/models/ssd_inception_v2_coco_2017_11_17/frozen_inference_graph.pbtxt
TensorRT inference engine settings:
  * Inference precision - DataType.FLOAT
  * Max batch size - 1

Building TensorRT engine. This may take few minutes.
TensorRT inference time: 97 ms
Detected bicycle with confidence 98%  // bicycle 발견했지만 에러발생 (libfreetype 문제)
Traceback (most recent call last):
  File "detect_objects.py", line 193, in module
    main()
  File "detect_objects.py", line 180, in main
    analyze_prediction(detection_out, det * prediction_fields, img_pil)
  File "detect_objects.py", line 87, in analyze_prediction
    color=coco_utils.COCO_COLORS[label]
  File "/usr/src/tensorrt/samples/python/uff_ssd/utils/boxes.py", line 33, in draw_bounding_boxes_on_image
    boxes[i, 3], color, thickness, display_str_list[i])
  File "/usr/src/tensorrt/samples/python/uff_ssd/utils/boxes.py", line 77, in draw_bounding_box_on_image
    font = ImageFont.truetype('arial.ttf', 24)
  File "/home/jetsontx2/.local/lib/python3.6/site-packages/PIL/ImageFont.py", line 280, in truetype
    return FreeTypeFont(font, size, index, encoding, layout_engine)
  File "/home/jetsontx2/.local/lib/python3.6/site-packages/PIL/ImageFont.py", line 136, in __init__
    if core.HAVE_RAQM:
  File "/home/jetsontx2/.local/lib/python3.6/site-packages/PIL/ImageFont.py", line 40, in __getattr__
    raise ImportError("The _imagingft C module is not installed")
ImportError: The _imagingft C module is not installed

$ sudo apt-get install libfreetype6-dev    // libfreetype 문제발생, 설치 진행
$ pip3 uninstall Pillow;pip3 install --no-cache-dir Pillow  // pillow package 재설치

$ sudo python3 detect_objects.py dog.jpg   // 재설치 이후 다시 테스트 진행
TensorRT inference engine settings:
  * Inference precision - DataType.FLOAT  //32bit FLOAT, 16bit HALF
  * Max batch size - 1

Loading cached TensorRT engine from /usr/src/tensorrt/samples/python/uff_ssd/utils/../workspace/engines/FLOAT/engine_bs_1.buf
TensorRT inference time: 347 ms
Detected bicycle with confidence 98%
Detected dog with confidence 95%
Detected car with confidence 79%
Total time taken for one image: 456 ms
Saved output image to: /usr/src/tensorrt/samples/python/uff_ssd/utils/../image_inferred.jpg

$ eog image_inferred.jpg   // 아래그림 참조

$ sudo python3 detect_objects.py cat.jpg   // 재설치 이후 다시 테스트 진행
TensorRT inference engine settings:
  * Inference precision - DataType.FLOAT
  * Max batch size - 1

Loading cached TensorRT engine from /usr/src/tensorrt/samples/python/uff_ssd/utils/../workspace/engines/FLOAT/engine_bs_1.buf
TensorRT inference time: 120 ms
Detected cat with confidence 98%
Total time taken for one image: 186 ms

Saved output image to: /usr/src/tensorrt/samples/python/uff_ssd/utils/../image_inferred.jpg

$ eog image_inferred.jpg  // 아래그림 참조
SSH로 테스트와 직접 HDMI 연결하여 테스트를 진행해보면, SSH가 좀 느린 것 같다.
처음에는 300x300만 되는줄 알았는데, 테스트해보니, 얼추 다 동작되는 것 같다.


1.2 VOC TEST 부분
README의 옵션으로 시도 했으며, SSD 모델을 VOC라는 Image들을 이용하여 Training 하여 성능을 향상시키는 것 같다. (세부내용은 README에도 없음)
VOC 내부에는 다양한 Image들이 존재하며 왜 이렇게 존재하는지는 나중에 별도로 알아야 할 것 같다.
$ sudo wget http://host.robots.ox.ac.uk/pascal/VOC/voc2007/VOCtest_06-Nov-2007.tar   //download 가 잘안됨,
$ sudo wget http://pjreddie.com/media/files/VOCtest_06-Nov-2007.tar    //다른 mirror 사이트를 찾음,  https://pjreddie.com/projects/pascal-voc-dataset-mirror/

$ sudo tar xvf VOCtest_06-Nov-2007.tar

$ sudo python3 voc_evaluation.py --voc_dir /usr/src/tensorrt/samples/python/uff_ssd/VOCdevkit/VOC2007  // Model은 상위와 동일
Preprocessing VOC dataset. It may take few minutes.
TensorRT inference engine settings:
  * Inference precision - DataType.FLOAT
  * Max batch size - 64

Building TensorRT engine. This may take few minutes.
Infering image 1/4952
Infering image 65/4952
Infering image 129/4952
Infering image 193/4952
Infering image 257/4952
Infering image 321/4952
Infering image 385/4952
Infering image 449/4952
Infering image 513/4952
Infering image 577/4952
Infering image 641/4952
Infering image 705/4952
Infering image 769/4952
Infering image 833/4952
Infering image 897/4952
Infering image 961/4952
Infering image 1025/4952
Infering image 1089/4952
Infering image 1153/4952
Infering image 1217/4952
Infering image 1281/4952
Infering image 1345/4952
Infering image 1409/4952
Infering image 1473/4952
Infering image 1537/4952
Infering image 1601/4952
Infering image 1665/4952
Infering image 1729/4952
Infering image 1793/4952
Infering image 1857/4952
Infering image 1921/4952
Infering image 1985/4952
Infering image 2049/4952
Infering image 2113/4952
Infering image 2177/4952
Infering image 2241/4952
Infering image 2305/4952
Infering image 2369/4952
Infering image 2433/4952
Infering image 2497/4952
Infering image 2561/4952
Infering image 2625/4952
Infering image 2689/4952
Infering image 2753/4952
Infering image 2817/4952
Infering image 2881/4952
Infering image 2945/4952
Infering image 3009/4952
Infering image 3073/4952
Infering image 3137/4952
Infering image 3201/4952
Infering image 3265/4952
Infering image 3329/4952
Infering image 3393/4952
Infering image 3457/4952
Infering image 3521/4952
Infering image 3585/4952
Infering image 3649/4952
Infering image 3713/4952
Infering image 3777/4952
Infering image 3841/4952
Infering image 3905/4952
Infering image 3969/4952
Infering image 4033/4952
Infering image 4097/4952
Infering image 4161/4952
Infering image 4225/4952
Infering image 4289/4952
Infering image 4353/4952
Infering image 4417/4952
Infering image 4481/4952
Infering image 4545/4952
Infering image 4609/4952
Infering image 4673/4952
Infering image 4737/4952
Infering image 4801/4952
Infering image 4865/4952
Infering image 4929/4952
Reading annotation for 1/4952
Reading annotation for 101/4952
Reading annotation for 201/4952
Reading annotation for 301/4952
Reading annotation for 401/4952
Reading annotation for 501/4952
Reading annotation for 601/4952
Reading annotation for 701/4952
Reading annotation for 801/4952
Reading annotation for 901/4952
Reading annotation for 1001/4952
Reading annotation for 1101/4952
Reading annotation for 1201/4952
Reading annotation for 1301/4952
Reading annotation for 1401/4952
Reading annotation for 1501/4952
Reading annotation for 1601/4952
Reading annotation for 1701/4952
Reading annotation for 1801/4952
Reading annotation for 1901/4952
Reading annotation for 2001/4952
Reading annotation for 2101/4952
Reading annotation for 2201/4952
Reading annotation for 2301/4952
Reading annotation for 2401/4952
Reading annotation for 2501/4952
Reading annotation for 2601/4952
Reading annotation for 2701/4952
Reading annotation for 2801/4952
Reading annotation for 2901/4952
Reading annotation for 3001/4952
Reading annotation for 3101/4952
Reading annotation for 3201/4952
Reading annotation for 3301/4952
Reading annotation for 3401/4952
Reading annotation for 3501/4952
Reading annotation for 3601/4952
Reading annotation for 3701/4952
Reading annotation for 3801/4952
Reading annotation for 3901/4952
Reading annotation for 4001/4952
Reading annotation for 4101/4952
Reading annotation for 4201/4952
Reading annotation for 4301/4952
Reading annotation for 4401/4952
Reading annotation for 4501/4952
Reading annotation for 4601/4952
Reading annotation for 4701/4952
Reading annotation for 4801/4952
Reading annotation for 4901/4952
Saving cached annotations to /usr/src/tensorrt/samples/python/uff_ssd/utils/../workspace/annotations_cache/annots.pkl
AP for aeroplane = 0.7817
AP for bicycle = 0.7939
AP for bird = 0.6812
AP for boat = 0.5579
AP for bottle = 0.4791
AP for bus = 0.8383
AP for car = 0.7645
AP for cat = 0.8259
AP for chair = 0.5948
AP for cow = 0.7847
AP for diningtable = 0.6731
AP for dog = 0.7886
AP for horse = 0.8402
AP for motorbike = 0.8103
AP for person = 0.7848
AP for pottedplant = 0.4290
AP for sheep = 0.7474
AP for sofa = 0.7683
AP for train = 0.8429
AP for tvmonitor = 0.7145
Mean AP = 0.7251
상위 테스트들은 전부 Jetson TX2의 Normal 상태에서 테스트를 진행을 했으며, 성능을 더 올리고 싶다면, Clock 부분을 수정하여 재 테스트를 진행하자.
2. TensorBoard 테스트
아직 TensorBoard의 정확한 용도와 사용법을 숙지하지 못하여 실행부분만 실행해본다.
$ cd ~
$ mkdir jhlee
$/home/jetsontx2/.local/bin/tensorboard --logdir ~/jhlee   // tensorboard는 상위 tensorflow로 이미 설치됨
browser를 이용하여 JetsonTX2의 ip를 접속 http://10.0.0.174:6006/

TensorBoard (*.PBTX)
https://www.tensorflow.org/guide/graph_viz
https://gusrb.tistory.com/21
3. TensorFlow와 TensorRT 개발방법
아래의 문서를 보면, TensorRT Inference optimization tool with TensorFlow 발표했으며, TensorFlow 1.7 에서 이용가능한 것 같다.
아래의 문서를 기반으로 예제를 Download 받아 테스트를 진행을 해보며 추후 시간이 된다면 더 자세히 문서를 읽고 관련내용들을 숙지한 후 테스트를 진행해본다.
- TensorRT를 Tensorflow에서 활용방법
- TF-TRT ( Tensorflow 에서 직접 TensorRT 엔진을 사용하는 방법 )
- UFF (Tensorflow에서 UFF Format으로 변환한 후 TensorRT로 사용하는 방법)
TF-TRT Guide
https://docs.nvidia.com/deeplearning/frameworks/tf-trt-user-guide/index.html
https://docs.nvidia.com/deeplearning/frameworks/tf-trt-user-guide/index.html#work
https://docs.nvidia.com/deeplearning/frameworks/tf-trt-user-guide/index.html#usingtftrt
TF-TRT-TensorBoard
https://docs.nvidia.com/deeplearning/frameworks/tf-trt-user-guide/index.html#debug-tools
https://devblogs.nvidia.com/tensorrt-integration-speeds-tensorflow-inference/
Example

- Tensorflow의 개발 과 Tensorflow와 TensorRT개발 비교
Trained Graph 만들고, 이를 Frozen Graph 변경하고 실행을 한다.
처음 Freeze 라는 용어를 몰랐는데, 일종의 실행 Format으로 변경한다고 생각하면 되겠다.
TensorRT에서는 Serialize라는 용어가 나오는데 이역시 실행될 수 or 저장되어지는Format이라고 생각하면되겠지만, TensorRT의 동작이 정확히 이해는 안되지만, 정리하자.
하지만, Freeze과 Serialize의 차이는 존재하는 것 같으며, 각각 사용되어지는 Framework에서 저장되는 방식이 다른 것 같다.
Framework에서는 호환
아래를 보면, Optimized Plan들이 TensorRT 유저입장에서는 엔진으로 보이며,
Optimized Plan들은 TensorRT Runtime Engine에 의해 De-Serialized되며, 적용이 된다.
3.1 TensorRT Deployment Flow
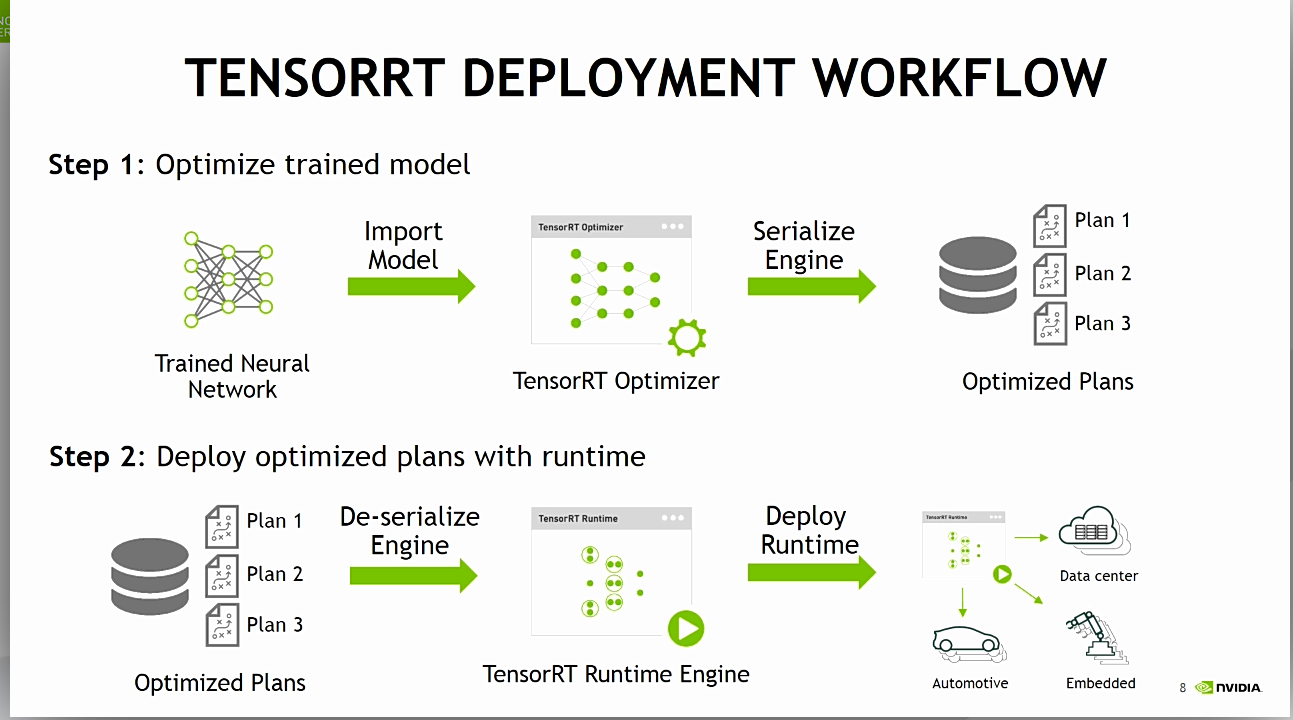
- 상위 STEP 1의 Optimize trained model

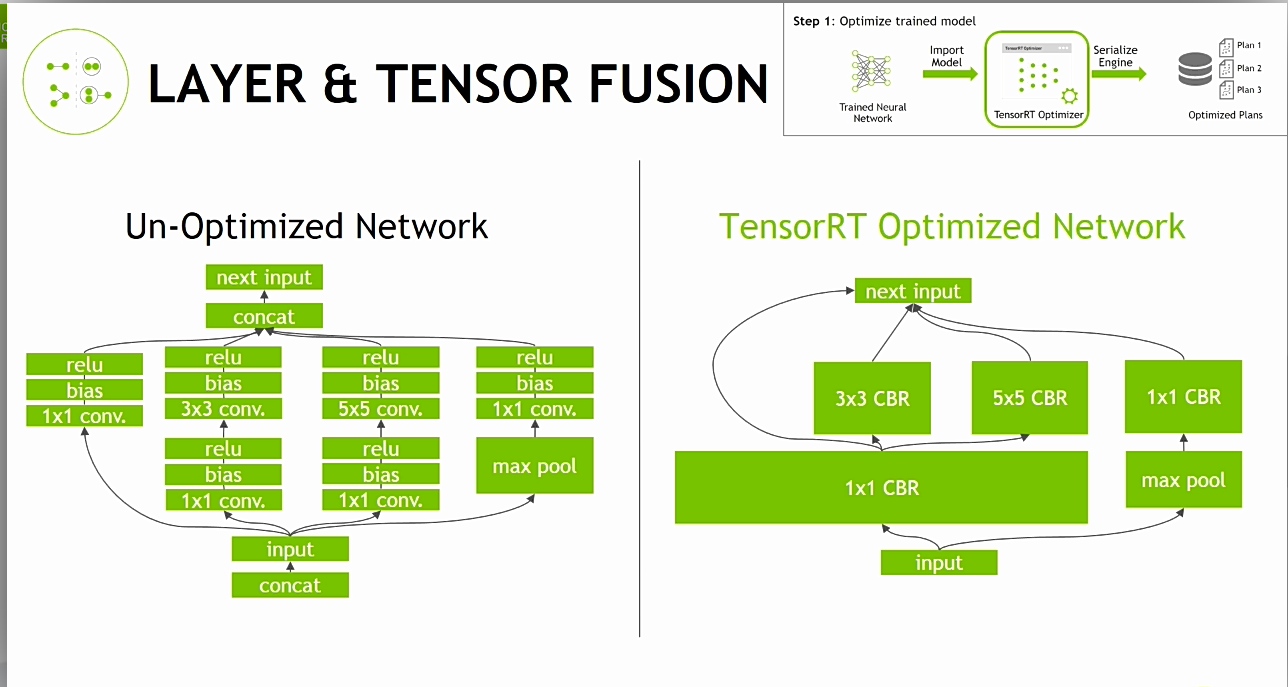
Layer & Tensor Fusion
복잡한 Layer의 갯수를 최소한으로 줄이는 것이며, 이를 통하여, 많은 Layer가 줄어든다.
성능향상이 된다.
Weights & Activation Precision Calibration
FP32, FP16, INT8 로 변경하면 아래와 같이 Range가 변경이 되며, 최적화를 진행하지만, 이는 TensorRT의 Manual 반드시 참조 (각 Layer와 지원여부 확인)

Kernel Auto Tuning 과 Dynamic Tensor Memory
Kernel 과 Memory관리를 해주는 기능인 것 같은데, 이부분은 정확한 이해를 다른 부분을 이해하고 하자.

- UFF Format TensorRT (python)

아래를 보면 이해를 할수 있다. Plan 파일이 Engine파일이며, 이는 TensorRT에 동작된다
.

- DEEP LEARNING DEPLOYMENT WITH TENSORRT
http://on-demand.gputechconf.com/gtcdc/2017/video/DC7172/
https://youtu.be/6My-daDk4zE?list=PLoS6u5SJMkUk1kk2_WWHfTrANJuYvZNIP
3.2 TensorRT의 장점의 정리
- TensorRT는 아래와 같이 다양한 Framework를 지원가능

- Caffe -> Caffe Parser
- CNTK, mxnet, pytorch, caffe2 -> onnx parser
- Tensorflow -> UFF parser or TF-TRT 사용
아래의 정리는 TensorRT 4.0이므로 착각하지말고 , TensorRT 5.0은 기능이 더 개선되었음

3.3 Tensorflow 설치 와 tftrt_sample 실행
- python2-Tensorflow-gpu 설치
python3 version 도 제대로 동작이 안됨 (주의, python3 tensorflow-gpu 재설치 진행 )
  $ pip install --extra-index-url=https://developer.download.nvidia.com/compute/redist/jp/v33/ tensorflow-gpu
// 문제발생 CUDA 9.0 으로 동작하므로 현재 CUDA 10.0하고 PATH가 맞지 않음
//libcublas.so.9.0: cannot open shared object file: No such file or directory
python2 /3 version 설치방법 있지만, 시도해보지 않음
https://stackoverflow.com/questions/49811510/how-to-install-tensorflow-gpu-for-both-python2-and-python3?rq=1
- Example TEST ( python2->python3 변경)
$ tar -xvf tftrt_sample.tar.xz
$ cd tftrt/

$ cat README
TRT Tensorflow integration example

Install tensorRT and Tensorflow with TRT contrib. Instructions are available from:
https://github.com/tensorflow/tensorflow/tree/master/tensorflow/contrib/tensorrt

Run the sample with:
./run_all.sh
It will run through native, FP32, FP16 and INT8 examples


$ cat ./run_all.sh
#!/bin/bash

python tftrt_sample.py --native --FP32 --FP16 --INT8 \
                       --num_loops 10 \
                       --topN 5 \
                       --batch_size 4 \
                       --workspace_size 2048 \
                       --log_file log.txt \
                       --network resnet_v1_50_frozen.pb \
                       --input_node input \
                       --output_nodes resnet_v1_50/predictions/Reshape_1 \
                       --img_size 224 \
                       --img_file  grace_hopper.jpg

$ ./run_all3.sh  // python3로 변경 후 실행

Namespace(FP16=True, FP32=True, INT8=True, batch_size=4, dump_diff=False, native=True, num_loops=10, topN=5, update_graphdef=False, with_timeline=False, workspace_size=2048)
Starting at 2019-06-05 10:36:28.410090
2019-06-05 10:36:28.522480: W tensorflow/core/platform/profile_utils/cpu_utils.cc:98] Failed to find bogomips in /proc/cpuinfo; cannot determine CPU frequency
2019-06-05 10:36:28.524851: I tensorflow/compiler/xla/service/service.cc:161] XLA service 0x27b6b450 executing computations on platform Host. Devices:
2019-06-05 10:36:28.525015: I tensorflow/compiler/xla/service/service.cc:168]   StreamExecutor device (0): ,
2019-06-05 10:36:28.657662: I tensorflow/stream_executor/cuda/cuda_gpu_executor.cc:965] ARM64 does not support NUMA - returning NUMA node zero
2019-06-05 10:36:28.658228: I tensorflow/compiler/xla/service/service.cc:161] XLA service 0x27a69610 executing computations on platform CUDA. Devices:
2019-06-05 10:36:28.658354: I tensorflow/compiler/xla/service/service.cc:168]   StreamExecutor device (0): NVIDIA Tegra X2, Compute Capability 6.2
2019-06-05 10:36:28.658837: I tensorflow/core/common_runtime/gpu/gpu_device.cc:1433] Found device 0 with properties:
name: NVIDIA Tegra X2 major: 6 minor: 2 memoryClockRate(GHz): 1.02
pciBusID: 0000:00:00.0
totalMemory: 7.67GiB freeMemory: 784.20MiB
2019-06-05 10:36:28.658921: I tensorflow/core/common_runtime/gpu/gpu_device.cc:1512] Adding visible gpu devices: 0
2019-06-05 10:36:32.198382: I tensorflow/core/common_runtime/gpu/gpu_device.cc:984] Device interconnect StreamExecutor with strength 1 edge matrix:
2019-06-05 10:36:32.198520: I tensorflow/core/common_runtime/gpu/gpu_device.cc:990]      0
2019-06-05 10:36:32.198596: I tensorflow/core/common_runtime/gpu/gpu_device.cc:1003] 0:   N
2019-06-05 10:36:32.198931: I tensorflow/core/common_runtime/gpu/gpu_device.cc:1115] Created TensorFlow device (/job:localhost/replica:0/task:0/device:GPU:0 with 3926 MB memory) -> physical GPU (device: 0, name: NVIDIA Tegra X2, pci bus id: 0000:00:00.0, compute capability: 6.2)
WARNING:tensorflow:From tftrt_sample.py:92: FastGFile.__init__ (from tensorflow.python.platform.gfile) is deprecated and will be removed in a future version.
Instructions for updating:
Use tf.gfile.GFile.
INFO:tensorflow:Starting execution
./run_all3.sh: line 13: 31992 Segmentation fault      (core dumped) python3 tftrt_sample.py --native --FP32 --FP16 --INT8 --num_loops 10 --topN 5 --batch_size 4 --workspace_size 2048 --log_file log.txt --network resnet_v1_50_frozen.pb --input_node input --output_nodes resnet_v1_50/predictions/Reshape_1 --img_size 224 --img_file grace_hopper.jpg
일단 상위예제로 Graph가 동작될 줄 알았으나, 문제가 있어 동작되지 않으며, Tensorboard와 연결해서 볼수 있을 줄 알았는데, 디버깅을 해야 할 것 같음추후 Tensorboard의 graph 부분의 활용법을 알아봐야겠음
4. NVIDIA의 UFF Format 관련사항
TensorRT에서는 현재 3가지 Parser를 제공하여 다른 기반 Platform 의 모델을 가져올수 있다
현재 상위 Tensorflow는 UFF를 사용하므로, 정확한 역할과 관련기능을 정확하게 이해를 해야겠다.
TensorRT의 배포구조
https://devblogs.nvidia.com/deploying-deep-learning-nvidia-tensorrt/
UFF Parser
https://docs.nvidia.com/deeplearning/sdk/tensorrt-api/python_api/parsers/Uff/pyUff.html
UFF Converter
https://docs.nvidia.com/deeplearning/sdk/tensorrt-api/index.html
https://docs.nvidia.com/deeplearning/sdk/tensorrt-api/python_api/uff/uff.html
UFF Operator
https://docs.nvidia.com/deeplearning/sdk/tensorrt-api/python_api/uff/Operators.html
댓글 없음 :
댓글 쓰기