1. Bitbucket Site
Atassian은 요즘 대세인 애자일 개발 솔루션업체로 Bitbucket 뿐만아니라 Bamboo와 Jira 등 여러개를 지원을 해주고 있지만, 물론 무료는 아니다.
DevOps 좀 더 관심을 가지면 무료로 쓸수 있는 것들이 많이 있다. 이 부분은 좀더 찾아보자
https://ko.atlassian.com/
Bitbucket Site는 Github와 같이 Git Remote Repository를 제공해주는 Site이며
SourceTree라는 Git관련 프로그램 무료이용이 가능하며 가장 편한게 호환성있게 사용할 수 있어 소개한다.
SourceTree는 Git와 Merurial Service를 무료이용이 가능하며 Bitbucket 뿐만아니라 Github도 연결하여 사용가능하기에 개인적으로 이것을 더 선호한다.
사실 사용하기도 더 편하다.
Bitbucket은 Github와 다르게 Private Remote Repositories를 개인에게 무료제공을 해주고 있다.
현재 나의 경우는 Private Repository는 Bitbucket을 이용하며, Team Project까지도 이용하고 있지만 무료이용한다 물론 5명까지 제한이 있다.
한마디로 좀 더 쓰고 싶다면, 돈내고 쓰라는 것이다.
Github는 경우는 모든 Remote Repository를 공개로 사용해야 무료이다.
https://blog.bitbucket.org/2014/05/30/repository-size-limits/
https://groups.google.com/forum/#!topic/bitbucket-users/5nXmbmVwYA4
여전히 Private Repository는 유료지만, 무제한 Repository를 제공한다.
다만, 개인으로 사용하는것인지, 기업 및 정부기관에서 사용할것인지에 따라 세부설정이 달라진다.
https://github.com/personal
https://github.com/business
1.1 Get Started 가입 및 설정
가입하여, 본인의 Username과 가지고 있는 email을 넣어 개인 Profile을 설정하고 가입하자.
Log in 은 email 과 passwd 이며, repository 사용시는 username과 passwd도 기억하자.
사이트의 맨 우측의 물음표 옆 아이콘을 누르면,
BitbucketSetting에서 기본설정이 가능하다.
이곳에서 자신의 기본 Profile과 Avatar및 Website 등 기본설정을 하자.
Username을 변경을 원하다면 이곳에서 가능하다.
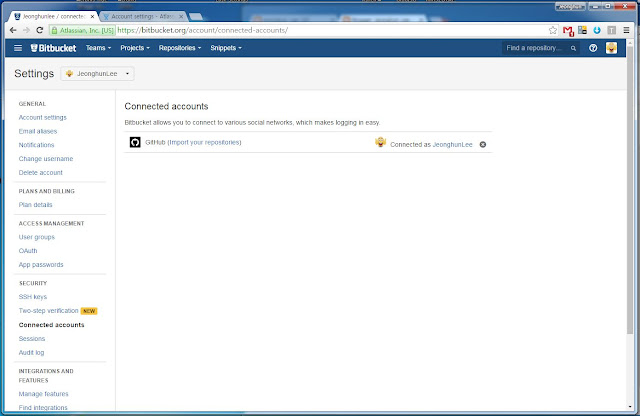
BitbucketSetting->Connected accounts->Github Import 가능
Github와도 연결이 가능하며 설정하자.
1.2 New Repository or Import Repository
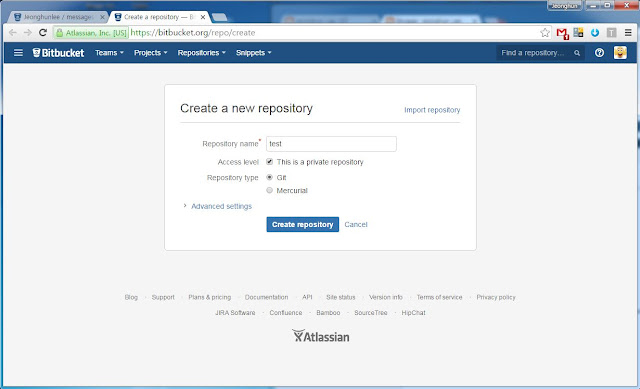
Bitbucket 사이트의 기본메뉴 Repositoires에서 본인 Remote Repository를 만들거나, 외부의 것을 import 하자.
- Repositories->Create repository
- Repositories->Import repository
Remote Repository가 생성이 되면, 상위 메뉴 Reositories에서 선택이 가능하며, 접근이된다.
아래와 같이 좌측에 여러메뉴가 있다.
A. Actions
- Clone : git의 clone 명령으로 remote repository에서 local repository를 생성해준다.
- Create branch: git의 branch 기능
- Create pull request : Pull request 요청 준비를 하는 것 같다.
- Compare : branch 사용할 경우, Compare & Merge 기능을 제공
- Fork: Repository를 그대로 복사가져오는 경우이며, Github와 동일하다.
B. Navigation
- Overview: ReadME.md 정보 및 git 주소를 알수 있으며 공유도 가능하다.
- Source: Repository에 저장된 Source를 보여준다.
- Commit: Remote Repository에 Push된 History를 보여준다.
- Branches: Branch를 가능하게 한다.
- Pull Request: 협업을 할 경우 pull command라는 것이 fetch하고 merge하는 기능이기에 일종의
상대방 Repository와내 Remote Repository를 싱크를 맞추는 작업이다.
상대방 Repository에게 내 변경된 소스를 반영해달라고 요청하는 것이며, 상대방은 이를 수락하면, pull을 이용하여
자신의 Source 반영한다.
- Download : 현재 Source download 및 Upload가 가능
- Setting: Repository Name , Project 설정 및 이곳에서 Repository를 Delete 및 Transfer가 가능
C. Navigation->Setting
- Repository Details : Repository Name, Project 설정 관련 및 기타 설정
- Delete repository : 현재 생성된 Repository 제거
- Transfer Repository : 다른 Bitbucket User에서 이전 Copy가 아님, Project 할 경우 사용.
- Wiki : Wiki 설정 (Private wiki , Public wiki 선택 가능)
1.4 주요 질문사항
https://confluence.atlassian.com/bitbucket/what-kind-of-limits-do-you-have-on-repository-file-upload-size-273877699.html
2. Source Tree 이용
Window에서 Git를 이용하려면, github의 경우는 자체 Tool을 제공하여 손쉽게 접근이 가능하지만,
물론 다른 WindowGit를 사용해도 된다. 하지만, Bitbucket은 atlassian 사의 Source Tree 사용을 권장한다.
그리고 이 Tool이 사용하기도 편하다. Source Tree Tool을 사용하기 위해서는 우선
atlassian사 가입하고 설치하자.
2.1 Source Tree 기본설치 후 확인작업
C:\Program Files (x86)\Atlassian\SourceTree\tools\putty
pageant.exe : SSH 인증하는 Tool
plink.exe : SSH or Telnet Tool
puttygen.exe : SSH Key Generator
A. Bitbucket 관련설정
처음 설치 진행 중에 호스팅계정목록에 bitbucket을 선택하고, username과 passwd를 넣어주어 설정한다.
이부분은 Bitbucket과 연동이 되는 매우 중요한 부분이기에 반드시 확인해야 한다.
- 호스팅계정목록에 bitbucket을 선택
- username과 passwd를 넣어준다.
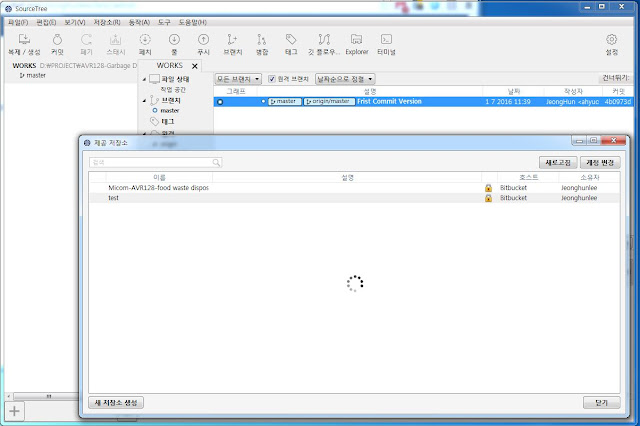
- 보기->제공저장소 본인의 Remote Repository들을 확인 가능
보기->제공 저장소 보기 선택
Bitbucket에서 만들어진 Remote Repositories들을 볼 수가 있으며, Window에 Local Repository가 없다면,
이를 더블클릭을 하여, Clone으로 가져오고 Local Repository를 생성하자.
B. Github 관련설정
지금 현재 Source Tree는 Bitbucket을 위한 Source Tree이며, 계정설정을 Bitbucket만 하였기에, 다음과 같이 Github 설정을 추가한다.
- 보기->제공저장소 본인의 Remote Repository 확인
- 계정변경 선택
- 호스팅 계정목록 에서 Bitbucket을 확인하고, 추가 버튼
- Github의 계정 username과 password 추가 확인 (email은 안되더군요)
위와 같이 설정하면 이제 모든 Remote Repository를 볼수가 있습니다.
3. SourceTree와 Bitbucket 이용방법
Bitbucket에서 Remote Repository Create 한 후 Source Tee를 이용하는 법을 간단히 소개한다.
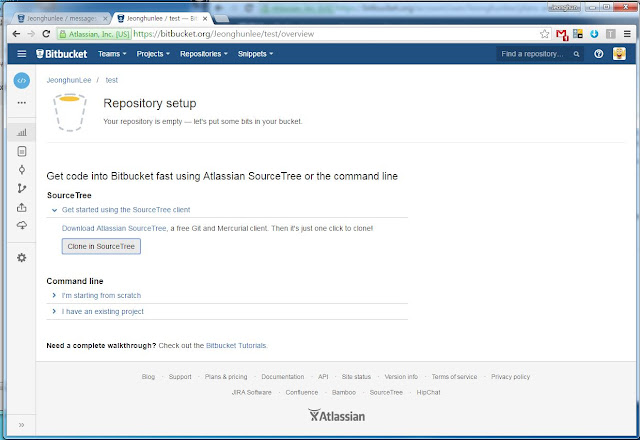
Source Tree로 기본설정 후 Bitbucket의 Empty Repository 에 Clone을 한 후 사용하면된다.
전체 기본이용순서는 다음과 같다.
- Bitbucket에서 Login 한 다음 상위메뉴 4메뉴 중 (Repositories->Create Repository)
- Bitbucket에서 new Remote Repository 생성 및 확인.
- Source Tree 에서 Clone으로 Remote와 동일한 Local Repository 생성
- 빈 디렉토리에 개발소스넣고, Commit으로 Stage에 넣고, Local Repository 반영
- 이 때 주석을 넣어 관련사항을 기록하자.
- Push 버튼 Bitbucket의 Remote Repository에 이를 반영
이를 3.1~3.3로 세부 그림과 함께 세부설명
3.1 Source Tree 이용하여 Bitbucket의 설정
- Bitbucket에서 new Repository를 test로 하나 생성
- Bitbucket에서 test Repository 생성확인
3.2 SourceTree 소스 생성/복제
복제는 즉 Git Clone은 Bitbucket에서 Github or Bitbucket의 Remote Repository 가져오는 것이다.
생성은 존재하지 않은 소스를 Bitbucket의 Remote Repository에 생성하게 하는 것이다.
두 방법은 거의 유사하며,
방법은 여러가지가 있겠지만 아래와 같이 두가지만 간단히 소개하겠다.
1. Repository를 생성(Init)/복제(clone) 방법
이 방법은 Github와 Bitbucket를 동시 사용한다면 모든 Git를 확인이 가능하며,
이를 확인하고 Git Init /Clone 하는 것이다.
- 보기->제공 저장소 보기 실행
- 상위 우측의 계정설정 (Github와 Bitbucket 설정)
- 기존에 존재하는 Remote Resoitory를 확인가능하다.
A. Remote Repository 생성방법
- 아래의 새저장소 생성 버튼
- 저장소 생성 메뉴에서 계정에 저장소 생성하기 메뉴에서 (Bitbucket or Github 변경)
- Remote Repository Name 설정
- 저장소 설정 한 후 BitBucket or Github에서 확인
B. Remote Repository 복제방법
- 아래 우측마우스를 누르고 Clone 버튼 한 다음 호스팅 프로젝트에서 본인 프로젝트 선택
- Source Tree-> 왼쪽 화면 하단 + 버튼 Repository 추가
2. 저장소복제/생성 버튼 선택
- 복제일 경우
- 소스경로/URL에서 나의 bitbucket을 주소 넣거나, 우측 호스팅프로젝트 버튼으로 탐색이용
- 목적지 경로 주소 나의 소스주소로 설정 반드시 빈디렉토리 설정
- 책갈피 본인이 알기 쉬운 이름으로 저장 Nick Name
- 클론 선택하여 소스를 Remote Repository 받는다.
*만약 실패한다면 목적지 경로 지우고, 새폴더로 생성하고 다시 시도 해보자.
* 책갈피의 역할
클론이 제대로 되어 Local Repository가 구성이 된다면, 소스트리 우측창에 프로젝트를 확인가능하다.
이때 좌측의 볼드체로 구성된 NickName이 바로 책갈피의 역할이며, 이름변경은 맘대로 가능하다.
그러므로, 본인의 프로젝트에 따라 알기쉽게 변경하여 사용하자.
3.3 Source Tree 소스 반영 (Push)
Workspace 는 정확히 말해, 나의 작업장소이며, 소스수정을 한다면
Local Repository에 이를 반영해야 하고, 그리고 나서, Remote Repository (Bitbucket)에 반영을 해야한다.
- Git Commit은 Local Repository에 나의 변경된 소스를 반영 하는 것이다.
- Git Push는 Local Repository와 Remote Repository를 Sink를 맟춘다고 보면된다.
이제 Git Command를 이해 했으니, 아래의 Source Tree를 사용해보자.
소스가 변경이 되었다면, 본인의 좌측의 local Repository 를 보면 아래와 같이 스테이지를 확인 가능하다.
이를 반영하면 된다.
- 본인의 Source를 변경해준다.
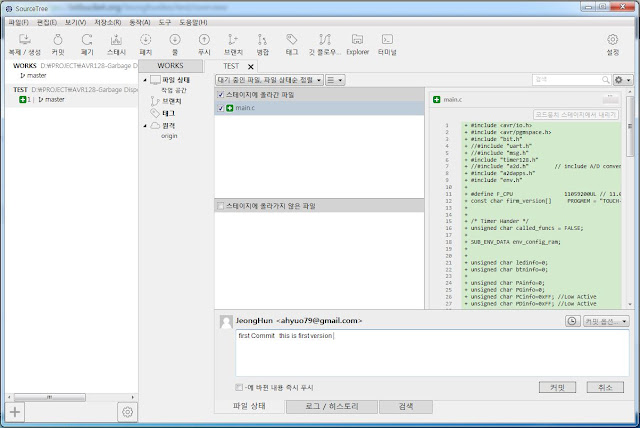
- Source Tree의 커밋버튼 눌러 이를 반영할 준비를 한다.
- 스테이지(Index or Stage Area) 작업소스 Stage All로 반영한다 (git개념참조)
- 맨 아래 주석을 채우고 Local Repository에 반영하기 위해서 커밋(Commit)을 진행
- Source Tree의 푸시버튼으로 Bitbucket에 이를 반영한다.
- 푸시도중 출력 전부보기로 현재 상태를 확인가능
Bitbucket의 나의 Repository로 가서 Commits을 보면 History를 확인가능
4. SourceTree와 Github이용방법
사용방법은 Bitbucket과 동일하며, Github 계정을 추가하고, Git Clone을 하면 별 문제 없이사용이 가능하다
5. 문제사항
가끔 다른분의 Repository를 Fork를 하고, Clone을 하면, 아래와 같은 문제가 발생한다.
소스다운은 되지만, SourceTree가 Blocking이 되며, 이 때 취소하지 않는다면, 폴더접근에도 문제가 생긴다.
이 방법을 해결하기 위해 처음 Embeded GIT 사용 및 Init로 사용하는 방법 등
여러방법을 했지만, 근본적인 문제해결이 되지않아 아래와 같이 소스와 함께 다 분석을 했다.
5.1 확장자 제한 및 설정
Local or Remote Repository에 못올라가는 문제는 SourceTree에서 아래와 같이 못올려주기 때문이니,아래와 같이 변경을 해주자.
- 도구->옵션
- Mercurial 메뉴 선택과 Git 메뉴 선택
- 전역무시목록 선택 파일 수정 (위 두 파일은 서로 다르며, 각각 설정해야한다)
기본적으로는 .gitignore를 이용해야하지만 손쉽게 이를 이용해서 설정하자.
.gitignore 수정하여 확장자 제어방법 소개
http://dolfalf.tistory.com/58
5.2 Git Clone 중 Blocking 되는 현상
git -c diff.mnemonicprefix=false -c core.quotepath=false clone --recursive https://JeonghunLee@github.com/JeonghunLee/stm32f1-ir.git D:\TEST\fff
Cloning into 'D:\TEST\fff'...

warning: templates not found C:\Program Files\Git\share\git-core\templates

Submodule 'common_lib' (git@github.com:ppkt/common_lib.git) registered for path 'common_lib'

Cloning into 'common_lib'...

The server's host key is not cached in the registry. You
have no guarantee that the server is the computer you
think it is.
The server's rsa2 key fingerprint is:

ssh-rsa 2048 16:27:ac:a5:76:28:2d:36:63:1b:56:4d:eb:df:a6:48
If you trust this host, enter "y" to add the key to
PuTTY's cache and carry on connecting.
If you want to carry on connecting just once, without
adding the key to the cache, enter "n".
If you do not trust this host, press Return to abandon the
connection.
- Remote Repository의 File 중 아래의 File 문제로 Blocking
위에서 안되는 이유가, Remote Repository가 또 다른 Remote Repository를 참조를 하였는데 또 다시 가져오다가,
멈추는 경우 인 경우인것이며, common_lib는 또 open된 Remote Repository 별다른 문제가 없이 동작이 되는게 맞는것 같다.
.gitattributes
.gitignore
.gitmodules
[submodule "common_lib"]
 path = common_lib
 url = git@github.com:ppkt/common_lib.git
원래는 SourceTree에서 Accept Server's Key 물어야하는데 Blocking이 된다.
다른 외국사이트를 보면 이를 옵션에서 Embeded GIT 설정으로 해결했는데, 해결이 되지 않는다.
그리고, Git init을 하여, PULL로 가져올려고 했는데 이 역시 실패.
나의 SourceTree도 가끔 아래와 같이 동작하지만, Key에서 문제가 발생한다.
cmd를 실행 한 후 강제로 plink로 Key를 받는 것이다.
이문제는 추후 SourceTree bug이므로 추후 upgrade되면 바뀔 것 같다.
- "C:\Program Files (x86)\Atlassian\SourceTree\tools\putty\plink.exe" github.com
- "C:\Program Files (x86)\Atlassian\SourceTree\tools\putty\plink.exe" bitbucket.org
FATAL ERROR: Disconnected: No supported authentication methods available (server sent: publickey)
https://confluence.atlassian.com/sourcetreekb/trust-a-server-s-host-key-when-no-button-is-available-to-trust-it-788731545.html
5.3 폴더 접근문제 발생
위 문제가 발생을 하면, SourceTree 종료해도 내부적으로
sh와 plink, pageant를 사용하는데 종료가 되지 않을 경우.
아래와 같이 탐색기에서도 접근문제가 발생한다.
이 때 해결책 다양하게 제공하지만, 본인은 unlocker 프로그램 자주이용하지만,
작업관리자가서 sh와 plink process가 종료하는 것이 좋은것 같다.
unlocker를 사용해도 process 여전히 존재함
http://answers.microsoft.com/ko-kr/windows/forum/windows_7-files/%ED%8C%8C%EC%9D%BC%EC%9D%B4-%EB%8B%A4%EB%A5%B8/3ae23758-9186-45c4-9fb9-aee55a69bcd7?auth=1
http://gong6587.tistory.com/1355
6. Team Project
사실 Git를 혼자 관리하고 하면, 매번 Commit으로 Local Repository 반영 후, Push로 Remote에 동기만 맞추면,
되기에 Fetch or Pull을 사용할 이유가 거의 없다. (SVN과 차이점도)
하지만, 2명이상 GIT 기반으로 같이 작업을 하면 이야기가 달라질 것이다.
아직 Repository를 Share를 해서, Member를 추가해서 사용해본적이 없다.
지금 생각으로는 위 방법도 아래와 같이 유사하게 동작할 것 같다.
6.1 Create Team
Bitbucket에서 Team->Create Team으로 Team을 만들고, 다른 Bitbucket 사용자 추가하여 넣어 만들자.
- Team name: Team 이름을 정하자.
- Team ID: bitbucket.org/teamid로 접근이 가능
Team을 구성할 경우, Project로 필요한데, Project 안에 Repository가 들어간다고 생각하면된다.
Team이 생성 후, Members에서 현재 Member를 확인하고, Following으로 변경
Follower의 개념 아직 모호하지만, User가 다른 User의 Repository 따른다는 것이다.
공유와 개념이 좀 헷갈린다.
https://confluence.atlassian.com/bitbucket/followers-resource-296095249.html
https://developer.github.com/v3/users/followers/
6.2 Create Project
Team이 존재하면, Project를 생성하여, Repository를 생성 및 Transfer해오자.
여러개의 Repository가 가능하므로, Project를 정하고, 가져오자.
- NAME: 만들고자 하는 Project 명
- KEY: 현재 어디에 사용이 되는지 정확히 모르겠다.
- Private Project 설정:
https://confluence.atlassian.com/bitbucket/projects-792497956.html
이 때 기존에 존재하던 나의 Remote Repository 있다면, Transfer를 하여 사용하던가 혹은 새로 생성하여 같이
이 Project를 공유해가면서 작업을 하는 것이다.
6.3 Window 작업(Local Repository)
Team으로 했을 경우, 상대방도 동시에 Commit과 Push를 하기 때문에 나의 소스는 항상 Commit하기 전에,
Remote와 동기를 맞춰야하 한다. 이때 사용하는 것이 Fetch or Pull 이다.
아래와 같이 Git 명령을 보면 되겠다.
http://ahyuo79.blogspot.com/2014/07/git-for-window_20.html
http://ahyuo79.blogspot.com/2014/07/git.html


