레이블이 SCM-GIT인 게시물을 표시합니다. 모든 게시물 표시

11/29/2019

Docker GitLab-CE 설치 및 기본이용확인

1. Docker로 이용 Gitlab-CE Server 설치 및 실행 

  • Docker Gitlab-CE 설치 및 기본운영 
Gitlab에서 쉽게 설명이 잘되어있어 따라하기도 쉽고 따라하기 좋다
  https://docs.gitlab.com/omnibus/docker/
  https://hub.docker.com/r/gitlab/gitlab-ce/tags/

  • Gitlab 직접 설치 Ubuntu
  https://about.gitlab.com/install/#ubuntu


문서를 읽다가 보면 현재 Docker Image에는 E-Mail을 위한 SMTP Server가 설치가 되어있지 않다고한다.
나중에 필요하다면 SMTP Server 설치를 진행해서도 테스트를 해보자


  • 기존에 SSH Server가 설치되어 정지

$ sudo service ssh status  //SSH Server 상태확인 
or 
$ sudo systemctl status ssh

$ sudo service ssh stop // SSH Server 정지  
or
$ sudo systemctl stop ssh

$ sudo systemctl enable/disable ssh //SSH Service enable/disable  

$ systemctl list-units --type service
$ systemctl list-units --type service --all


1.1 Image Download and Run Gitlab-CE Container 

기존으로 Background(detach)로 돌리것이므로, Docker의 설정인 Terminal mode 설정을 비롯하여 다른 설정이 필요없다.
본인이 Terminal에 들어가서 확인하고 싶다면 docker exec 로 이용하여 확인한다

$ docker pull gitlab/gitlab-ce

$ docker run --detach \
  --hostname gitlab.example.com \
  -p 443:443 -p 80:80 -p 22:22 \
  --name gitlab \
  --restart always \
  -v /srv/gitlab/config:/etc/gitlab \
  -v /srv/gitlab/logs:/var/log/gitlab \
  -v /srv/gitlab/data:/var/opt/gitlab \
  gitlab/gitlab-ce:latest

$ docker ps -a  // Container 동작확인 
CONTAINER ID        IMAGE                     COMMAND             CREATED             STATUS                 PORTS                                                          NAMES
e96d2500ff76        gitlab/gitlab-ce:latest   "/assets/wrapper"   2 hours ago         Up 2 hours (healthy)   0.0.0.0:22->22/tcp, 0.0.0.0:80->80/tcp, 0.0.0.0:443->443/tcp   gitlab


  • PortMapping 
  1. SSH : 22
  2. HTTP: 80
  3. HTTPS:443
이미 상위 Server를 사용한다면, 다른 Port로 Mapping하여 사용하자

  • Host 와 Container Data 공유
  1. /srv/gitlab/data      For storing the GitLab configuration files
  2. /srv/gitlab/logs       For storing logs
  3. /srv/gitlab/config  For storing the GitLab configuration files
상위설정대로 하면 Host의 /srv/gitlab 에 모든 정보가 저장되어진다.


  • hostname 
hostname은 나의 경우 없기때문에 그냥 기존대로 실행했으며, 추후 DDNS를 이용하여 hostname을 생성 한 후 나중에 다시 테스트 진행


1.2 Git Lab의 Config 설정 

Gitlab 의 설정은 /etc/gitlab/gitlab.rb 에서 하면되며, 자세한 내용은 아래의 세부 설정부분에서 참조 

  • GitLab Config 설정 및 확인 
$ docker exec -it gitlab /bin/bash
root@gitlab:/#   vi /etc/gitlab/gitlab.rb 

or 

$ docker exec -it gitlab editor /etc/gitlab/gitlab.rb  

Config의 SMTP 관련설정
  https://docs.gitlab.com/omnibus/settings/smtp.html

Config  HTTPS 관련설정
  https://docs.gitlab.com/omnibus/settings/nginx.html#enable-https

  • Gitlab Docker 재실행 
$ docker restart gitlab  //설정 변경후 Container 재시작  


1.3  Gitlab 관리 부분 


  • Data Backup 확인을 위해  Container 삭제 후 다시 재시작 

여러명의 ID를 만들고 데이타를 저장을 한 후 Gitlab Container를 삭제 후 다시 시작을 해보면 제대로 /srv/gitlab 에 Backup 되었는지 확인가능하다

$ docker ps -a  // Container 동작확인 
CONTAINER ID        IMAGE                     COMMAND             CREATED             STATUS                 PORTS                                                          NAMES
e96d2500ff76       gitlab/gitlab-ce:latest   "/assets/wrapper"   2 hours ago         Up 2 hours (healthy)   0.0.0.0:22->22/tcp, 0.0.0.0:80->80/tcp, 0.0.0.0:443->443/tcp   gitlab

$ docker stop e96d2500ff76   // Container 정지 

$ docker rm e96d2500ff76    // Container 삭제   

상위  docker run 명령어를 사용하여 다시 테스트 진행 (문제 없음확인)

  • GitLab의 Log 확인 
$ docker logs gitlab | tail 


2. Gitlab-CE 기본설정 및 확인 

아래의 링크로 접속 (본인 IP접속가능 or Hostname)
  http://localhost


Root Password를 설정


New User를 등록하고 관리시작
( Root 권한이라서 그런가 Sign in 이외 Resister 가 존재)


그룹 과 개인으로 구분해서 사용하자


그룹으로 생성


개인 Project 생성 및 기본 테스트


아직 Composer를 이용하여 별도설정 해보지 못했으며, 현재 테스트 용도로만 사용하고 있다.
그리고, Docker를 동시에 여러개 사용하지도 않는다.


Gitlab-CE 와 EE의 차이
  http://developer.gaeasoft.co.kr/development-guide/gitlab/gitlab-introduce/


  • Raspberry PI에서 직접 GitLab Server 이용 
  https://hackernoon.com/create-your-own-git-server-using-raspberry-pi-and-gitlab-f64475901a66
  https://projects.raspberrypi.org/en/projects/getting-started-with-git


6/07/2018

Git 사이트링크 및 관련링크 (Gitlab 사용 및 Docker 기능이용)

1. Git Site 가격 및 개별 정책 확인 

Github/Gitlab/Bitbucket 비교
  https://m.blog.naver.com/dlwhdgur20/221006619001

매번 가격과 기능정책이 변경되므로, 사실 주기적으로 가격과 지원사항을 직접 확인하자.

기업에서는 Bitbucket의 JIRA를 선호하는 것으로 보이면, 중/소기업은 Gitlab 선호하는 것으로 보인다. 
Github은 주로 Open Project용으로 많이 사용하는 것으로 보이는데, 가장크니, 많은 기능을 제공해주고 있다. 

Github 가격 및 정책확인

Gitlab 가격 및 정책확인

Bitbucket 가격 및 정책확인 

Gitlab 이외 GIT IO
  https://gogs.io/

Gitbook (Github와 연동가능)
현재 가입을 한 후 미사용했으며, 직접 사용해본 후 Link 
  https://legacy.gitbook.com/book/madnite1/git-gitlab-jenkins/details


1.1 Raspberry Pi 기반으로 Git 설치형서버 


1.2  Gitlab 관련사항

현재 가격적으로 Gitlab이 가장 좋고 괜찮으며, Community의 경우 무료로 설치가능하며,
Raspberry Pi 기반으로 Docker로 HDD는 RAID로 해서 만들어도 괜찮을 것 같다. 

물론 Build Server (CI)는 별도로 외부에 구성을 해야겠지만, 현재 Raspberry Pi 구성은 괜찮음

Gitlab CI ( Community Version 추후 사용)
  https://swalloow.github.io/gitlabci-docker

Gitlab 과 SLACK 연결   

Gitlab 기본 Manual 
Gitlab CE Docker 다른곳으로 이전방법 
Docker 기반의 Jenkins 

7/01/2016

SourceTree ( Git 관리용)

1. Bitbucket Site 

Atassian은 요즘 대세인 애자일 개발 솔루션업체로 Bitbucket 뿐만아니라 Bamboo와 Jira 등 여러개를 지원을 해주고 있지만, 물론 무료는 아니다.
DevOps 좀 더 관심을 가지면 무료로 쓸수 있는 것들이 많이 있다. 이 부분은 좀더 찾아보자

  https://ko.atlassian.com/

Bitbucket Site는 Github와 같이 Git Remote Repository를 제공해주는 Site이며
SourceTree라는 Git관련 프로그램 무료이용이 가능하며 가장 편한게 호환성있게 사용할 수 있어 소개한다.

SourceTree는 Git와 Merurial Service를 무료이용이 가능하며 Bitbucket 뿐만아니라 Github도 연결하여 사용가능하기에 개인적으로 이것을 더 선호한다.
사실 사용하기도 더 편하다.

Bitbucket은 Github와 다르게 Private Remote Repositories를 개인에게 무료제공을 해주고 있다.
현재 나의 경우는 Private Repository는 Bitbucket을 이용하며, Team Project까지도 이용하고 있지만 무료이용한다 물론 5명까지 제한이 있다.
한마디로 좀 더 쓰고 싶다면, 돈내고 쓰라는 것이다.

Github는 경우는 모든 Remote Repository를 공개로 사용해야 무료이다.

  • Project 진행시, 사용자수가 5명
   https://blog.bitbucket.org/2014/05/30/repository-size-limits/
   https://groups.google.com/forum/#!topic/bitbucket-users/5nXmbmVwYA4

  • Github도 최근에 변경이 된것 같다.
여전히 Private Repository는 유료지만, 무제한 Repository를 제공한다.
다만, 개인으로 사용하는것인지, 기업 및 정부기관에서 사용할것인지에 따라 세부설정이 달라진다.

   https://github.com/personal
   https://github.com/business


1.1 Get Started 가입 및 설정

가입하여, 본인의 Username과 가지고 있는 email을 넣어 개인 Profile을 설정하고 가입하자.
Log in 은 email 과 passwd 이며, repository 사용시는 username과 passwd도 기억하자.


  • 기본정보 설정
       사이트의 맨 우측의 물음표 옆 아이콘을 누르면, BitbucketSetting에서 기본설정이 가능하다.
       이곳에서 자신의 기본 Profile과  Avatar및 Website 등 기본설정을 하자.
       Username을 변경을 원하다면 이곳에서 가능하다.


  • 외부 Repository 연결
       BitbucketSetting->Connected accounts->Github Import 가능
       Github와도 연결이 가능하며 설정하자.


1.2 New Repository or Import Repository 


   Bitbucket 사이트의 기본메뉴 Repositoires에서 본인 Remote Repository를 만들거나, 외부의 것을 import 하자.

  1. Repositories->Create repository 
  2. Repositories->Import repository 


    Remote Repository가 생성이 되면,  상위 메뉴 Reositories에서 선택이 가능하며, 접근이된다.
   아래와 같이 좌측에 여러메뉴가 있다.

A. Actions
  • Clone : git의 clone 명령으로 remote repository에서 local repository를 생성해준다.
  • Create branch: git의 branch 기능
  • Create pull request :  Pull request 요청 준비를 하는 것 같다.
  • Compare : branch 사용할 경우, Compare & Merge 기능을 제공
  • Fork:  Repository를 그대로 복사가져오는 경우이며, Github와 동일하다.

B. Navigation
  • Overview: ReadME.md 정보 및 git 주소를 알수 있으며 공유도 가능하다.
  • Source: Repository에 저장된 Source를 보여준다.
  • Commit: Remote Repository에 Push된 History를 보여준다.
  • Branches: Branch를 가능하게 한다.
  • Pull Request: 협업을 할 경우 pull command라는 것이 fetch하고 merge하는 기능이기에 일종의 
       상대방 Repository와내 Remote Repository를 싱크를  맞추는 작업이다.
       상대방 Repository에게 내 변경된 소스를 반영해달라고 요청하는 것이며, 상대방은 이를 수락하면, pull을 이용하여
       자신의 Source 반영한다. 
  • Download : 현재 Source download 및 Upload가 가능
  • Setting:  Repository Name , Project 설정 및 이곳에서 Repository를 DeleteTransfer가 가능 

C. Navigation->Setting
  • Repository Details   : Repository Name, Project 설정 관련 및 기타 설정
  • Delete repository   : 현재 생성된 Repository 제거  
  • Transfer Repository : 다른 Bitbucket User에서 이전 Copy가 아님, Project 할 경우 사용.
  • Wiki                    :  Wiki 설정 (Private wiki , Public wiki 선택 가능)


1.4 주요 질문사항

  • File upload Size 제한 문제 
  https://confluence.atlassian.com/bitbucket/what-kind-of-limits-do-you-have-on-repository-file-upload-size-273877699.html


2. Source Tree 이용 

Window에서 Git를 이용하려면, github의 경우는 자체 Tool을 제공하여 손쉽게 접근이 가능하지만,
물론 다른 WindowGit를 사용해도 된다. 하지만, Bitbucket은 atlassian 사의 Source Tree 사용을 권장한다.
그리고 이 Tool이 사용하기도 편하다. Source Tree Tool을 사용하기 위해서는 우선 atlassian사 가입하고 설치하자.


2.1 Source Tree 기본설치 후 확인작업
C:\Program Files (x86)\Atlassian\SourceTree\tools\putty

pageant.exe : SSH 인증하는 Tool
plink.exe : SSH or Telnet Tool
puttygen.exe : SSH Key Generator


A. Bitbucket 관련설정 

처음 설치 진행 중에 호스팅계정목록에 bitbucket을 선택하고,  username과 passwd를 넣어주어 설정한다.
이부분은 Bitbucket과 연동이 되는 매우 중요한 부분이기에 반드시 확인해야 한다.

  1. 호스팅계정목록에 bitbucket을 선택
  2. username과 passwd를 넣어준다.
  3. 보기->제공저장소  본인의 Remote Repository들을 확인 가능 


  • Bitbucket Repository 확인 
     보기->제공 저장소 보기  선택

     Bitbucket에서 만들어진 Remote Repositories들을 볼 수가 있으며, Window에 Local Repository가 없다면,
     이를 더블클릭을 하여, Clone으로 가져오고 Local Repository를 생성하자.


B. Github 관련설정 

지금 현재 Source Tree는 Bitbucket을 위한 Source Tree이며, 계정설정을 Bitbucket만 하였기에, 다음과 같이 Github 설정을 추가한다.
  1. 보기->제공저장소  본인의 Remote Repository 확인
  2. 계정변경 선택
  3. 호스팅 계정목록 에서 Bitbucket을 확인하고, 추가 버튼
  4. Github의 계정 username과 password 추가 확인 (email은 안되더군요)


위와 같이 설정하면 이제 모든 Remote Repository를 볼수가 있습니다.


3. SourceTree와 Bitbucket 이용방법 

Bitbucket에서 Remote Repository Create 한 후 Source Tee를 이용하는 법을 간단히 소개한다.
Source Tree로 기본설정 후 Bitbucket의 Empty Repository 에 Clone을 한 후 사용하면된다.

전체 기본이용순서는 다음과 같다.
  1. Bitbucket에서 Login 한 다음 상위메뉴 4메뉴 중 (Repositories->Create Repository)
  2. Bitbucket에서 new Remote Repository 생성 및 확인. 
  3. Source Tree 에서 Clone으로 Remote와 동일한 Local Repository 생성
  4. 빈 디렉토리에 개발소스넣고, Commit으로 Stage에 넣고, Local Repository 반영
  5. 이 때 주석을 넣어 관련사항을 기록하자. 
  6. Push 버튼 Bitbucket의 Remote Repository에 이를 반영 

이를 3.1~3.3로 세부 그림과 함께 세부설명


3.1 Source Tree 이용하여 Bitbucket의 설정 

  1. Bitbucket에서 new Repository를 test로 하나 생성 
  2. Bitbucket에서 test Repository 생성확인  

3.2 SourceTree 소스 생성/복제

복제는 즉 Git Clone은 Bitbucket에서 Github or Bitbucket의 Remote Repository 가져오는 것이다.
생성은 존재하지 않은 소스를 Bitbucket의 Remote Repository에 생성하게 하는 것이다.

두 방법은 거의 유사하며,
방법은 여러가지가 있겠지만 아래와 같이 두가지만 간단히 소개하겠다.

1. Repository를 생성(Init)/복제(clone) 방법

이 방법은 Github와 Bitbucket를 동시 사용한다면 모든 Git를 확인이 가능하며, 
이를 확인하고 Git Init /Clone 하는 것이다.
  • 보기->제공 저장소 보기 실행
  • 상위 우측의 계정설정 (Github와 Bitbucket 설정)
  • 기존에 존재하는 Remote Resoitory를 확인가능하다. 


A. Remote Repository 생성방법  
  • 아래의 새저장소 생성 버튼 
  • 저장소 생성 메뉴에서 계정에 저장소 생성하기 메뉴에서 (Bitbucket or Github 변경) 
  • Remote Repository Name 설정 
  • 저장소 설정 한 후 BitBucket or Github에서 확인 

B. Remote Repository 복제방법
  • 아래 우측마우스를 누르고 Clone 버튼 한 다음 호스팅 프로젝트에서 본인 프로젝트 선택 
  • Source Tree-> 왼쪽 화면 하단 + 버튼 Repository 추가 


2. 저장소복제/생성 버튼 선택
  1. 복제일 경우 
  2. 소스경로/URL에서 나의 bitbucket을 주소 넣거나, 우측 호스팅프로젝트 버튼으로 탐색이용
  3. 목적지 경로 주소 나의 소스주소로 설정 반드시 빈디렉토리 설정
  4. 책갈피  본인이 알기 쉬운 이름으로 저장 Nick Name 
  5. 클론 선택하여 소스를 Remote Repository 받는다.
    *만약 실패한다면 목적지 경로 지우고, 새폴더로 생성하고 다시 시도 해보자.

* 책갈피의 역할

클론이 제대로 되어 Local Repository가 구성이 된다면, 소스트리 우측창에 프로젝트를 확인가능하다.
이때 좌측의 볼드체로 구성된 NickName이 바로 책갈피의 역할이며, 이름변경은 맘대로 가능하다.
그러므로, 본인의 프로젝트에 따라 알기쉽게 변경하여 사용하자.


3.3 Source Tree  소스 반영 (Push)

Workspace 는 정확히 말해, 나의 작업장소이며, 소스수정을 한다면
Local Repository에 이를 반영해야 하고, 그리고 나서, Remote Repository (Bitbucket)에 반영을 해야한다.
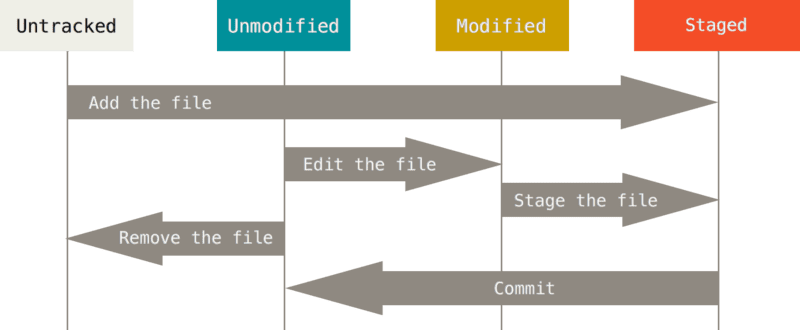
  1. Git Commit은 Local Repository에 나의 변경된 소스를 반영 하는 것이다.
  2. Git Push는 Local Repository와 Remote Repository를 Sink를 맟춘다고 보면된다.

이제 Git Command를 이해 했으니, 아래의 Source Tree를 사용해보자.
소스가 변경이 되었다면, 본인의 좌측의 local Repository 를 보면 아래와 같이 스테이지를 확인 가능하다.
이를 반영하면 된다. 
  • Git Commit & Push 
  1. 본인의 Source를 변경해준다.  
  2. Source Tree의 커밋버튼 눌러 이를 반영할 준비를 한다. 
  3. 스테이지(Index or Stage Area) 작업소스  Stage All로 반영한다 (git개념참조)
  4. 맨 아래 주석을 채우고 Local Repository에 반영하기 위해서 커밋(Commit)을 진행 
  5. Source Tree의 푸시버튼으로 Bitbucket에 이를 반영한다.  
  6. 푸시도중 출력 전부보기로 현재 상태를 확인가능 


  • 반영된 소스 확인 
   Bitbucket의 나의 Repository로 가서 Commits을 보면 History를 확인가능


4. SourceTree와 Github이용방법

사용방법은 Bitbucket과 동일하며, Github 계정을 추가하고, Git Clone을 하면 별 문제 없이사용이 가능하다


5. 문제사항

가끔 다른분의 Repository를 Fork를 하고, Clone을 하면, 아래와 같은 문제가 발생한다.
소스다운은 되지만, SourceTree가 Blocking이 되며, 이 때 취소하지 않는다면, 폴더접근에도 문제가 생긴다.

이 방법을 해결하기 위해 처음 Embeded GIT 사용 및 Init로 사용하는 방법 등
여러방법을 했지만, 근본적인 문제해결이 되지않아 아래와 같이 소스와 함께 다 분석을 했다.


5.1 확장자 제한 및 설정

Local or Remote Repository에 못올라가는 문제는 SourceTree에서 아래와 같이 못올려주기 때문이니,아래와 같이 변경을 해주자.
  • 도구->옵션
  • Mercurial 메뉴 선택과 Git 메뉴 선택 
  • 전역무시목록 선택 파일 수정 (위 두 파일은 서로 다르며, 각각 설정해야한다)
기본적으로는  .gitignore를 이용해야하지만 손쉽게 이를 이용해서 설정하자.

  .gitignore 수정하여 확장자 제어방법 소개
  http://dolfalf.tistory.com/58


5.2 Git Clone 중 Blocking 되는 현상 


git -c diff.mnemonicprefix=false -c core.quotepath=false clone --recursive https://JeonghunLee@github.com/JeonghunLee/stm32f1-ir.git D:\TEST\fff
Cloning into 'D:\TEST\fff'...

warning: templates not found C:\Program Files\Git\share\git-core\templates

Submodule 'common_lib' (git@github.com:ppkt/common_lib.git) registered for path 'common_lib'

Cloning into 'common_lib'...

The server's host key is not cached in the registry. You
have no guarantee that the server is the computer you
think it is.
The server's rsa2 key fingerprint is:

ssh-rsa 2048 16:27:ac:a5:76:28:2d:36:63:1b:56:4d:eb:df:a6:48
If you trust this host, enter "y" to add the key to
PuTTY's cache and carry on connecting.
If you want to carry on connecting just once, without
adding the key to the cache, enter "n".
If you do not trust this host, press Return to abandon the
connection.


  • Remote Repository의 File 중 아래의 File 문제로 Blocking  
위에서 안되는 이유가, Remote Repository가 또 다른 Remote Repository를 참조를 하였는데 또 다시 가져오다가,
멈추는 경우 인 경우인것이며, common_lib는 또 open된 Remote Repository 별다른 문제가 없이 동작이 되는게 맞는것 같다.


.gitattributes
.gitignore
.gitmodules

[submodule "common_lib"]
 path = common_lib
 url = git@github.com:ppkt/common_lib.git


원래는 SourceTree에서 Accept Server's Key 물어야하는데 Blocking이 된다.
다른 외국사이트를 보면 이를 옵션에서 Embeded GIT 설정으로 해결했는데, 해결이 되지 않는다.
그리고, Git init을 하여, PULL로 가져올려고 했는데 이 역시 실패.

나의 SourceTree도 가끔 아래와 같이 동작하지만, Key에서 문제가 발생한다.


  • 해결방법.

cmd를 실행 한 후 강제로 plink로 Key를 받는 것이다.
이문제는 추후 SourceTree bug이므로 추후 upgrade되면 바뀔 것 같다.

  • "C:\Program Files (x86)\Atlassian\SourceTree\tools\putty\plink.exe" github.com
  • "C:\Program Files (x86)\Atlassian\SourceTree\tools\putty\plink.exe" bitbucket.org


FATAL ERROR: Disconnected: No supported authentication methods available (server sent: publickey)


https://confluence.atlassian.com/sourcetreekb/trust-a-server-s-host-key-when-no-button-is-available-to-trust-it-788731545.html


5.3 폴더 접근문제 발생 

위 문제가 발생을 하면, SourceTree 종료해도 내부적으로 sh와 plink, pageant를 사용하는데  종료가 되지 않을 경우.
아래와 같이 탐색기에서도 접근문제가 발생한다.

이 때 해결책 다양하게 제공하지만, 본인은 unlocker 프로그램 자주이용하지만,
작업관리자가서 sh와 plink process가 종료하는 것이 좋은것 같다.
unlocker를 사용해도 process 여전히 존재함


http://answers.microsoft.com/ko-kr/windows/forum/windows_7-files/%ED%8C%8C%EC%9D%BC%EC%9D%B4-%EB%8B%A4%EB%A5%B8/3ae23758-9186-45c4-9fb9-aee55a69bcd7?auth=1


  • unlocker 프로그램제공 

http://gong6587.tistory.com/1355


6. Team Project

사실 Git를 혼자 관리하고 하면, 매번 Commit으로 Local Repository 반영 후, Push로 Remote에 동기만 맞추면, 되기에 Fetch or Pull을 사용할 이유가 거의 없다. (SVN과 차이점도)

하지만, 2명이상 GIT 기반으로 같이 작업을 하면 이야기가 달라질 것이다.
아직 Repository를 Share를 해서, Member를 추가해서 사용해본적이 없다.
지금 생각으로는 위 방법도 아래와 같이 유사하게 동작할 것 같다.

6.1  Create Team 

Bitbucket에서 Team->Create Team으로 Team을 만들고, 다른 Bitbucket 사용자 추가하여 넣어 만들자. 
  • Team name: Team 이름을 정하자. 
  • Team ID: bitbucket.org/teamid로 접근이 가능 
Team을 구성할 경우, Project로 필요한데, Project 안에 Repository가 들어간다고 생각하면된다.

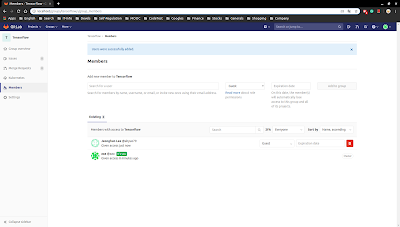
    Team이 생성 후, Members에서 현재 Member를 확인하고, Following으로 변경 
    Follower의 개념 아직 모호하지만, User가 다른 User의 Repository 따른다는 것이다.
    공유와 개념이 좀 헷갈린다.

   https://confluence.atlassian.com/bitbucket/followers-resource-296095249.html
   https://developer.github.com/v3/users/followers/

6.2 Create Project

Team이 존재하면, Project를 생성하여, Repository를 생성 및 Transfer해오자.
여러개의 Repository가 가능하므로, Project를 정하고, 가져오자.

  • NAME:  만들고자 하는 Project 명
  • KEY: 현재 어디에 사용이 되는지 정확히 모르겠다. 
  • Private Project 설정:

    https://confluence.atlassian.com/bitbucket/projects-792497956.html

이 때 기존에 존재하던 나의 Remote Repository 있다면, Transfer를 하여 사용하던가 혹은 새로 생성하여 같이  이 Project를 공유해가면서 작업을 하는 것이다.

6.3 Window 작업(Local Repository)

Team으로 했을 경우, 상대방도 동시에 Commit과 Push를 하기 때문에 나의 소스는 항상 Commit하기 전에,  Remote와 동기를 맞춰야하 한다. 이때 사용하는 것이 Fetch or Pull 이다.  아래와 같이 Git 명령을 보면 되겠다.


출처: http://blog.osteele.com/posts/2008/05/my-git-workflow

    http://ahyuo.blogspot.kr/2014/07/git-for-window_20.html
    http://ahyuo.blogspot.kr/2014/07/git.html

7/21/2014

GITHub Site 및 Github Program 사용방법

1. Github 관한 소개

Github는 GIT를 공개 웹호스팅이며, 최근 3년사이에 사이트가 많이 변경이 되어 Manual도 다시 Update한다.
별도의 Github에서 Window Program을 제공하지만, 이것보다는 Source Tree가 더 쓰기가 괜찮은 것 같다.

2. Github의 기본구성 

더 이상 Bootcamp는 제공하지 않으며, Guide와 Start Project로 간단하게 구성되어있다.
그리고, 본인의 프로젝트와 Fork된 프로젝트가 아이콘으로 구분이 되어 표시되어진다.

  • Github  기본사이트 
  https://github.com/


  • 이전메뉴


  • 본인의 실제 Github 
  https://github.com/JeonghunLee
  1. Gist :  소스를 공개적으로 쉽게 쓸 수 있고 공개 할수 있다. 
  2. Git  :  Server를 무료로 사용해주게 해준다.  


  • GIT 기본사용서 
       http://rogerdudler.github.io/git-guide/index.ko.html
  • Github Help
       https://help.github.com/
  • Gist 의 설명 
       https://help.github.com/articles/about-gists/
  • wiki 의 설명
       https://help.github.com/articles/about-github-wikis/
  • Remote repositories
       https://help.github.com/articles/about-remote-repositories/

  • Git Command의 일반적인 작업 
모든 Command는 다 안나왔지만, 일반적인 작업순서이므로 금방이해가 된다.

https://blog.osteele.com/2008/05/my-git-workflow/


3.  Github에서 Project 시작방법  

Github 사이트가서  Start repository  한 후 하고 Repository 이름을 정하자.
그리고, git init 와 git clone으로 이를 down load를 한다.

  • Linux 에서 Git 설치 및 준비 
 $ sudo apt-get install git 

**HTTPS 할 경우, Username과 Password 입력 ( Username Github 주소 표시)

**SSH 일 경우 ssh-keygen을 이용하여 key 생성후 이를 Github에 Setting->SSH Keys 등록

나의 경우, SSH가 편하고 좋으며, 한번 Key 생성 후 등록하면 걱정할 필요없다. 

  • Window 에서 설치 (선택)
  1. Github Program  설치 
  2. Source Tree  설치 ( 다시 설명)
현재 Source Tree를 자주 사용하다 보니, Linux 명령어도 아래의 사이트를 참조해서 보면쉽게 이해가능하다.
  https://www.atlassian.com/git/tutorials/syncing


  • GIT 기본설정  (SSH/HTTPS 반드시 먼저설정)
기본으로 본인이 사용하는 Github의 계정정보를 넣어주고 설정한다. 

$ git config --global user.email "you@example.com"  //Github 설정된 email 
$ git config --global user.name "JeonghunLee"       //Github UserName 

  • GIT 설정확인 
폴더 안에 .git

$ git config --list    // 현재 설정된 부분 확인  
user.email=xxxxxxxxx    // 상위에서 설정한 Github 설정된 email 
user.name=JeonghunLee   // 상위에서 설정한 Github Username 
......
remote.origin.url=https://github.com/JeonghunLee/xxxx.git
remote.origin.fetch=+refs/heads/*:refs/remotes/origin/*
branch.master.remote=origin
branch.master.merge=refs/heads/master


  • GIT Remote 확인 
$ git remote -v  // Remote Repository와 좌측 이름 확인 
origin https://github.com/JeonghunLee/Ubuntu1804_Basic.git (fetch)
origin https://github.com/JeonghunLee/Ubuntu1804_Basic.git (push)

// 상위 remote.master.remote=origin 되었으면, remote -v의 좌측역시 동일하게 되어야함 


3.1  Github에서 Remote New Repository 생성   

아래와 같이 Github Site에 로그인을 한 다음에 Repository로 가서 New or Start Project  본인이 직접 새로운 Github의 Remote Repository를 생성한다.


A. Github 사이트에서 Remote Repository 생성   

Github에서 Remote Repository 생성시 아래와 같이 간단히 사용법을 알려준다.


B. 본인이 작업한 소스를 Local Repository에 생성 및 등록 Update한다  
  1. git init :  Git Local Repository를 구성한다
  2. git add : add로  Index(Head)에 등록한다 
  3. git commit -m : Commit으로 최종적으로 Local Repository 등록.
  4. git status : 현재 GIT 상태를 파악  

  • GIT Project 생성 및 파일추가 와 Local Repository에 Commit 

echo "# ahyuo.github.io" >> README.md
git init
git add README.md               // STAGE/INDEX 에 File 등록 
git commit -m "first commit"    // Local Repository에 Commit 
git status                      // 현재 GIT 상태확인 및 다음해야할 Command 추천 


C. Remote Repository와 등록 및 Push. 
  1. git remote add orgin : 현재 만들어진 new repository를 추가등록
  2. git push -u orgin master  : Local Repository와 Remote Repository를 Sync 즉 Update 

$ git remote add origin https://github.com/JeonghunLee/test
$ git remote -v                         // 등록된 remote Repository 확인 
$ git push -u origin master


상위에서 설명한 Remote Repository 설정확인


3.2 Github에서 Remote Repository를 가져올 경우  

직접 만들지 않고 기존에 존재하는 Remote Repository에서 Source를 Download하여 사용하는 경우이다.
보통 본인이 하던 작업 or 다른 Github 사람 작업 가져오기 경우가 될 수 있겠다.


$ git clone https://github.com/JeonghunLee/test.git   //소스 가져오기  

본인 Repository를 수정을 한 후 update 하고 싶다면 상위와 동일하다.

$ git add *                                    // Local Index(Stage) 에 등록 
$ git commit -m "added my functtion commit"    // Local Repository 등록 

$ git remote -v   // 등록된 remote Repository 확인 


$ git remote add origin https://github.com/JeonghunLee/test.git
$ git push -u origin master


만약 push가 되지 않는다면, 상위에서 설명한 Remote Repository 설정확인


3.3 Web에서 Github 의 Repository를 수정/추가 한 경우

아래와 같이 본인의 작업환경에가서 Remote Repository가 변경이 되어있으므로,
Local Repository도 아래와 같이 Sync를 맞춰준다.


$ cd test                    // 본인의 Local Repository 이동
$ git pull https://github.com/JeonghunLee/test.git  // 나의 Github의 Repository와 Sync를 맞춰어주는 작업 


3.4 Remote Repository 등록 과 Update(push) 할 경우 

이제 상위에서 기본 사용법을 익혔으니, 실제 HTTPS or SSH로 이용하여 Remote Repository에 이용해보자
이미 Local Repository 가 생성이 되어있다고 가정하고, 아래 방법으로 Update만 하면된다.
git init 중요 (Local Repository 생성)

  • A. HTTPS로 했을 경우 
중요한것은 본인의 Username과 Password를 알아둬야 가능하다.

// Github에서 이미 Remote Repository를 생성 
$ git remote add origin https://github.com/JeonghunLee/test.git            // Remote Repository 등록 (Github Remote 등록)
$ git remote -v                                                            // 등록된 remote Repository 확인 
$ git push -u origin master                                                // Local Repository 와 Remote Repository Push 하여 Sync
Username for 'https://github.com': 
Password for 'https://xxxxx@github.com':

  • B. SSH로 했을 경우
SSH는 Key 기반으로 동작하기 때문에 우선 아래의 Key를 생성하여 Github에 등록하자.
// Github에서 이미 Remote Repository를 생성 
$ git remote add origin git@github.com:JeonghunLee/test.git                // Remote Repository를  origin 등록 
$ git push -u origin master                                                // origin의 등록된 Remote Repository의 master에 Push 

1. SSH Key 생성하는방법 (본인 email 사용)

$ ssh-keygen -t rsa -b 4096 -C "your_email@example.com"   // RSA 기반으로 나의 Github Email 기반으로 Key생성
Generating public/private rsa key pair.
Enter file in which to save the key (/home/jhlee/.ssh/id_rsa): 
Created directory '/home/jhlee/.ssh'.

2. Password 두번 입력

Enter passphrase (empty for no passphrase): 
Enter same passphrase again: 
Your identification has been saved in /home/jhlee/.ssh/id_rsa.        // Private Key (Base64 Encoding)
Your public key has been saved in /home/jhlee/.ssh/id_rsa.pub.        // Public Key  (Base64 Encoding)
The key fingerprint is:
cf:bf:e0:59:f4:e5:9b:c5:6d:f9:17:df:1d:7c:f4:c0 your_email@example.com
The key's randomart image is:
+--[ RSA 4096]----+
|    .oo.         |
|.    .oo         |
|o . +o* .        |
| + + O.+         |
|  o o * S        |
|     . *         |
|      E .        |
|     .           |
|                 |
+-----------------+


3. Key를 확인하고 Github의 개인설정 Setting->SSH Key 등록


$ cat ~/.ssh/id_rsa.pub     // 이정보를 전체 입력 
ssh-rsa AAAAB3NzaC1yc2EAAAADAQABAAABAQDLRdkIhvX5JZmRjaz6r19sdvHj+iDWskd+e8EWkFjrhuPFQdtd5KuFpgpDnchpgLNSxIYug0KzELqiiYMBk0MakVjvAlv9G5jo+VioHFsk9Hql9mAJUTQJ9sMAcu+JLY+3gGChNRbHTcnUK1Jm5SnPETmkasflA2Miv3ifhsr6Odmdc2VXtj6jqGrPGp47i21SXscszmGAdPtaUffo9xmfX9XKOOXjml2exNDPKl58Qu9OAF8Bn4Izxou34ctozA+UflJYOwCgcPf+dt3pa7SvnfpnzZpk4QsVh/ertjmUxno7Go71TgZRiwRe/lnK6xSmm0PDWjX2zquqagOaCkz/ your_email@example.com

4. 개인설정 (Setting->SSH Keys 등록) 후 확인
  https://github.com/settings/profile

Github 암호 없이  SSH Key 기반으로 접속이 가능

4. SSH-Agent 를 실행

$ eval "$(ssh-agent -s)"
Agent pid 2612

5. SSH에서 Key 추가 후 git push 실행

$ ssh-add ~/.ssh/id_rsa    
Enter passphrase for /home/jhlee/.ssh/id_rsa:             
Identity added: /home/jhlee/.ssh/id_rsa (/home/jhlee/.ssh/id_rsa)


Key 생성방법 및 추가방법 (Github 설명)
  https://help.github.com/articles/generating-a-new-ssh-key-and-adding-it-to-the-ssh-agent/

Key 확인방법
  https://help.github.com/articles/checking-for-existing-ssh-keys/


추후 관리는 git tag  version 관리를 진행하고 git push remote와 sync를 맞추고새로운 file이 있을 경우 git add로 등록을 해주고 git commit으로 반영하고
remote와 sync를 맞추자.
사실 Tool로 관리하는 것이 편하긴 편하다.


3.5 Github 의 Repository Setting 

개별 Repository 의 Setting 의 기능에 대해 기본적으로 알아보자.

  1. Repository 이름 변경
  2. Repository 삭제 가능


4. 상대방과 협업 

Local repository 라는 본인의 개별 공간을 생성도 가능하지만, 상대방 Remote repository 와 나의 Remote Repository를 이용하여 협업도 가능하며,
상대방 Remote Repository에서도 협업이 가능하다.
  1. Fork는 상대방 Repository를 내 Repository로 그대로 복사해 오는 것
  2. Pull Request는 상대방 Repository 와 내 Remote Repository와 Merge하지하기 위해 요청하는 것

  • Fork
보통 상대방의 유용한 Repository를 Fork를 통하여 나의 Repository로 쉽게 가져올수 있다.
다만 이때 라이센스를 확인을 하고 가져오고 사용하자.
그리고, 이제 가져온 Repository는 내 맘대로 수정이 가능하며 권한도 내가 가지고 있다.
만약 수정을 하여 상대방이 내 소스가 좋다고 느껴 Pull Request를 할지도 모른다.
그러나, 보통 보면, 이것을 많이 거절하는 것 추세로 가는 것 같다.
그래도 반드시 참조와 라이센스는 중요하다.

  • Pull Request 
내 Repository를 상대방들이 Fork를 해서 가져가서 소스를 고치며, 내가 이제 Pull Request 가 가능하다.
이것을 이용하여 소스를 Merge하고 협업이 가능한 것이다.
Git의 pull command라는 것이 fetch하고 merge하는 기능이기에 일종의 상대방 Repository와 내 Remote Repository를 싱크를  맞추는 요청이다. (pull command)
                 
if you are hoping to contribute back to the original fork, you can send the original author a pull request    


5.  Github에서 Download 하는 방법  

Github 계정이 있다면,  상대방의 Public Github를 가져오는 방법은 Fork로 가져오면된다.
본인의 Github 소스를 Download 하고 싶다면  git clone을 이용하자.


6. Github Desktop 설정 및 기본사용법

아래 설정은 참고만 하고, 기본적으로 거의 고칠필요는 없다.
추후 이 챕터는 다시 작성.

  • 설정->Repository Setting
       현재 설정을 유지하지만, 만약 문제가 발생을 한다면, 아래의 설정을 수정한다.   
           .gitattributes 설정  // Line endings and attributes 변경
           .gitignore의설정   // Ignored files
 
  • 설정->Option 
  1. Configure git    기본환경설정 
  2. Clone Path :  my window repository path 
  3. Shell 설정 


Configure git는  GIT Command (git config --global user.name , user.email) 동일하며,  이며, 추후 여기에 설정되는 값들은 git config에 반영이 되므로, git config --list 로
확인하자.


이 Tool에서  쉽게 clone과 init을을 할 수 있는데, create 는  git init 과 동시에 폴더 생성이 되며, Clone도 git init 과 clone을 폴더 생성이다. 참 편하다.


여기서 create를 해주고, 파일들을 등록하고, 마지막에 Publish Repository를 해주면,이를 github에 자동으로 등록해주고, Github에 Remote Repository를 생성해준다.
물론 난 Public으로 생성

그런데,  Publish 하는 도중 Error  Failed to publish this branch 에러가 발생하는 경우가 발생한다. 이녀석이 https로만 통신을 하는데, 뭔가 문제가 발생을 한다.
내쪽에서 그래서 Proxy Server를 사용하면 해결이 된다고 하는데, 해보지 않았다.

지금 이 Tool이 https로만 동작하기에 , 설정에서 Repository Setting 에서 변경 불가능 해결책은 두가지다.
Proxy Server를 이용하거나, Shell을 이용하여, 직접 ssh주소로 연결하여 push하는거다.


1. Proxy Server 해결방법.

git config --global http.proxy http[s]://userName:password@proxyaddress:port

관련내용.
  http://stackoverflow.com/questions/13894387/github-failed-to-publish-this-branch-error-on-windows


2. Terminal에서 ssh주소로 직접 연결 

나는 귀찮아서, 이 방법으로 선택했으며, git command도 익힐 겸 해서  아래와 같이다 git command로 작성해서 해결을 했다.
이 문제가 발생하면,  github와 통신이 제대로 안되다 보니, Tool에서 제공하는 clone 기능과 sync기능 역시 제대로 안된다. 직접 command로 해야한다.  
다행히,Github에 자동으로 Repository까지는 생성이 되어서 귀찮게 Github사이트에 만들 필요가 없었다.


위와 같이 Github 사이트에서 나의 새로운 프로젝트를 확인을 하고, SSH주소를 확인을 한다.
지우고 싶다면, Setting -> Danger Zone의 Delete this repository 를 사용하면된다.

아래와 같이 한 이유는 origin 이미  https 주소로 사용되어있기에, ssh로 새로 사용.

$ git remote add ssh git@github.com:xxxxxx.

$ git push ssh master    // ssh remote주소에  master branch를 push한다. 

7/18/2014

Window Git Server 구축

윈도우에서 Git Server 구축을 원하다면, 아래의 사이트를 참조.
솔직히 본인도 사용을 하지 않고, 아직 필요성을 크게 느끼지를 못하지만, 혹시 몰라서
추후 사용시 알아두자


  • How to Install Bonobo 
   http://blog.gaerae.com/2015/05/git-server-for-windows.html
   https://www.microsoft.com/ko-kr/download/details.aspx?id=30653


  • Bonobo Window Git Server Download 
   https://bonobogitserver.com/

7/17/2014

GIT For WINDOW Tool 사용방법

1. 신규 프로젝트  제작

신규프로젝트를 제작 할때, working directory를 선정을 하고, 그 안에, git init을 하여,
git에 필요한 stage area와 local repository를 생성하여 일을 진행을 한다.

그리고, 필요한 파일은 생성을 하거나, 다른곳에서 copy해 와서 add로 추가한다음
commit을 하여 진행을 한다.

1.1  GIT Bash 이용

$ git init    //  git 초기화, 이후  .git 디렉토리 생성됨
                //   관련내용은 progit 9장은 자세히 참조.
$ git add *.c        // 추가하고 싶은 파일 추가.
$ git add README
     
$ git commit -m 'initial project version'   // commit  내 개인 저장소로 저장시도. 
.
        추가후, window tool로 history 확인

1.2  GIT Window Tool 이용 

        1.  mkdir  gittest  and git init here 선택


        2. copy source to gittest and git add files now
         

      3.   git commit tools 실행하여 commit를 한다.
             (commit message를 요구한다,)


      4.   git history 로 확인


3. 기존 프로젝트 진행

git init으로 .git 디렉토리를 생성을 하고, clone으로 모든 정보를 복사하여 가져온다.

$ git init                      //  git 초기화, 이후  .git 디렉토리 생성됨    
$ git clone remote        // remote에서 소스 및 프로젝트 히스토리를 가져온다. 


3. Remote에 프로젝트 저장.

$ git remote add origin git@gitserver:/opt/git/project.git
$ git push origin master

7/16/2014

다양한 GIT Tool 소개

1. GIT for Window Download 

Window에서 GUI와 Bash 둘다 지원하는 Tool이 있어 이를 간단히 소개하고,
아래와 같이, 간단히 설치 방법과 사용방법을 설명한다
만약, Github를 사용한다면,  Github에서 제공해주는 Window Tool을 사용해도 괜찮다.
이 Tool은 일반적인 GIT를 사용할때 편한 것 같다.

  -  관련사이트  (GIT for Window)
              http://msysgit.github.io/
  -   FILE
             Git-1.9.4-preview20140611.exe

1.1 Window GIT program 설치 

   1 아래와 같이 아이콘만 추가하고, 전부 기본설정으로 하였다.


  2  아래와 같이 PATH 환경설정 수정 관한 것 것이란다.   1번을 권한다고 하니
  • 1번은  PATH에 관한 가장 안전한 선택이란다.  
                (GIT Bash에서 GIT command로만 사용가능하단다.)
  • 2번은  GIT Bash와 Window  Command에서 사용가능하다고 한다.
  • 3번은  Window Command에서 Unix tool을 사용한다고 하는데,Cygwin을 말하는지?(아무래도, window Command와 unix command가 중복이 되는지)


        나중에 기회가 되면,  2번을 선택해서 TEST를 해봐야겠다.

아래말은  2번을 선택했을 경우 인것 같다.  (progit 에서 인용)
Windows에 포함된 기본 쉘(Command Prompt, 명령 프롬프트)을 꼭 써야 하면 공백이 포함된 파라미터를 Git 명령어에 넘길 때 작은 따옴표(' ') 대신 큰 따옴표(" ")를 사용해야 한다.
파라미터 끝에 ^ 기호가 있을 때도 큰 따옴표로 파라미터를 감싸야 한다.
Windows 쉘에서 ^ 기호는 다음 줄로 명령어가 이어짐을 나타낸다.

  2.3 Line ending conversion,
  • 1번    Text file에  checkout과 commit 할때,모두 자동 변경
                              ( Unix style,LF <->Window style, CRLF)
<->
  • 2번   checkout 그대로유지, commit은   linux style 
  • 3번   checkout 그대로유지  commit 도 그대로 유지


 기타 설명
      * commit :    Data 를  Local repository로 저장시키려는 시도.
      * checkout:  Local repository 에서 Work space로 가져오려는 시도
                         (되돌리기 및 복구).

관련설명
       http://rogerdudler.github.io/git-guide/index.ko.html          (쉬운설명)


2. Git Site 소개 및 다른 Git Program  

Git Site는 사이트들은 Remote Repository 를 제공해주며, Git Sever를 관리를 하고 있다.
또한 이 사이트들은 각 회사별로 Git Program을 별도로 제공을 해주고 있다.

Github인 경우는 Public Remote Repository, 즉 공개로 사용하면 거의 무제한으로 제공해주고 있다.

Bitbucket인 경우는 Private Remote Repository를 제공을 하지만 제한적이다
역시 돈내고 써야 비밀성도 보장된다.

2.1 Bitbucket Site 및 SourceTree Program  

ATLASSIAN사의 bitbucket를 사용하는 도중 알게된 window git program으로 현재 거의 이프로그램을 이용하며 Github 계정도 이것을 이용하여 접속한다
Github Program을 거의 사용안한다.

사실 사용방법도 너무 간단해서 메뉴얼을 작성할 필요가 없을 정도이다.
일단 bitbucket 에서 repository를 생성을 한 다음에 Source Tree를 설치 후,
atlassian.com 회사 가입을 하고  로그인 한 다음 bitbucket에 로그인을 하면 자동적으로 본인이 현재 사용하는 repository가 나온다.
소스를 반영하고 싶다면 Commit 과 Push를 하면 이 정보들이 반영이 된다.

2.2 Github Site 및 Github Program 

요즘 가장 유명한 Github이며, 요즘 이곳에서만 Open Source가 많이 제공되고 있으며,
가장 활발하게 움직이고 있는 사이트이다
그리고, 별도로 Github Program 이라는 Window용 전용 Program을 제공한다.


3. Linux or Window에서 환경설정
     

3.1 기본설정확인
  
git bash 실행 후  config 파일 확인

  • vi /etc/gitconfig  기본 환경설정 
  • vi ~/.gitconfig    특정 사용자 환경설정  (사용자 정보 설정후 생김 )
  • vi .git/config      특정 저장소에 존재 (현재 존재하지 않음 ,역순으로 적용) 


3.2 기본설정

사용자 정보
  • $ git config --global user.name "JH Lee"
  • $ git config --global user.email jhlee@example.com
색 정보
  • $ git config --global color.ui true

3.3  다른 Merge,Diff 도구변경.

이부분은 아직 미확인

  http://www.perforce.com/perforce/downloads/component.html

참고, progit
    7.1.3 다른 Merge, Diff 도구 사용하기
   그리고, 편집기와 diff 도구를 설정 할수 있으나, 기본설정으로 사용.

3.4  설정 사항 확인

$ git config --list


참고 사이트
  http://msysgit.github.com/
  http://mcchae.egloos.com/10881235
  http://forum.falinux.com/zbxe/index.php?document_srl=588283&mid=lecture_tip
  http://blog.hjf.pe.kr/34


7/13/2014

GIT 기본 명령어 사용법

GIT의 사용방법은 아래 사이트 너무 쉽게 잘 나와있고, 좀더, 자세히 알고 싶다면,
progit의 기본내용은 2장,3장,9장을 자세히 읽어보면 이를 쉽게 이해 할수 있다.

  https://www.kernel.org/pub/software/scm/git/docs/

  • 새로운 Local Repository 생성 후 Source 전부를  Update 할 경우 
$  git init      //  working directory에서 새로운 git 디렉토리를 생성. 
$  git add  *  //  working directory에 copy 해와서, command를 실행.
$  git commit -m " comment"   // local directory에 반영시킨다.  

  •  기존 프로젝트 가져올 경우
$  git init      //  working directory에서 새로운 .git 디렉토리를 생성. 
$  git clone   // url 주소 (local emote)에서 소스 및 history 복사하기. 

  •  Remote  Repository에 Update 및 주소 등록 
$  git remote add [remote]    // remote 서버주소를 origin으로 대체  
$  git push [remote]  master  // 반영할 서버주소  와 branch 이름을 넣어준다 

일반적으로  remote 를 orgin으로 구성하는 것 같으며, 기본 HEAD 위치는 master를 표시

  • 기본환경설정
$ git config --global user.name "xxx xxxx"   //사용자 정보 설정
$ git config --global user.email xxxx@example.com  // 사용자 정보 설정.
$ git config --list    // 확인   

편집기나, diff도구를 config를 통해서 변경가능하다.


  • 소프트웨어 Release 
$ git log --pretty=oneline             // 여기서 나온 쳇섬정보 (9fceb02) 이용
$ git tag 1.0.0   b2e1d63ff            // tag를 이용해서,  version 관리.
$ git tag                              // Tag 정보확인
// 태그 사용법이 두종류라서 자세한 내용은 progit의 2.6 태그
$ git push [remote] 1.0.0         // Tag를 만들면, 이를 서버에 반영 


  • Branch 및 Merge 
$ git checkout      // 가고 싶은 branch1 이름을 넣어준다.
$ git merge         // merge branch1 branch2  합침 

$ git  checkout -b    // 새로운 branch 로 분기한다. 
$ git  branch -d      // branch를 삭제한다. 

$ git push [remote]     // remote 주소로 가지이름을 반영 


* [remote] : origin 이나 git remote add 에 의해 등록가능
* [branch] : git checkout -b 에 생성가능.

  • Merge 할 경우 

$ git fetch [remote-name]  // HEAD가 가르키는 branch 가져온다.
$ git pull     // fetch와 merge를 동시에 한다. 

현재 pull / rebase / merge 부분이 많이 혼동되며, 직접 사용해봐야 알겠음 

7/12/2014

GIT 기본개념

1. GIT의 기초와 용어

GIT 문서 혹은 인터넷에 있는 그림을 읽다보면, 기본용어부터 혼동이 되어, 자꾸 헷갈리고 한다. 그래서 이부분 부터 정리하고 가는 것이 나은 것 같아,
아래와 같이 간단히 정리하고자 한다.

  • GIT 한글 메뉴얼/ 영문메뉴얼 
한글 메뉴얼을 보다 이해가지 않다가 영문메뉴얼보면 잘 이해가 갈때가 많다.

   https://git-scm.com/book/ko/v2
   https://git-scm.com/book/en/v2


1.1 GIT의 지원 Protocol 

Git 현재 4가지 Protocol을 지원을 해주며, 많이 사용되는 것이 http/ssh/git 이다.
(Local, SSH, Git, HTTP)

  • HTTP/HTTPS
주로 아래와 같이 pull 전용을 사용을 하며, push할 경우는 WebDAV를 이용한다고 합니다.
  • SSH
기본적으로 인증을 필요하며, login이 필요로 하며, push, pull하기가 쉽지만, login과 인증단점입니다.

자세한 내용은 4.1 Git Manual을 보시면, 장단점을 아실수가 있습니다.
  
  https://git-scm.com/book/ko/v1/Git-%EC%84%9C%EB%B2%84-%ED%94%84%EB%A1%9C%ED%86%A0%EC%BD%9C

1.2  Git Local Operations

Repository는 Local과 Remote가 존재하며, Remote는 원격지 Git Server가 있을 경우 사용한다.
만약 없다면, 아래와 같이 Local Repository로 Source 관리를 진행을 한다.

아래의 용어들은 반드시 이해를 해야한다.

Git의 기본상태 
  • Committed란 데이터가 로컬 데이터베이스에 안전하게 저장됐다는 것을 의미한다. 
  • Modified는 수정한 파일을 아직 Local Repository에 Commit하지 않은 것을 말한다. 
  • Staged란 현재 수정한 파일을 곧 커밋할 것이라고 표시한 상태를 의미한다.


  • Tracked : 마지막 snopshot에 저장된 file들로, 상태는 unmodifed, modified or staged 상태.
  • UnTracked: Staging Area안 에 없거나 마지막 snapshoot에도 없는 모든 file들, 신규파일 


    https://git-scm.com/book/en/v2/Getting-Started-Git-Basics
    https://git-scm.com/book/en/v2/Git-Basics-Recording-Changes-to-the-Repository


1.3  GIT 관련 작업흐름용어 

  • Workspace or Working directory 
실제 개발자의 작업소스 , 즉 개발소스가 위치해 있는 곳이며, 개발유저가 작업하는 공간을 말한다

  • Index or Stage Area or Staging Area
Staging Area는 .git 디렉토리에 존재하며, 단순한 파일(Index) 이고 곧 커밋할 파일에 대한 정보를 저장한다.
종종 인덱스라고 불리기도 하지만, Staging Area라는 명칭이 표준이 되어가고 있다

  • Local Repository 
HEAD는 현재 Local Repository의 GIT Commit 위치를 표시하며, 개발자가 처음 clone으로 Local로 가져온 Local Repository를 말한다. 
Git을 Commit을 할 경우 작업소스가 이곳에 반영되며, .git 안에 HEAD와 Index가 존재

  • Remote Repository 
Remote에 저장된 Repository로 .git 의 관련파일과 Workspace도 같이 존재한다. 
주로 git clone / fetch or pull로 가져오고, push로 반영한다.


출처: http://blog.osteele.com/posts/2008/05/my-git-workflow


출처: http://blog.osteele.com/posts/2008/05/my-git-workflow


1.4  Git Repository를 만드는 방법

  1. Local에는 기존의 작업소스가 있으면, 이것을 Local Repository 반영하는 방법 
  2. 외부서버에서 제공하는  존재하는 Repository를  Clone하는 방법 

  • 기존작업소스가 있으며, Local에 Reposiory를 생성해서 만드는 방법 (1번)
  1. git init      :   .git 디렉토리를 생성하여, empty Git repository를 생성
  2. git add *.c :   Stage Area or Index에 반영. 
  3. git commit -m 'first version ' :  이용하여 Local Repository에 반영 

  • 외부서버에 CLONE으로 가져오는 방법 (2번)
  1. git clone url : remote에서 Repository에서 가져와 Local Repository에 저장. 


    Git manual 9장 참조
    https://git-scm.com/book/ko/v1/Git%EC%9D%98-%EB%82%B4%EB%B6%80-Plumbing-%EB%AA%85%EB%A0%B9%EA%B3%BC-Porcelain-%EB%AA%85%EB%A0%B9
    https://git-scm.com/book/en/v2/Git-Basics-Getting-a-Git-Repository#Initializing-a-Repository-in-an-Existing-Directory

  • git init으로 .git를 생성
git init로 바로 생성하여 내부구성
$ git init 
$ ll
.git  // Kernel 내부 .git config
$ tree .git
├── HEAD  // ref: refs/heads/master  (현재 사용중인 Git 의 정보위치이며 Branch or Tag가 있다면 변경) 아직 index는 미생성 
├── branches
├── config  // Git의 Config  (중요) 
├── description
├── hooks  // Git의 hooking 이 존재하는데, 세부사용법은 아직 모름 
│   ├── applypatch-msg.sample
│   ├── commit-msg.sample
│   ├── post-update.sample
│   ├── pre-applypatch.sample
│   ├── pre-commit.sample
│   ├── pre-rebase.sample
│   ├── prepare-commit-msg.sample
│   └── update.sample
├── info
│   └── exclude
├── objects
│   ├── info
│   └── pack
└── refs
    ├── heads
    └── tags
$ rm -rf .git


  • git clone (shallow clone 과 deep clone) 비교 및 .git 구성확인 
Git clone 은 현재 Git의 History 와 소스를 받아오는 기능으로, History를 depth 기능 옵션으로 조절가능하다. 

// Git Kernel 소스는 download하지만 전체이력을 못 받음 
$ git clone --depth 1 https://github.com/hardkernel/linux.git -b odroid-3.0.y-android  
$ ll
.git   // 상위 설정과 동일 
linux  // Linux Kernel  Branch Version: odroid-3.0.y-android ( Workspace 생성)
$ cd linux
$ tree --charset unicode .git  // .git 정보분석 
.git
├── HEAD     //ref: refs/heads/odroid-3.0.y-android  (현재 Git의 위치) 
├── branches  // branch Directory로 현재 Branch가 없음  
├── config
├── description
├── hooks
│   ├── applypatch-msg.sample
│   ├── commit-msg.sample
│   ├── post-update.sample
│   ├── pre-applypatch.sample
│   ├── pre-commit.sample
│   ├── pre-rebase.sample
│   ├── prepare-commit-msg.sample
│   └── update.sample
├── index     // index 존재하며, Binary이며, 변경사항이 있다면 변경 
├── info
│   └── exclude
├── logs            
│   ├── HEAD
│   └── refs
│       └── heads
│           └── odroid-3.0.y-android  // Log로 refs/heads/branch 정보를 볼수 있다. 
├── objects  // 1 depth 이므로 모든 History를 가져오지 않으므로 사이즈가 작음 
│   ├── info
│   └── pack // Local Repository Snapshot Data
│       ├── pack-eb0888d55e1033caf11a41b0e613155f0c7b853e.idx   
│       └── pack-eb0888d55e1033caf11a41b0e613155f0c7b853e.pack
├── packed-refs
├── refs
│   ├── heads   //Local Repository refs/heads/odroid-3.0.y-android  위치 
│   │   └── odroid-3.0.y-android   //41124682529c80d880993276110c286d0a41dd38  
│   ├── remotes   //Remote Repository 위치 정보 
│   │   └── origin                
│   │       └── HEAD                      //ref: refs/remotes/origin/odroidg12-4.9.y    
│   └── tags                                         // tag 정보지만 현재 없음 
└── shallow          // depath 옵션을 주었기 때문에 shallow 생성되며, 위치정보 (41124682529c80d880993276110c286d0a41dd38)  

$ vi .git/config  //상위 head 파일 중심으로 보면됨  
[core]
        repositoryformatversion = 0
        filemode = true
        bare = false
        logallrefupdates = true
[remote "origin"]
        url = https://github.com/hardkernel/linux.git
        fetch = +refs/heads/odroid-3.0.y-android:refs/remotes/origin/odroid-3.0.y-android
[branch "odroid-3.0.y-android"]
        remote = origin
        merge = refs/heads/odroid-3.0.y-android

$ du -sh .git
124M    .git

$ du -sh .git/objects/
120M    .git/objects/

$ rm -rf .git

일반적으로 git clone으로 deep clone을 하여  .git (git 관련 config 및 관련파일) 모두 받아오지만, 문제는 snapshot의 크기가 너무 커진다. 
// Git Kernel 소스 와 전체이력을 받아오지만 Size 차이가 너무많이남 
$ git clone https://github.com/hardkernel/linux.git -b odroid-3.0.y-android  // Git Deep Clone 

$ tree --charset unicode linux/.git
linux/.git
|-- branches
|-- config
|-- description
|-- HEAD
|-- hooks
|   |-- applypatch-msg.sample
|   |-- commit-msg.sample
|   |-- post-update.sample
|   |-- pre-applypatch.sample
|   |-- pre-commit.sample
|   |-- prepare-commit-msg.sample
|   |-- pre-push.sample
|   |-- pre-rebase.sample
|   `-- update.sample
|-- index
|-- info
|   `-- exclude
|-- logs
|   |-- HEAD
|   `-- refs
|       |-- heads
|       |   `-- odroid-3.0.y-android
|       `-- remotes
|           `-- origin
|               `-- HEAD
|-- objects
|   |-- info
|   `-- pack
|       |-- pack-cc7be19c1c52440ab7be476f1eebe7b55e39139e.idx
|       `-- pack-cc7be19c1c52440ab7be476f1eebe7b55e39139e.pack
|-- packed-refs
`-- refs
    |-- heads
    |   `-- odroid-3.0.y-android
    |-- remotes
    |   `-- origin
    |       `-- HEAD
    `-- tags

$ vi linux/.git/config
[core]
        repositoryformatversion = 0
        filemode = true
        bare = false
        logallrefupdates = true
[remote "origin"]
        url = https://github.com/hardkernel/linux.git
        fetch = +refs/heads/odroid-3.0.y-android:refs/remotes/origin/odroid-3.0.y-android
[branch "odroid-3.0.y-android"]
        remote = origin
        merge = refs/heads/odroid-3.0.y-android

$ du -sh linux/.git
3.7G    linux/.git

$ du -sh linux/.git/objects/
3.7G    linux/.git/objects/

$ rm -rf .git

  https://git-scm.com/docs/git-clone

  • git fetch 의 .git 구성 비교
git fetch는 git clone과 다르게,  workspace인 현재 아래의 remote의 Kernel 소스는 가져오지 않으며, .git 에 관련된 정보만 가져온다. 
  1. 만약 .git의 정보가 없으면, git init로 강제 생성 후 실행 
  2. 만약 기존 .git 정보가 존재하면, 변경된 사항을 가져온다.  
$ git init
$ git fetch https://github.com/hardkernel/linux.git odroid-3.0.y-android
$ ll
.git
$ tree .git
.git/
├── FETCH_HEAD   // 41124682529c80d880993276110c286d0a41dd38                branch 'odroid-3.0.y-android' of https://github.com/hardkernel/linux
├── HEAD         // ref: refs/heads/master  
├── branches
├── config
├── description
├── hooks
│   ├── applypatch-msg.sample
│   ├── commit-msg.sample
│   ├── fsmonitor-watchman.sample
│   ├── post-update.sample
│   ├── pre-applypatch.sample
│   ├── pre-commit.sample
│   ├── pre-push.sample
│   ├── pre-rebase.sample
│   ├── pre-receive.sample
│   ├── prepare-commit-msg.sample
│   └── update.sample
├── info
│   └── exclude
├── objects
│   ├── info
│   └── pack // 상위 Index는 존재하지 않으며, snapshot data만 존재 
│       ├── pack-4c5025bde724819ecf7d0e94d0b62eb7e51cc378.idx
│       └── pack-4c5025bde724819ecf7d0e94d0b62eb7e51cc378.pack
└── refs
    ├── heads
    └── tags

$ cat .git/config
[core]
        repositoryformatversion = 0
        filemode = true
        bare = false
        logallrefupdates = true

$ du -sh .git/
768M    .git/

$ rm -rf .git

          * odroid-3.0.y-android branch 이름

    https://git-scm.com/book/ko/v1/Git%EC%9D%98-%EB%82%B4%EB%B6%80-Git-%EB%A0%88%ED%8D%BC%EB%9F%B0%EC%8A%A4


1.5 Git Directory의 주요사항  

  • .git 안의 아래의 FILE 혹은 Directory이며 GIT을 관리하는 정보들이 포함
  1. HEAD: branch 참조 file이며, 현재 checkout한 branch 위치  
  2. index: Staging Area로 commit 할 files들을 저장한 file 
  3. objects: 이 Directory는 source의 snapshot 저장정보.
  4. refs: 이 Directory는 Commit 의 pointer를 저장한다. 
    https://git-scm.com/book/en/v2/Git-Internals-Plumbing-and-Porcelain
    https://git-scm.com/book/en/v2/Git-Internals-Git-Objects
    https://git-scm.com/book/en/v2/Git-Internals-Git-References
    https://git-scm.com/book/en/v2/Git-Internals-The-Refspec

결론적으로, 유저가 직접 수정해야 관리해야하는 Workspace 하나이지만, index와 local repository는 유저에 안에 있으며, git command로 소스관리 목적하에 관리되어진다. 

    https://git-scm.com/book/en/v2/Git-Branching-Basic-Branching-and-Merging


1.6 GIT Update 관련  

   https://kldp.org/node/134487
   https://www.kernel.org/pub/software/scm/git/docs/git-rebase.html
   http://blog.outsider.ne.kr/666
     

2. Git 관련사이트 및 참조내용  

아래내용들을 참조하자

  • 참조사이트 

  http://rogerdudler.github.io/git-guide/index.ko.html          (쉬운설명)
  http://dogfeet.github.io/articles/2012/progit.html              (Progit 매뉴얼)
  http://blog.osteele.com/posts/2008/05/my-git-workflow   (좋은그림)
  • ProGIT
  http://dogfeet.github.io/articles/2012/progit.html
  • GIT 간편설명서
  http://rogerdudler.github.io/git-guide/index.ko.html
  • Window GIT
  http://msysgit.github.com/
  http://mcchae.egloos.com/10881235
  http://forum.falinux.com/zbxe/index.php?document_srl=588283&mid=lecture_tip
  • Android 이클립스에서  소스 다운
  http://hightin.tistory.com/16
  • GIT 설치
  http://blog.naver.com/david_shkim/50106135598
  • GIT 쉬운설명
  http://blog.hjf.pe.kr/37
  • GITHuB
  http://blog.outsider.ne.kr/865
  • GIT 사용법
  http://bunhere.tistory.com/37