레이블이 EVM-Jetson TX2인 게시물을 표시합니다. 모든 게시물 표시

5/27/2019

JetPack 4.2 설치

1. JetPack 4.2 설치 

기존에 사용하던 JetPack3.3 에서 JetPack 4.2으로 변경을 하기위해서 아래와 같이 Download한 후 설치를 진행한다.

JetPack 4.2 Download
  https://developer.nvidia.com/embedded/jetpack

JetPack 설치방법
  https://docs.nvidia.com/sdk-manager/download-run-sdkm/index.html
  https://docs.nvidia.com/jetson/jetpack/install-jetpack/index.html#how-to-install-jetpack


설치방법은 이전보다 더 간단하며, 설치하기도 너무 쉽다.
우선 Host PC에서 SDKManager 를 설치하고 실행하자

  • SDKManager 설치 
$ cd ~/Downloads   // 설치장소는 맘대로 
$ sudo dpck -i sdkmanager_0.9.11-3405_amd64.deb 
or 
$ sudo apt install ./sdkmanager-[version].[build#].deb  

$ sudo dpkg -l | grep sdkmanager   // 설치확인 
ii  sdkmanager                                      0.9.12-4180                                  amd64        NVIDIA SDK Manager


1.1  SDK Manager  실행 

처음 한번 실행된 장소 기준으로 Pakcage를 Download를 하며, 이 정보를 매번 기억을 하고 있다.
그러므로, 설치 중에 Package 설치 장소 및 NVIDIA SDK 장소는 확인하자.
SDKManager도 JetPack 3.3 처럼 Jetson TX2의 microUSB 와 HostPC와 연결된 상태에서 진행해야한다.

  • SDKManager 실행 

$ sdkmanager  // GUI 설치 진행 

  1. Developer Zone — developer.nvidia.com (site에서 가입)
  2. NVOnline — partners.nvidia.com (3rt Party를 위함)
  3. Offline — to install SDKs that were previously downloaded, .. see Offline Install

  • Offiline 진행시 Manual
  https://docs.nvidia.com/sdk-manager/offline-install/index.html


Developer Zone 설치를 진행하면, 아래와 같이 시작을 하며, 데이타 정보를 Google Analictics 로 수집을 하고 이를 다 동의하고 설치를 진행한다.
상위사이트에서 먼저 가입을 하고 진행을 해야한다.


본인의 Target Hardware 에 맞게 설정하고 설치 진행
  1. P2888 ( Jetson AGX Xavier)
  2. P3310 ( Jetson TX2)
  3. P3489 ( Jetson TX2i)
  4. P3448 ( Jetson Nano)


JETPACK 4.2의 Host에 설치되는 항목들을 살펴보면,
  1. NVIDIA Nsight Graphics:  아직 사용을 못해봄 
  2. NVIDIA Nsight Systems:  이전에는 C++만 지원을해서 빌드만 하고 Target 후 Debug까지 했으나, 현재 거의 사용 안함.   
일단 상위 Host Developer Tools이 Upgrade가 많이 되었으며, Graphics 의 기능도 궁금하다.


  • SDK Manager 설치환경
참고로 STEP2에서 라이센스 동의부분에
Download & INSTALL OPTIONS 부분으로 설치위치 변경가능


Target 인 Jetson에 설치될 항목들을 살펴보자.
Jetson OS 와 각 Jetson SDK 항목들이 존재한다.


Target은 우선 CuDA Upgrade 되었으며, TensorRT는 5.0 부터 Python이 지원가능하다고 한다.
나머지는 눈으로 직접 다 확인을 자세히 하자.


  • STEP 3

Jetson TX2 선택 후 Flash할 방법 선택
  1. AutoSetup : USB CDC 통신기반으로 Upgrade진행  ( 처음실패함)
  2. ManualSetup: Force Recovery Mode 로 진입하여 진행 

  • Force Revoery Mode 진입방법  
  1. Disconnect/Connect AC Power 
  2. Press Power Button 
  3. Press Revoery Button and Reset Button
  4. Release Reset Button  after 2 secs 
  5. Release Recovery Button 

RECOVERY과 REST BUTTON을 2초 간 누르고, RESET을 먼저 버튼에서 손을 놓는다.

  • AutoSetup
USB CDC로 SSH로 접속하여 자동으로 잡아서 진행을 하며,자동으로 Recovery Mode로 가면서  Writing을 하는 것 같다.
나의 경우는 처음에 실패를 해서, Manual Setup으로 진행


  • Manual Setup 
Force Revoery Mode 진입 Host에서 lsusb를 하면 Nvidia가 나오며 진행


둘다 진행을 하면 아래와 같이 진행됨
OS가 Flash가 되고, USB Mass Storage가 자동 Mount되고 나서 OS는 완전히 Flash 되고 Reboot


상위를 진행을 했다면, Jetson OS 부분은 진행이 되고, Ubuntu는 동작이 된다.
하지만, Jetson SDK Component를 추가로 더 설치를 진행해야한다.

1.2 Jetson SDK Component 설치 

Jetson에서 Ubuntu가 동작이 되면서 초기화를 진행을 해야 아래의 메세지를 진행이 가능하다.

  • Jetson SDK Component 를 설치 Message ( USB 문제사항)
아래의 "Install SDK components on your Jetson TX2"  메세지를 확인
아래의 메세지가 나오면 USB의 SSH가 동작되지 않으며, USB CDC가 잡히질 않고 진행이 되지 않는다. 이유는 Ubuntu의 기본 시스템을 설정하지 않아, 이를 설정해야 한다.

  • Jetson TX2의 Ubuntu 설정 
  1. Jetson TX2를 HDMI로 연결 (만약 화면이 잡힐지 않는다면, 재연결 및 마우스움직임) 
  2. 라이센스를 동의
  3. 언어/키보드/지역설정
  4. System Configuration 설정 ( Username 과 Password 설정 및 Jetson Name )
  5. USB 동작가능 ( Host에서 Mass Stroage 잡히는 것을 확인 )

  • HOST에서 USB CDC 확인 (옵션)
$ lsusb -t  // 상위 설정 후 확인 
.......
   |__ Port 6: Dev 40, If 4, Class=Mass Storage, Driver=usb-storage, 480M
    |__ Port 6: Dev 40, If 2, Class=Communications, Driver=cdc_acm, 480M
    |__ Port 6: Dev 40, If 0, Class=Communications, Driver=rndis_host, 480M
    |__ Port 6: Dev 40, If 5, Class=Communications, Driver=cdc_ether, 480M
    |__ Port 6: Dev 40, If 3, Class=CDC Data, Driver=cdc_acm, 480M
    |__ Port 6: Dev 40, If 1, Class=CDC Data, Driver=rndis_host, 480M
    |__ Port 6: Dev 40, If 6, Class=CDC Data, Driver=cdc_ether, 480M
    |__ Port 9: Dev 3, If 0, Class=Hub, Driver=hub/4p, 480M
        |__ Port 2: Dev 26, If 0, Class=Vendor Specific Class, Driver=usbfs, 12M
        |__ Port 3: Dev 32, If 0, Class=Mass Storage, Driver=usb-storage, 480M
.....
$ ifconfig

enp0s20f0u6 Link encap:Ethernet  HWaddr ce:a6:cc:57:fb:cf  
          inet addr:192.168.55.100  Bcast:192.168.55.255  Mask:255.255.255.0
          inet6 addr: fe80::2082:92ec:3a25:daf2/64 Scope:Link
          UP BROADCAST RUNNING MULTICAST  MTU:1500  Metric:1
          RX packets:294 errors:0 dropped:0 overruns:0 frame:0
          TX packets:233 errors:0 dropped:0 overruns:0 carrier:0
          collisions:0 txqueuelen:1000 
          RX bytes:48429 (48.4 KB)  TX bytes:54113 (54.1 KB)
..............


  • Target에 Jetson SDK Components 설치진행 

상위에서 Jetson의 설정이 끝났다면, 상위에서 SSH  ID/PW로 입력후  설치진행  
나의 경우는 ID/PW (jetsontx2/nvidia) 설정했지만, 다시 설치해서  nvidia/nvidia로 다 변경을 했다. (다른 소스와 호환성을 위해서 ) 


  • Jetson SDK Components 설치사항들 
  1. CUDA (CUDA Toolkit 10.0)
  2. AI  (cuDNN, TensorRT)
  3. Computer Vision (OpenCV , VisionWorks)
  4. Multimedia (Multimedia API)

이 부분이 설치가 되어야 실제 Jetson SDK Components가 설치가 되며,  추후 Jetson에서 Sample 예제도 확인가능하다.


상당한 시간이 걸리며, 설치후 아래의 Completed Successfully 확인


2. SDK Manager 로 설치후 확인 

상위 SDK Manager 설치환경을 확인하고, 각각의 디렉토리를 확인하자.

  • NVIDIA SDK 설치된 위치 

$ tree -L 2 ~/nvidia/nvidia_sdk/

/home/jhlee/nvidia/nvidia_sdk/     //Jetson TX2 OS 관련 BSP 
├── JetPack_4.2_Linux
│   └── documentations                 // Jetpack 4.2 문서 확인하자 
└── JetPack_4.2_Linux_P3310
    └── Linux_for_Tegra         // flash command 


  • SDKManger가 Download 한 Package들 
 $ tree -L 2 ~/Downloads/
/home/jhlee/Downloads/         // sdkmanager 설치 진행 한 곳  
├── nvidia
│   └── sdkm_downloads
└── sdkmanager_0.9.11-3405_amd64.deb

$ ls ~/Downloads/nvidia/sdkm_downloads/            // 설치된 Package 사항확인, Jetson SDK component 
Jetson_Linux_R32.1.0_aarch64.tbz2
NVIDIA_Nsight_Graphics_2018.7.L4T.25921359.deb
NsightSystems-linux-public-2019.3.2.12-510a942.deb
Tegra_Linux_Sample-Root-Filesystem_R32.1.0_aarch64.tbz2
Tegra_Multimedia_API_R32.1.0_aarch64.tbz2
cuda-repo-cross-aarch64-10-0-local-10.0.166_1.0-1_all.deb
cuda-repo-l4t-10-0-local-10.0.166_1.0-1_arm64.deb
cuda-repo-ubuntu1604-10-0-local-10.0.166-410.62_1.0-1_amd64.deb
devtools_docs.zip
graphsurgeon-tf_5.0.6-1+cuda10.0_arm64.deb
libcudnn7-dev_7.3.1.28-1+cuda10.0_arm64.deb
libcudnn7-doc_7.3.1.28-1+cuda10.0_arm64.deb
libcudnn7_7.3.1.28-1+cuda10.0_arm64.deb
libnvinfer-dev_5.0.6-1+cuda10.0_arm64.deb
libnvinfer-samples_5.0.6-1+cuda10.0_all.deb
libnvinfer5_5.0.6-1+cuda10.0_arm64.deb
libopencv-dev_3.3.1-2-g31ccdfe11_arm64.deb
libopencv-python_3.3.1-2-g31ccdfe11_arm64.deb
libopencv-samples_3.3.1-2-g31ccdfe11_arm64.deb
libopencv_3.3.1-2-g31ccdfe11_arm64.deb
libvisionworks-repo_1.6.0.500n_arm64.deb
libvisionworks-sfm-repo_0.90.4_arm64.deb
libvisionworks-tracking-repo_0.88.2_arm64.deb
python-libnvinfer-dev_5.0.6-1+cuda10.0_arm64.deb
python-libnvinfer_5.0.6-1+cuda10.0_arm64.deb
python3-libnvinfer-dev_5.0.6-1+cuda10.0_arm64.deb
python3-libnvinfer_5.0.6-1+cuda10.0_arm64.deb
sdkmanager_0.9.12-4180_amd64.deb
sdkml3_jetpack_l4t_42.json
tensorrt_5.0.6.3-1+cuda10.0_arm64.deb
uff-converter-tf_5.0.6-1+cuda10.0_arm64.deb

상위에서 arm64기반의 package를 중심으로 확인
  https://developer.nvidia.com/embedded/downloads

2.1  Host 와 Jetson TX2 의 설정 및 설치 

  • Host에서 Jetson TX2로 SSH 연결 
$ ssh -X jetsontx2@192.168.55.1  // SSH로 편하게 접속 

아래 에러 발생시, 
@@@@@@@@@@@@@@@@@@@@@@@@@@@@@@@@@@@@@@@@@@@@@@@@@@@@@@@@@@@
@    WARNING: REMOTE HOST IDENTIFICATION HAS CHANGED!     @
@@@@@@@@@@@@@@@@@@@@@@@@@@@@@@@@@@@@@@@@@@@@@@@@@@@@@@@@@@@

$ ssh-keygen -R 192.168.55.1  // Key 재발행 후 재접속 


Ubuntu Package 설치전에, LAN을 연결한 후 Internet 연결 확인

  • Ubuntu 기본 Package Update & Upgrade 
jetsontx2@jetsontx2-desktop:~$ sudo apt update
jetsontx2@jetsontx2-desktop:~$ sudo apt upgrade 

시간이 무지 많이 오래 걸리므로, 다음에는 반드시 Backup Image을 만들고 작업을 해야겠다.

3. 다른 방법으로 Jetson TX2 Flash 방법 

Jetpack3.3 처럼 flash.sh command가 존재하며, 사실 sdkmanager도 내부적으로 동일하게 사용을 한다.

3.1 SDKManager Command  사용 

sdkmanager 사용법
  https://docs.nvidia.com/sdk-manager/sdkm-command-line-install/index.html

Jetson TX2 
$ ./sdkmanager --cli install --user john.doe@example.com --logintype devzone
--product Jetson --version 4.2 --targetos Linux --host 
--target P2888 --flash all  

상위방법은 별도로 시도를 해보지를 않았고,  무슨 장점이 있는 지 모르겠다.
일단 만약 시도를 한다면, 상위  target은 p3310으로 변경하고, 본인의 email을 넣어야 할 것 같다.
세부내용은 sdkmanager --help를 보자.

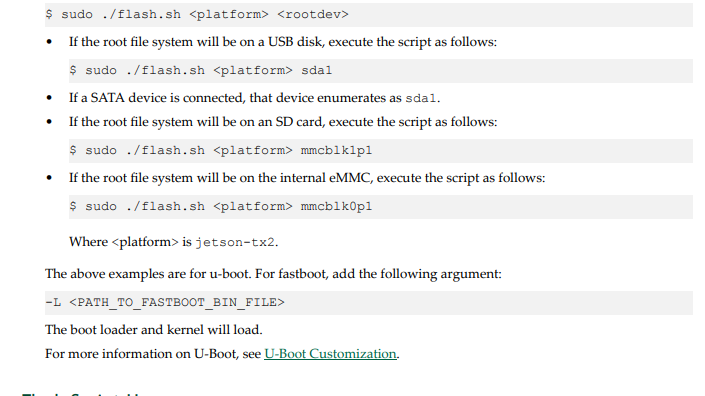
3.2  Flash Command 사용 

이전 Jetpack 3.3 과 동일하게 지원이 가능하며, 현재 OS와 기본 Package 설치되는 것으로 알고 있다. (Jetson SDK Components는 별도로 설치해야함)


  • Force Recovery Mode


  • Host PC에서 USB 연결확인 
$ lsusb  // Host 에서 USB 로 Jetson TX2 연결 후 Connection 확인
.....
Bus 001 Device 036: ID 0955:7020 NVidia Corp. 

만약 상위와 같이 잡히지 않는다면,  Force Recovery Mode로 진입 후 다시 확인

  • Flash 방법 ( Host 와 Jetson 과 USB 연결)
$ cd ~/nvidia/nvidia_sdk/JetPack_4.2_Linux_P3310/Linux_for_Tegra   // for Jetson TX2 
$ sudo ./flash.sh jetson-tx2 mmcblk0p1 // For Jetson TX2

상위대로 한다면, 기본설치만되고, NVIDIA에서 제공해주는 Jetson SDK components는 설치가 되지 않으므로 주의하자.

Jetson SDK components는 상위 nvidia/sdkm_downloads/  에 별도로 package로 존재

  • 기타 다른 보드 
- sudo ./flash.sh jetson-tx2i mmcblk0p1 // For Jetson TX2i
- sudo ./flash.sh jetson-xavier mmcblk0p1 // For Jetson Xavier
- sudo ./flash.sh jetson-nano-qspi-sd mmcblk0p1 // For Jetson Nano

상위로 진행 한 후 Jetson과 HDMI로 모니터로 연결하고, 관련 기본 설정을 해주자.


  • APP Partition Backup 후 이를 적용
 $ ls bootloader/system.img*   // 존재하는 system.img 확인 
bootloader/system.img  bootloader/system.img.raw      //  ( system.img 4G, system.img.raw 28G)

$ lsusb // 반드시 Jetson 연결 확인 후, Recovery Mode 변경 
Bus 001 Device 040: ID 0955:7020 NVidia Corp.

$ sudo ./flash.sh -r -k APP -G clone.img jetson-tx2 mmcblk0p1    // Jetson TX2의 APP Partition Image를 Backup  (clone.img) ( Filesystem)  

//다음 에러가 발생하면, Recovery Mode 변경 
[sudo] password for jhlee: 
###############################################################################
# L4T BSP Information:
# R32 (release), REVISION: 1.0, GCID: 14531094, BOARD: t186ref, EABI: aarch64, 
# DATE: Wed Mar 13 07:41:08 UTC 2019
###############################################################################
Error: probing the target board failed.
       Make sure the target board is connected through 
       USB port and is in recovery mode.

//제대로 실행된 경우 시간이 많이 걸림
###############################################################################
# L4T BSP Information:
# R32 (release), REVISION: 1.0, GCID: 14531094, BOARD: t186ref, EABI: aarch64, 
# DATE: Wed Mar 13 07:41:08 UTC 2019
###############################################################################
# Target Board Information:
# Name: jetson-tx2, Board Family: t186ref, SoC: Tegra 186, 
# OpMode: production, Boot Authentication: NS, 
###############################################################################
./tegraflash.py --chip 0x18 --applet "/home/jhlee/nvidia/nvidia_sdk/JetPack_4.2_Linux_P3310/Linux_for_Tegra/bootloader/mb1_recovery_prod.bin" --skipuid --cmd "dump eeprom boardinfo cvm.bin" 
Welcome to Tegra Flash
version 1.0.0
Type ? or help for help and q or quit to exit
Use ! to execute system commands
............. 

$ ls  // 새로 생성된 clone.img 확인 
clone.img  clone.img.raw

$ mkdir jhleeback

$ cp bootloader/system.img* jhleeback/                                      // 반드시 bootloader/system.img bakcup  

$ sudo cp clone.img.raw bootloader/system.img             //  bootloader/system.img 교체 

$ sudo ./flash.sh -r -k APP jetson-tx2 mmcblk0p1             // 적용된 이미지로 Flash


  • Target Filesystem 정보 확인
이전과 동일하게, Host PC에서 mount하여, Target의 Filesystem 정보확인이 가능하다.

$ cd jhleeback

$ mkdir test  //mount 디렉토리 

$ ls
system.img  system.img.raw  test

$ sudo mount -t ext4 -o loop ./system.img.raw ./test 

$ ls test/    // Target Filesystem 확인 
README.txt  bin  boot  dev  etc  home  lib  lost+found  media  mnt  opt  proc  root  run  sbin  snap  srv  sys  tmp  usr  var

$ ls ./test/usr/local/       // CUDA 설치확인, 미설치 
bin  etc  games  include  lib  man  sbin  share  src

$ ls ./test/usr/src/         // tensorrt 설치확인 , 미설치 (/usr/src/tensorrt/bin/   , /usr/src/tensorrt/samples/)
linux-headers-4.9.140-tegra-linux_x86_64  linux-headers-4.9.140-tegra-ubuntu18.04_aarch64  nvidia

$ sudo umount test   // 정보확인 후 반드시 unmount 

  • Jetson TX2에서 Partition 확인 
$ sudo gdisk -l /dev/mmcblk0
[sudo] password for nvidia: 
GPT fdisk (gdisk) version 1.0.3

Partition table scan:
  MBR: protective
  BSD: not present
  APM: not present
  GPT: present

Found valid GPT with protective MBR; using GPT.
Disk /dev/mmcblk0: 61071360 sectors, 29.1 GiB
Sector size (logical/physical): 512/512 bytes
Disk identifier (GUID): 00000000-0000-0000-0000-000000000000
Partition table holds up to 31 entries
Main partition table begins at sector 2 and ends at sector 9
First usable sector is 4104, last usable sector is 61071327
Partitions will be aligned on 8-sector boundaries
Total free space is 1 sectors (512 bytes)

Number  Start (sector)    End (sector)  Size       Code  Name
   1            4104        58724359   28.0 GiB    0700  APP              // UBUNTU FileSYSTEM 
   2        58724360        58732551   4.0 MiB     0700  mts-bootpack
   3        58732552        58740743   4.0 MiB     0700  mts-bootpack_b
   4        58740744        58741767   512.0 KiB   0700  cpu-bootloader
   5        58741768        58742791   512.0 KiB   0700  cpu-bootloader_b
   6        58742792        58743815   512.0 KiB   0700  bootloader-dtb
   7        58743816        58744839   512.0 KiB   0700  bootloader-dtb_b
   8        58744840        58750983   3.0 MiB     0700  secure-os
   9        58750984        58757127   3.0 MiB     0700  secure-os_b
  10        58757128        58761223   2.0 MiB     0700  eks
  11        58761224        58769415   4.0 MiB     0700  adsp-fw
  12        58769416        58777607   4.0 MiB     0700  adsp-fw_b
  13        58777608        58778815   604.0 KiB   0700  bpmp-fw
  14        58778816        58780023   604.0 KiB   0700  bpmp-fw_b
  15        58780024        58781023   500.0 KiB   0700  bpmp-fw-dtb
  16        58781024        58782023   500.0 KiB   0700  bpmp-fw-dtb_b
  17        58782024        58786119   2.0 MiB     0700  sce-fw
  18        58786120        58790215   2.0 MiB     0700  sce-fw_b
  19        58790216        58802503   6.0 MiB     0700  sc7
  20        58802504        58814791   6.0 MiB     0700  sc7_b
  21        58814792        58818887   2.0 MiB     0700  FBNAME
  22        58818888        59081031   128.0 MiB   0700  BMP
  23        59081032        59343175   128.0 MiB   0700  BMP_b
  24        59343176        59408711   32.0 MiB    0700  SOS
  25        59408712        59474247   32.0 MiB    0700  SOS_b
  26        59474248        59605319   64.0 MiB    0700  kernel
  27        59605320        59736391   64.0 MiB    0700  kernel_b
  28        59736392        59737415   512.0 KiB   0700  kernel-dtb
  29        59737416        59738439   512.0 KiB   0700  kernel-dtb_b
  30        59738440        60262727   256.0 MiB   0700  CAC
  31        60262728        61071326   394.8 MiB   0700  UDA


최근에 위키에 생김
  https://elinux.org/Jetson/TX2_Cloning

  • 세부사항 아래참고 및 Jetpack 3.3 부분참고
  https://devtalk.nvidia.com/default/topic/1050477/jetson-tx2/jetpack4-2-flashing-issues-and-how-to-resolve/
  https://ahyuo.blogspot.com/2019/01/jetson-tx2.html

5/24/2019

NVIDIA TensorRT Manual 및 관련자료 수집 및 용어정리

1. NVIDIA TensorRT Manual 

  • NVIDIA Deep Learning Manual 
  Deep Learning에 Frame 과 NVIDIA의 종합 SDK Manual
  아래사이트에서 궁금한 내용은 각각 아이콘을 클릭해서 들어가자
  https://developer.nvidia.com/deep-learning-software

  • NVIDIA TensorRT
C++ 구성이 되었으며, Inference Engine으로 사용됨
  https://developer.nvidia.com/tensorrt

  • TensorRT 기본기능 설명 
성능을 업그레이드 하는 방법소개하며, CPU만 사용할때보다는 최고 40배 빠르다고함.
  https://devblogs.nvidia.com/speed-up-inference-tensorrt/

  • TensorRT Cloud (nvidia-docker, x86만 지원하며, ARM 아직 미지원)
  https://ngc.nvidia.com/catalog/containers/nvidia:tensorrt


  • TensorRT python API 사용방법 소개 
  https://docs.nvidia.com/deeplearning/sdk/tensorrt-developer-guide/index.html#python_topics


  • TensorRT의 DLA( Deep Learning Accelerator)
현재 Jetson TX2에는 HW적으로 해당사항이 없음 
  https://docs.nvidia.com/deeplearning/sdk/tensorrt-developer-guide/index.html#dla_topic


  • TensorRT의 제약사항 (필수확인)
JetsonTX2FP32/FP16만 지원하며, DLA는 소스는 존재하지만 HW가 지원못함
  https://docs.nvidia.com/deeplearning/sdk/tensorrt-support-matrix/index.html
  https://docs.nvidia.com/deeplearning/sdk/tensorrt-support-matrix/index.html#layers-matrix
  https://docs.nvidia.com/deeplearning/sdk/tensorrt-support-matrix/index.html#hardware-precision-matrix

  https://docs.nvidia.com/deeplearning/sdk/tensorrt-developer-guide/index.html


  • TensorRT의 성능측정
Nsight를 이용하여 CUDA를 측정하고 이를 개선하는것 같은데, 주로 x86용으로 사용하는 것 같다.
현재 Jetson TX2도 Nsight를 지원하지만, 이는 동작성능측정인 것 같다.
추후 Tensorflow의 Tensorboard로 분석하는 법을 배워야할 것 같다.
(우선 Tensorflow부터)
  https://docs.nvidia.com/deeplearning/sdk/tensorrt-best-practices/index.html
  https://docs.nvidia.com/deeplearning/sdk/tensorrt-best-practices/index.html#profiling

  • TensorRT Sample (C++/python)
C++ Sample / Python Sample
  https://docs.nvidia.com/deeplearning/sdk/tensorrt-sample-support-guide/index.html

  • TensorRT (x86용 설치)
  https://docs.nvidia.com/deeplearning/sdk/tensorrt-install-guide/index.html#overview

  • TensorRT의 함수 (Graph Surgeon)
TensorFlow의 Graph를 분석이 중요하다고 하는데, 이 부분을 어떻게 해야하는지를 나중에 자세히알아보도록 하자
  https://docs.nvidia.com/deeplearning/sdk/tensorrt-api/python_api/graphsurgeon/graphsurgeon.html

  • TensorRT의 UFF/Caffe/Onnx Parser 함수 
다른 Model을 Import하여 Parser하여 변환을 할 것인데, 어떻게 진행하는 지 알아야함
현재 별도의 명령어로 Conver는 존재
  https://docs.nvidia.com/deeplearning/sdk/tensorrt-api/python_api/parsers/Uff/pyUff.html


  • TensorRT의 Python Network 구성 (Layer)
Deep Learning Network로 상위에서 각 제약사항과 같이 봐야하며, 대충의 기능을 알아두자
  https://docs.nvidia.com/deeplearning/sdk/tensorrt-api/python_api/infer/Graph/pyGraph.html#

  • TensorRT의 Python Core 기능 
Core에서 CudaEngine을 보면 핵심기능같은데, 상위문서 보면 Serialize 인것으로 생각
Profiler를 별도로 제공하며, 이를 분석하고 사용하는 도구가 무엇인지는 차후에 찾아보자
  https://docs.nvidia.com/deeplearning/sdk/tensorrt-api/python_api/infer/Core/pyCore.html
  https://docs.nvidia.com/deeplearning/sdk/tensorrt-api/python_api/infer/Core/Profiler.html

  • TensorRT Userful Resource 
  http://on-demand.gputechconf.com/gtcdc/2017/video/DC7172/
  https://docs.nvidia.com/deeplearning/sdk/tensorrt-best-practices/index.html
  http://on-demand.gputechconf.com/gtcdc/2017/video/DC7172/
  https://devblogs.nvidia.com/tensorrt-4-accelerates-translation-speech-recommender/
  http://on-demand.gputechconf.com/gtc/2018/video/S8822/


1.1  NVIDIA에서 사용되는 용어 정리 

NVIDIA의 Manual을 보면 약어들이 존재해서 혼란하게 만들어서 관련부분들을 간단히 정리하여 적는다.
최근부터 NVIDIA에서 한글지원을 해주고 있으므로, 가능하다면 한글로 보자.
  • DGX: NVIDIA Workstation 인지 기기인지 좀 혼동, 추측으로 Workstation (홈페이지에서 세부설명이 없어혼동) 
  • NGC: NVIDIA GPU Cloud 로 x86기반으로 지원 (Docker)

 아래의  Product부분참조 
  https://www.nvidia.com/en-us/data-center/dgx-systems/

1.2 NVIDIA DGX System 
NVIDIA에서 Deep Learning Training 을 위해서 제작한 Workstation인지 혼동되며 이후 모델을 HGX로 만들 생각인 것 같다.
HGX는 이름만 존재하며, 아직 정식버전은 없는 것 같다.
DGX도 여러 종류가 존재하며, 빠른 train을 위한 Workstation으로 이용가능할 것 같으며, 클라우딩도 지원 및 다중 GPU도 지원이 되어 성능이 빠른 것 같다

  • NVIDIA DGX Series 
아래의 Link를 보면 각각의  Workstation 및 고사양으로 사용가능한 것 같다.
  https://www.nvidia.com/en-us/data-center/dgx-pod-reference-architecture/
  https://www.nvidia.com/en-us/data-center/dgx-systems/
  https://www.nvidia.com/ko-kr/data-center/dgx-station/
  https://youtu.be/PuZ2F87Lqg4

  • Tensorflow -> TensorRT
  https://docs.nvidia.com/deeplearning/frameworks/tf-trt-user-guide/index.html


1.3 NVIDIA의 Docker 사용

NVIDIA의 Docker의 구성은 다음과  같다.
  1. docker :  x86 과 ARM 지원 
  2. nvidia-docker :  ARM은 아직 미지원 

NVIDIA에서는 GPU Cloud를 이용하여 Docker기능을 좀 더 제공을 하고 있으며, 이 때 사용하는 것이 nvidia-docker 이지만, 이는 ARM은 아직 지원하지 않는다.
처음 nvidia-docker가 ARM을 지원을 하는줄 알고 착각하여 좀 삽질을 했다.

NVIDIA GPU Cloud 및 NVIDIA-DOCKER(nvidia-docker) 는 Host PC에서 사용되는 기능으로 주로 Training 과 이를 Test 하기 위해서 사용되는 것 같다.
개인생각으로는 추후에 ARM도 지원을 해줄 것 같은데, 그때 자세히 알아보자.

NVIDIA-DOCKER 지원 (Host PC만 지원 , ARM 미지원 )
  https://github.com/NVIDIA/nvidia-docker/issues/214
  https://github.com/NVIDIA/nvidia-docker/wiki
  https://github.com/NVIDIA/nvidia-docker/wiki/Frequently-Asked-Questions#do-you-support-tegra-platforms-arm64
  https://www.nvidia.co.kr/content/apac/event/kr/deep-learning-day-2017/dli-1/Docker-User-Guide-17-08_v1_NOV01_Joshpark.pdf

  • NVIDIA GPU Cloud  (NGC) 가입 및 이용
  https://ngc.nvidia.com/
  https://ngc.nvidia.com/catalog/containers/nvidia:tensorrt


  • TensorRT의 Docker 사용방법
  https://docs.nvidia.com/deeplearning/sdk/tensorrt-container-release-notes/pullcontainer.html#pullcontainer

상위의 문서를 보면 DGX를 이용하지 않는다면, NVIDIA® GPU Cloud™ (NGC) 문서를 참고하라고 해서 이것을 참고
  https://docs.nvidia.com/ngc/ngc-getting-started-guide/index.html

  • Jetson TX2 에서 docker를 이용하여 TensorRT 설치 시도 

nvidia@tegra-ubuntu:~/jhlee$ mkdir docker
nvidia@tegra-ubuntu:~/jhlee$ cd docker
nvidia@tegra-ubuntu:~/jhlee/docker$ sudo docker pull nvcr.io/nvidia/tensorrt:19.05-py3   
[sudo] password for nvidia: 
19.05-py3: Pulling from nvidia/tensorrt
7e6591854262: Pulling fs layer 
089d60cb4e0a: Pulling fs layer 
9c461696bc09: Pulling fs layer 
45085432511a: Pull complete 
6ca460804a89: Pull complete 
2631f04ebf64: Pull complete 
86f56e03e071: Pull complete 
234646620160: Downloading [=====================>                             ]  265.5MB/615.2MB
7f717cd17058: Verifying Checksum 
e69a2ba99832: Download complete 
bc9bca17b13c: Download complete 
1870788e477f: Download complete 
603e0d586945: Downloading [=====================>                             ]  214.3MB/492.7MB
717dfedf079c: Download complete 
1035ef613bc7: Download complete 
c5bd7559c3ad: Download complete 
d82c679b8708: Download complete 
....

$ sudo docker images
REPOSITORY                TAG                 IMAGE ID            CREATED             SIZE
nvcr.io/nvidia/tensorrt   19.05-py3           de065555c278        2 weeks ago         3.83GB

Nvidia docker 기반에 TensorRT 동작
  https://docs.nvidia.com/deeplearning/sdk/tensorrt-container-release-notes/running.html
Nvidia Docker (Docker에 Cuda기능추가)
  https://devblogs.nvidia.com/nvidia-docker-gpu-server-application-deployment-made-easy/
Jetson TX2 자료로 Docker 검색가능 
  https://elinux.org/Jetson_TX2


  • nvidia-docker 설치
NVIDIA에서 제공하는 Docker로 CPU중심의 Docker가 아닌 GPU도 같이 사용이 가능하며,  현재 ARM Version은 미제공
  https://github.com/nvidia/nvidia-docker/wiki/Installation-(version-2.0)
  https://nvidia.github.io/nvidia-docker/


  • Jetson의 개발환경 구축 (PC)
  https://github.com/teoac/DeepLearningOnJetson/wiki/How-to-Set-Environment-for-Development


  • Tensorflow for Jetson TX2
Jetson에서 쉽게 Tensorflow를 쉽게 설치가능
  https://docs.nvidia.com/deeplearning/frameworks/install-tf-jetsontx2/index.html
  https://www.nvidia.com/en-us/autonomous-machines/embedded-systems/jetson-tx2/


  • Jetson TX2의 Jetpack 과 Issack SDK 관련자료 
  https://developer.nvidia.com/embedded/jetpack
  https://developer.nvidia.com/isaac-sdk


  • Nsight 
NVIDIA에서 제공해주는 Eclipse 기반의 IDE Tool로 Jetpack 설치하면 존재함
  https://developer.nvidia.com/nsight-systems
  https://developer.nvidia.com/nsight-graphics

4/30/2019

NVIDIA의 Deep Learning-TensorRT

1. NVIDIA DEEP LEARNING SDK 구조 및 기본설명

NVIDIA의 Deep Learning 전체 시스템을 간단히 보면, TRAINING 과 INFERENCE 로 나누어지며, TRAINING을 통해 DATA MODEL을 만들고,
이 MODEL를 가지고 INFERENCE 에서 적용하는 방식이다.

정말 단순하고 당연한 구조이지만, NVIDIA만의 특징은 상위 두 기능에 각각의 NVIDIA의 기능들을 제공하고 있기때문이다.

Training And Inference


NVIDIA Deep Learning SDK

상위에서 설명한 기능들을 살펴보자.
현재 NVIDIA의 공식사이트에서 확인된 기술은 다음과 같으며, 확인할때 마다 지속적으로 변경되는 것으로 보아 앞으로도 확장이 될 것 같다.
  1. Deep Learning Primitives (CUDA® Deep Neural Network library™ (cuDNN))
  2. Deep Learning Inference Engine (TensorRT™ )
  3. Deep Learning for Video Analytics (NVIDIA DeepStream™ SDK)
  4. Linear Algebra (CUDA® Basic Linear Algebra Subroutines library™ (cuBLAS))
  5. Sparse Matrix Operations (NVIDIA CUDA® Sparse Matrix library™ (cuSPARSE))
  6. Multi-GPU Communication (NVIDIA® Collective Communications Library ™ (NCCL))


CUDA는 NVIDIA에서 제공하는 Graphic Library로 그중에서 포함된 기능들을 설명한다.

  • CUDA/CuDNN
CuDNN은 CUDA Deep Learning Network Library라고 하며, DNN위한 Library라고 한다.
Convolution , Pooling,을 제공을 해주며, 다양한 Deep Learning Framework에서 사용되어진다고 한다.


  • CUDA/cuBLAS
선형대수라고하며, CPU의 MKL BLAS Library보다, 6배이상으로 빠르다고 하면, GPU Library 라고하는데, 사용을 해봐야 알것 같다.
CUDA 내부 역할을 잘모르기 때문에, 이부분을 단정지어 말하기가 애매하다.


  • CUDA/cuSPARSE
cuBLAS와 cuPARSE와의 차이는 잘모르겠으며,  CPU의 MKL BLAS의 역할하는 것 같으며, 명확하지 않다.
Matlab 처럼 Matrix의 기능을 빠르게 지원을 해주는 것으로 생각된다.


일단 상위 3개의 기능이 CUDA에 포함이 되고 있으며, 이를 구분해서 알아두자.


  • TensoRT
Training은 Host PC에서 진행을 할 것이며, 만들어진 Model기반으로 이를 적용할 NVIDIA의 Inference Engine 및 Framework라고 생각하면 되겠다.
이는 x86/ ARM 을 다 지원하므로, 개별 부분은 다 자세히 알아봐야 한다.
현재 Jetson에서는 C++만을 지원하고 있다. (추후 Python은 어떻게 될지 모르겠다.).


  • Deep Stream SDK
TensorRT와 마찬가지로, C++로 Inference에서 사용이되며, Deep Learning을 이용한 빠른 Video 분석을 위한 Library라고 생각하는데, 추측으로는 TensorRT를 Gstream 처럼 만들어서 넣는 개념인 것 같다.
만약 사용이되어지면, 실시간으로 비디오 Yolo와 비슷 할 것 같다.
( TensorRT에서 현재 Yolo 지원)


  • NCCL 
멀티 GPU 통신 기능로, 주로 Training할 때 사용될 것으로 생각이 된다.
Host PC에서 여러개의 GPU와 통신하여 빠른 기능을 사용할때 사용할 것 같다.


상위내용은 아래에서 확인
  https://docs.nvidia.com/deeplearning/sdk/introduction/index.html


JetsonTX2 기준으로 본다면, 사용할 부분은  Training은 PC에서 특정 Framework을 이용하여 Model을 만드는 것을 진행 한 후  Inference은 Jetson TX2의 TensorRT로 최적화를 진행
(Tensorflow->TensorRT)


TensorRT Install 및 구조파악
  https://docs.nvidia.com/deeplearning/sdk/tensorrt-install-guide/index.html

Nvidia Jetson Tutorial
  https://developer.nvidia.com/embedded/learn/tutorials

Nvidia 의 TensorFlow to TensorRT
  https://developer.nvidia.com/embedded/twodaystoademo


1.1 NVIDIA Deep Learning SDK Manual

상위 NVIDIA Manual을 보면 좌측을 보면 아래와 같이 구성이 되어있으며, 필요한 부분만 보자.

  • Deep Learning SDK:  반드시 봐야하며, 전체 구조를 쉽게 파악가능 
  • Performance:  Nvidia의 제공하는 성능에 대해서 설명해주지만, 현재 이해 불가능 
  • Training Library:  상위 cuDNN/NCCL 설명이 Training 중심으로 나오지만, 추후 자세히 
  • Inference Library: TensorRT가 Inference 엔진이 가장중요하며, 이부분을 이해 
  • Inference Server: Docker를 이용하여 동작되며, HTTP/GRPC제공하며, Tensorflow server와 비슷한 것 같다. 
  • Data Loading: Data Loading Library 라고 하는데, 읽어보면, Trainning시 Bigdata를 말하는 것 같다. 
  • Archives: 상위 각각의 설명을 Guide로 설명해주고 있다. 

NVIDIA Deep Learning SDK
  https://docs.nvidia.com/deeplearning/sdk/index.html

NVIDIA DGX (추후 파악)
  https://docs.nvidia.com/deeplearning/dgx/
  https://docs.nvidia.com/deeplearning/dgx/install-tf-jetsontx2/index.html

NVIDIA DEV COMMUNITY
  https://devtalk.nvidia.com/


1.2 Jetson TX2의 Jetpack 설치 및 환경확인

Jetson TX2에서 진행을 하고 있기 때문에 제약사항은 반드시 확인을 해야한다.

  1. Jetson TX2  (Ubuntu 16.04)
  2. Jetpack 3.3  설치  (TensorRT 4.0.2)
  3. Tensorflow 1.8.0 설치 

Jetpack 3.3 관련내용
  https://developer.nvidia.com/embedded/jetpack-3_3

Jetpack 4.1 관련내용
  https://developer.nvidia.com/embedded/downloads#?search=L4T%20Jetson%20TX2%20Driver%20Package


TensoRT는 x86과 Jetson에서도 돌아가는 시스템이지만 Manual을 볼때 반드시 체크해야할 것이 Jetson에도 적용이되는지를 확인을 해야한다.
TensorRT는 NVIDIA에서 제공하는 Deep Learning inference Engine을 말한다.


현재 TensorRT 5.x까지 지원을 하고 있으며,  현재 본인의 TensorRT version 아래와 같이 확인해보자.

nvidia@tegra-ubuntu$  dpkg -l | grep TensorRT
ii  libnvinfer-dev                              4.1.3-1+cuda9.0                              arm64        TensorRT development libraries and headers
ii  libnvinfer-samples                          4.1.3-1+cuda9.0                              arm64        TensorRT samples and documentation
ii  libnvinfer4                                 4.1.3-1+cuda9.0                              arm64        TensorRT runtime libraries
ii  tensorrt                                    4.0.2.0-1+cuda9.0                            arm64        Meta package of TensorRT

  https://devtalk.nvidia.com/default/topic/1050183/tensorrt/tensorrt-5-1-2-installation-on-jetson-tx2-board/

Download TensorRT
  https://developer.nvidia.com/nvidia-tensorrt-download

How To Upgrade TensorRT (x86기반)
  https://docs.nvidia.com/deeplearning/sdk/tensorrt-install-guide/index.html#installing-debian

  https://medium.com/@ardianumam/installing-tensorrt-in-jetson-tx2-8d130c4438f5


2. Training Framework

Manual의 Index를 보면, Training Library를 보면, CUDA의 cuDNN/NCCL 기능을 활용되는 기능만 설명이 되어있다.

현재 실제 Training을 해보지 않은 입장에서는 어떻게 Training을 진행해야하는지는 모르기 때문에, 추후 알게 된다면, 관련부분을 다시 자세히 서술하자.

Manual의 Performance에서 Training with Mixed Precision부분을 보면 다양한 Framework를 통해 진행을 하는 것 같다.

NVCaffe, Caffe2, MXNet, Microsoft Cognitive Toolkit, PyTorch, TensorFlow and Theano
그리고, 다양한 Format을 이용하여, 정확도를 변경하여 최적화를 진행을 하는 것 같다.
이 부분은 실제로 Training을 진행해봐야 아는 부분이기에, Manual만 읽고 이해하기로 한다.

  • Framework들 
  https://docs.nvidia.com/deeplearning/sdk/mixed-precision-training/index.html#framework


3. Inference (TensorRT)

TensorRT의 기능은 위에서 설명했듯이 NVIDIA의 Inference의 엔진이며, C++로 구현이 되어있다.
그리고, 다른 Deep Learning Framework에서 작성된 Network Model을 가져와 이곳에 맞게 사용되어지는 것 같다.


  • TensorRT의 사용법
  1. Deep Learning Framework와 연결하여 사용
  2. TensorRT 단독사용 

상위 두개로 지원을 해주는 것 같으며, 최종으로는 TensorRT만 사용하도록 갈 것 같다.
TensorRT도 Deep Learning Framework 같지만, 오직 Inference 기능만 제공하기에,
다른 Framework과 다른 것 같다.


TensorRT의 최신기능 및 설명 ( 성능 )
  https://developer.nvidia.com/tensorrt
  http://www.nextplatform.com/wp-content/uploads/2018/01/inference-technical-overview-1.pdf


TensorRT의 기능설명 및 지원  Parser
  https://docs.nvidia.com/deeplearning/sdk/tensorrt-developer-guide/index.html

TensorRT는 C++로 구현되었으며, Python도 구현이 되어있다고 한다.

Network 정의를 보면,  input/output tensors들을 정의하고, Layer들을 추가 및 설정변경하고,  다양한 설정을 제공하는 것을 알 수 있다.

  1. Network Definition : Network Model 관련된 부분( Deep Learning 공부를 해야함)
  2. Builder: Network의 최적화에 관련된 부분 같다. 
  3. Engine: Inference Engine 이라고 하는데 이 세개는 정확히 구분하기가 애매하다. 


  • TensorRT의 Parser 
다른 Framework, 작성된 Network를 직접 가져올수 있다고 하며, Caffe or UFF or ONNX format으로 형태로 가져와서 이를 최적화 하는 기능 가지고 있다고 한다.
  1. Caffe Parser
  2. UFF Parser
  3. ONNX Parser

  https://docs.nvidia.com/deeplearning/sdk/tensorrt-developer-guide/index.html#api


TensorRT는 다양한 Deep learning Framework를 연결지원하여, 생성된 Trained Model을 TensorRT에 최적화 진행이 가능하며 이때 이용하는 것이 Parser기능이다.

  • Framework(TensorFlow)와 TensorRT 사용법 및 Convert 
  https://docs.nvidia.com/deeplearning/sdk/tensorrt-developer-guide/index.html#build_model
  https://github.com/NVIDIA-AI-IOT/tf_to_trt_image_classification

  • TensorFlow to UFF Convert Format 
  https://devtalk.nvidia.com/default/topic/1028464/jetson-tx2/converting-tf-model-to-tensorrt-uff-format/

  • TensorFlow에서 TensorRT Import 방법 및 사용법 
TensorFlow와 TensorRT를 같이 사용하는 방법
  https://docs.nvidia.com/deeplearning/sdk/tensorrt-developer-guide/index.html#import_tf_python


  • TensorFlow에 TensorRT 적용
tf : Tensorflow
trt: TensorRT

  https://jkjung-avt.github.io/tf-trt-models/
  https://github.com/NVIDIA-AI-IOT/tf_trt_models


  • TensorRT Support Matrix 
TensorRT의 Parser 정보 지원확인
TensorRT의 Layer와 Features의 제약사항확인
  https://docs.nvidia.com/deeplearning/sdk/tensorrt-support-matrix/index.html


  • TensorRT Release version 의 기능확인
  https://docs.nvidia.com/deeplearning/sdk/tensorrt-container-release-notes/index.html


  • TensorRT API (C++/Python)  
  https://docs.nvidia.com/deeplearning/sdk/tensorrt-api/index.html


  • TensorRT docker 사용법 
  https://docs.nvidia.com/deeplearning/sdk/tensorrt-container-release-notes/running.html

  • TensorRT의 Sample 사용법 
  https://docs.nvidia.com/deeplearning/sdk/tensorrt-sample-support-guide/index.html
  https://docs.nvidia.com/deeplearning/sdk/tensorrt-sample-support-guide/index.html#mnist_sample


nvidia@tegra-ubuntu$ ls /usr/src/tensorrt/samples/
common     Makefile         sampleCharRNN     sampleGoogleNet  sampleMNIST     sampleMovieLens  sampleOnnxMNIST  sampleUffMNIST  trtexec
getDigits  Makefile.config  sampleFasterRCNN  sampleINT8       sampleMNISTAPI  sampleNMT        samplePlugin     sampleUffSSD

nvidia@tegra-ubuntu$ cd /usr/src/tensorrt/samples
nvidia@tegra-ubuntu$ sudo make 


Jetson의 TensorRT의 Python은 미지원이지만, 차후 지원
  https://devtalk.nvidia.com/default/topic/1036899/tensorrt-python-on-tx2-/


3.1 TensorRT Sample TEST

Jetson TX2에서 Jetpack을 설치된 상태에서 Test를 진행을 했으며, 처음에는 Compile이 되지 않았기 때문에, 내부에서 Build를 해서 실행파일을 생성해야한다.
그리고, Network Model은 내부에 제공을 해주지만, Caffe Model로 지원을 해주고 있다.

trt : tensorRT

nvidia@tegra-ubuntu$  cd /usr/src/tensorrt/bin/
nvidia@tegra-ubuntu$ ls
$ ls
chobj                     sample_fasterRCNN        sample_mnist            sample_nmt               sample_uff_mnist
dchobj                    sample_fasterRCNN_debug  sample_mnist_api        sample_nmt_debug         sample_uff_mnist_debug
download-digits-model.py  sample_googlenet         sample_mnist_api_debug  sample_onnx_mnist        sample_uff_ssd
giexec                    sample_googlenet_debug   sample_mnist_debug      sample_onnx_mnist_debug  sample_uff_ssd_debug
sample_char_rnn           sample_int8              sample_movielens        sample_plugin            trtexec
sample_char_rnn_debug     sample_int8_debug        sample_movielens_debug  sample_plugin_debug      trtexec_debug

nvidia@tegra-ubuntu$ $ ls ../data/                               // sample의 모델과 관련정보 
char-rnn  faster-rcnn  googlenet  mnist  movielens  ssd

nvidia@tegra-ubuntu$ ./sample_mnist              
Reading Caffe prototxt: ../data/mnist/mnist.prototxt
Reading Caffe model: ../data/mnist/mnist.caffemodel

Input:

@@@@@@@@@@@@@@@@@@@@@@@@@@@@
@@@@@@@@@@@@@@@@@@@@@@@@@@@@
@@@@@@@@@@@@@@@@@@@@@@@@@@@@
@@@@@@@@@@@@@@@@@@@@@@@@@@@@
@@@@@@@@#-:.-=@@@@@@@@@@@@@@
@@@@@%=     . *@@@@@@@@@@@@@
@@@@%  .:+%%% *@@@@@@@@@@@@@
@@@@+=#@@@@@# @@@@@@@@@@@@@@
@@@@@@@@@@@%  @@@@@@@@@@@@@@
@@@@@@@@@@@: *@@@@@@@@@@@@@@
@@@@@@@@@@- .@@@@@@@@@@@@@@@
@@@@@@@@@:  #@@@@@@@@@@@@@@@
@@@@@@@@:   +*%#@@@@@@@@@@@@
@@@@@@@%         :+*@@@@@@@@
@@@@@@@@#*+--.::     +@@@@@@
@@@@@@@@@@@@@@@@#=:.  +@@@@@
@@@@@@@@@@@@@@@@@@@@  .@@@@@
@@@@@@@@@@@@@@@@@@@@#. #@@@@
@@@@@@@@@@@@@@@@@@@@#  @@@@@
@@@@@@@@@%@@@@@@@@@@- +@@@@@
@@@@@@@@#-@@@@@@@@*. =@@@@@@
@@@@@@@@ .+%%%%+=.  =@@@@@@@
@@@@@@@@           =@@@@@@@@
@@@@@@@@*=:   :--*@@@@@@@@@@
@@@@@@@@@@@@@@@@@@@@@@@@@@@@
@@@@@@@@@@@@@@@@@@@@@@@@@@@@
@@@@@@@@@@@@@@@@@@@@@@@@@@@@
@@@@@@@@@@@@@@@@@@@@@@@@@@@@

Output:

0: 
1: 
2: 
3: **********
4: 
5: 
6: 
7: 
8: 
9: 

nvidia@tegra-ubuntu$ ./sample_uff_mnist
../data/mnist/lenet5.uff


---------------------------


@@@@@@@@@@@@@@@@@@@@@@@@@@@@
@@@@@@@@@@@@@@@@@@@@@@@@@@@@
@@@@@@@@@@@@@@@@@@@@@@@@@@@@
@@@@@@@@@@@@@@@@@@@@@@@@@@@@
@@@@@@@@@@@@@@@@+  :@@@@@@@@
@@@@@@@@@@@@@@%= :. --%@@@@@
@@@@@@@@@@@@@%. -@= - :@@@@@
@@@@@@@@@@@@@: -@@#%@@ #@@@@
@@@@@@@@@@@@: #@@@@@@@-#@@@@
@@@@@@@@@@@= #@@@@@@@@=%@@@@
@@@@@@@@@@= #@@@@@@@@@:@@@@@
@@@@@@@@@+ -@@@@@@@@@%.@@@@@
@@@@@@@@@::@@@@@@@@@@+-@@@@@
@@@@@@@@-.%@@@@@@@@@@.*@@@@@
@@@@@@@@ *@@@@@@@@@@@ *@@@@@
@@@@@@@% %@@@@@@@@@%.-@@@@@@
@@@@@@@:*@@@@@@@@@+. %@@@@@@
@@@@@@# @@@@@@@@@# .*@@@@@@@
@@@@@@# @@@@@@@@=  +@@@@@@@@
@@@@@@# @@@@@@%. .+@@@@@@@@@
@@@@@@# @@@@@*. -%@@@@@@@@@@
@@@@@@# ---    =@@@@@@@@@@@@
@@@@@@#      *%@@@@@@@@@@@@@
@@@@@@@%: -=%@@@@@@@@@@@@@@@
@@@@@@@@@@@@@@@@@@@@@@@@@@@@
@@@@@@@@@@@@@@@@@@@@@@@@@@@@
@@@@@@@@@@@@@@@@@@@@@@@@@@@@
@@@@@@@@@@@@@@@@@@@@@@@@@@@@
10 eltCount
--- OUTPUT ---
0 => 14.2556  : ***
1 => -4.83078  : 
2 => 1.09185  : 
3 => -6.29008  : 
4 => -0.835606  : 
5 => -6.92059  : 
6 => 2.40399  : 
7 => -6.01171  : 
8 => 0.730784  : 
9 => 1.50033  : 


---------------------------


@@@@@@@@@@@@@@@@@@@@@@@@@@@@
@@@@@@@@@@@@@@@@@@@@@@@@@@@@
@@@@@@@@@@@@@@@@@@@@@@@@@@@@
@@@@@@@@@@@@@@@@@@@@@@@@@@@@
@@@@@@@@@@@@+ @@@@@@@@@@@@@@
@@@@@@@@@@@@. @@@@@@@@@@@@@@
@@@@@@@@@@@@- @@@@@@@@@@@@@@
@@@@@@@@@@@#  @@@@@@@@@@@@@@
@@@@@@@@@@@#  *@@@@@@@@@@@@@
@@@@@@@@@@@@  :@@@@@@@@@@@@@
@@@@@@@@@@@@= .@@@@@@@@@@@@@
@@@@@@@@@@@@#  %@@@@@@@@@@@@
@@@@@@@@@@@@% .@@@@@@@@@@@@@
@@@@@@@@@@@@%  %@@@@@@@@@@@@
@@@@@@@@@@@@%  %@@@@@@@@@@@@
@@@@@@@@@@@@@= +@@@@@@@@@@@@
@@@@@@@@@@@@@* -@@@@@@@@@@@@
@@@@@@@@@@@@@*  @@@@@@@@@@@@
@@@@@@@@@@@@@@  @@@@@@@@@@@@
@@@@@@@@@@@@@@  *@@@@@@@@@@@
@@@@@@@@@@@@@@  *@@@@@@@@@@@
@@@@@@@@@@@@@@  *@@@@@@@@@@@
@@@@@@@@@@@@@@  *@@@@@@@@@@@
@@@@@@@@@@@@@@* @@@@@@@@@@@@
@@@@@@@@@@@@@@@@@@@@@@@@@@@@
@@@@@@@@@@@@@@@@@@@@@@@@@@@@
@@@@@@@@@@@@@@@@@@@@@@@@@@@@
@@@@@@@@@@@@@@@@@@@@@@@@@@@@
10 eltCount
--- OUTPUT ---
0 => -5.21897  : 
1 => 14.7033  : ***
2 => -3.10811  : 
3 => -5.6187  : 
4 => 3.30519  : 
5 => -2.81663  : 
6 => -2.79249  : 
7 => 0.943604  : 
8 => 2.90335  : 
9 => -2.76499  : 


---------------------------


@@@@@@@@@@@@@@@@@@@@@@@@@@@@
@@@@@@@@@@@@@@@@@@@@@@@@@@@@
@@@@@@@@@@@@@@@@@@@@@@@@@@@@
@@@@@@@@@@@@@@@@@@@@@@@@@@@@
@@@@@@@@@@@*.  .*@@@@@@@@@@@
@@@@@@@@@@*.     +@@@@@@@@@@
@@@@@@@@@@. :#+   %@@@@@@@@@
@@@@@@@@@@.:@@@+  +@@@@@@@@@
@@@@@@@@@@.:@@@@: +@@@@@@@@@
@@@@@@@@@@=%@@@@: +@@@@@@@@@
@@@@@@@@@@@@@@@@# +@@@@@@@@@
@@@@@@@@@@@@@@@@* +@@@@@@@@@
@@@@@@@@@@@@@@@@: +@@@@@@@@@
@@@@@@@@@@@@@@@@: +@@@@@@@@@
@@@@@@@@@@@@@@@* .@@@@@@@@@@
@@@@@@@@@@%**%@. *@@@@@@@@@@
@@@@@@@@%+.  .: .@@@@@@@@@@@
@@@@@@@@=  ..   :@@@@@@@@@@@
@@@@@@@@: *@@:  :@@@@@@@@@@@
@@@@@@@%  %@*    *@@@@@@@@@@
@@@@@@@%  ++  ++ .%@@@@@@@@@
@@@@@@@@-    +@@- +@@@@@@@@@
@@@@@@@@=  :*@@@# .%@@@@@@@@
@@@@@@@@@+*@@@@@%.  %@@@@@@@
@@@@@@@@@@@@@@@@@@@@@@@@@@@@
@@@@@@@@@@@@@@@@@@@@@@@@@@@@
@@@@@@@@@@@@@@@@@@@@@@@@@@@@
@@@@@@@@@@@@@@@@@@@@@@@@@@@@
10 eltCount
--- OUTPUT ---
0 => -2.20233  : 
1 => -0.773752  : 
2 => 23.4804  : ***
3 => 3.09638  : 
4 => -4.57744  : 
5 => -5.71223  : 
6 => -5.92572  : 
7 => -0.543553  : 
8 => 4.85982  : 
9 => -9.1751  : 


---------------------------


@@@@@@@@@@@@@@@@@@@@@@@@@@@@
@@@@@@@@@@@@@@@@@@@@@@@@@@@@
@@@@@@@@@@@@@@@@@@@@@@@@@@@@
@@@@@@@@@@@@@@@@@@@@@@@@@@@@
@@@@@@@@#-:.-=@@@@@@@@@@@@@@
@@@@@%=     . *@@@@@@@@@@@@@
@@@@%  .:+%%% *@@@@@@@@@@@@@
@@@@+=#@@@@@# @@@@@@@@@@@@@@
@@@@@@@@@@@%  @@@@@@@@@@@@@@
@@@@@@@@@@@: *@@@@@@@@@@@@@@
@@@@@@@@@@- .@@@@@@@@@@@@@@@
@@@@@@@@@:  #@@@@@@@@@@@@@@@
@@@@@@@@:   +*%#@@@@@@@@@@@@
@@@@@@@%         :+*@@@@@@@@
@@@@@@@@#*+--.::     +@@@@@@
@@@@@@@@@@@@@@@@#=:.  +@@@@@
@@@@@@@@@@@@@@@@@@@@  .@@@@@
@@@@@@@@@@@@@@@@@@@@#. #@@@@
@@@@@@@@@@@@@@@@@@@@#  @@@@@
@@@@@@@@@%@@@@@@@@@@- +@@@@@
@@@@@@@@#-@@@@@@@@*. =@@@@@@
@@@@@@@@ .+%%%%+=.  =@@@@@@@
@@@@@@@@           =@@@@@@@@
@@@@@@@@*=:   :--*@@@@@@@@@@
@@@@@@@@@@@@@@@@@@@@@@@@@@@@
@@@@@@@@@@@@@@@@@@@@@@@@@@@@
@@@@@@@@@@@@@@@@@@@@@@@@@@@@
@@@@@@@@@@@@@@@@@@@@@@@@@@@@
10 eltCount
--- OUTPUT ---
0 => -10.1173  : 
1 => -2.8161  : 
2 => -2.5111  : 
3 => 19.4893  : ***
4 => -2.07457  : 
5 => 6.91505  : 
6 => -2.07856  : 
7 => -0.881291  : 
8 => -0.81335  : 
9 => -7.68046  : 


---------------------------


@@@@@@@@@@@@@@@@@@@@@@@@@@@@
@@@@@@@@@@@@@@@@@@@@@@@@@@@@
@@@@@@@@@@@@@@@@@@@@@@@@@@@@
@@@@@@@@@@@@@@@@@@@@@@@@@@@@
@@@@@@@@@@@@@@@@@@@@@@@@@@@@
@@@@@@@@@@@@@@@@.*@@@@@@@@@@
@@@@@@@@@@@@@@@@.=@@@@@@@@@@
@@@@@@@@@@@@+@@@.=@@@@@@@@@@
@@@@@@@@@@@% #@@.=@@@@@@@@@@
@@@@@@@@@@@% #@@.=@@@@@@@@@@
@@@@@@@@@@@+ *@@:-@@@@@@@@@@
@@@@@@@@@@@= *@@= @@@@@@@@@@
@@@@@@@@@@@. #@@= @@@@@@@@@@
@@@@@@@@@@=  =++.-@@@@@@@@@@
@@@@@@@@@@       =@@@@@@@@@@
@@@@@@@@@@  :*## =@@@@@@@@@@
@@@@@@@@@@:*@@@% =@@@@@@@@@@
@@@@@@@@@@@@@@@% =@@@@@@@@@@
@@@@@@@@@@@@@@@# =@@@@@@@@@@
@@@@@@@@@@@@@@@# =@@@@@@@@@@
@@@@@@@@@@@@@@@* *@@@@@@@@@@
@@@@@@@@@@@@@@@= #@@@@@@@@@@
@@@@@@@@@@@@@@@= #@@@@@@@@@@
@@@@@@@@@@@@@@@=.@@@@@@@@@@@
@@@@@@@@@@@@@@@++@@@@@@@@@@@
@@@@@@@@@@@@@@@@@@@@@@@@@@@@
@@@@@@@@@@@@@@@@@@@@@@@@@@@@
@@@@@@@@@@@@@@@@@@@@@@@@@@@@
10 eltCount
--- OUTPUT ---
0 => -5.58382  : 
1 => -0.332037  : 
2 => -2.3609  : 
3 => 0.0268471  : 
4 => 9.68715  : ***
5 => 0.345264  : 
6 => -5.68754  : 
7 => 0.252157  : 
8 => 0.0862162  : 
9 => 4.92423  : 


---------------------------


@@@@@@@@@@@@@@@@@@@@@@@@@@@@
@@@@@@@@@@@@@@@@@@@@@@@@@@@@
@@@@@@@@@@@@@@@@@@@@@@@@@@@@
@@@@@@@@@@@@@@@@@@@@@@@@@@@@
@@@@@@@@@@@@@@@@@@@@@@@@@@@@
@@@@@@@@@@=   ++++#++=*@@@@@
@@@@@@@@#.            *@@@@@
@@@@@@@@=             *@@@@@
@@@@@@@@.   .. ...****%@@@@@
@@@@@@@@: .%@@#@@@@@@@@@@@@@
@@@@@@@%  -@@@@@@@@@@@@@@@@@
@@@@@@@%  -@@*@@@*@@@@@@@@@@
@@@@@@@#  :#- ::. ::=@@@@@@@
@@@@@@@-             -@@@@@@
@@@@@@%.              *@@@@@
@@@@@@#     :==*+==   *@@@@@
@@@@@@%---%%@@@@@@@.  *@@@@@
@@@@@@@@@@@@@@@@@@@+  *@@@@@
@@@@@@@@@@@@@@@@@@@=  *@@@@@
@@@@@@@@@@@@@@@@@@*   *@@@@@
@@@@@%+%@@@@@@@@%.   .%@@@@@
@@@@@*  .******=    -@@@@@@@
@@@@@*             .#@@@@@@@
@@@@@*            =%@@@@@@@@
@@@@@@%#+++=     =@@@@@@@@@@
@@@@@@@@@@@@@@@@@@@@@@@@@@@@
@@@@@@@@@@@@@@@@@@@@@@@@@@@@
@@@@@@@@@@@@@@@@@@@@@@@@@@@@
10 eltCount
--- OUTPUT ---
0 => -4.68429  : 
1 => -5.85174  : 
2 => -11.9795  : 
3 => 3.46393  : 
4 => -6.07335  : 
5 => 23.6807  : ***
6 => 1.61781  : 
7 => -2.97774  : 
8 => 1.30685  : 
9 => 4.07391  : 


---------------------------


@@@@@@@@@@@@@@@@@@@@@@@@@@@@
@@@@@@@@@@@@@@@@@@@@@@@@@@@@
@@@@@@@@@@@@@%.:@@@@@@@@@@@@
@@@@@@@@@@@@@: *@@@@@@@@@@@@
@@@@@@@@@@@@* =@@@@@@@@@@@@@
@@@@@@@@@@@% :@@@@@@@@@@@@@@
@@@@@@@@@@@- *@@@@@@@@@@@@@@
@@@@@@@@@@# .@@@@@@@@@@@@@@@
@@@@@@@@@@: #@@@@@@@@@@@@@@@
@@@@@@@@@+ -@@@@@@@@@@@@@@@@
@@@@@@@@@: %@@@@@@@@@@@@@@@@
@@@@@@@@+ +@@@@@@@@@@@@@@@@@
@@@@@@@@:.%@@@@@@@@@@@@@@@@@
@@@@@@@% -@@@@@@@@@@@@@@@@@@
@@@@@@@% -@@@@@@#..:@@@@@@@@
@@@@@@@% +@@@@@-    :@@@@@@@
@@@@@@@% =@@@@%.#@@- +@@@@@@
@@@@@@@@..%@@@*+@@@@ :@@@@@@
@@@@@@@@= -%@@@@@@@@ :@@@@@@
@@@@@@@@@- .*@@@@@@+ +@@@@@@
@@@@@@@@@@+  .:-+-: .@@@@@@@
@@@@@@@@@@@@+:    :*@@@@@@@@
@@@@@@@@@@@@@@@@@@@@@@@@@@@@
@@@@@@@@@@@@@@@@@@@@@@@@@@@@
@@@@@@@@@@@@@@@@@@@@@@@@@@@@
@@@@@@@@@@@@@@@@@@@@@@@@@@@@
@@@@@@@@@@@@@@@@@@@@@@@@@@@@
@@@@@@@@@@@@@@@@@@@@@@@@@@@@
10 eltCount
--- OUTPUT ---
0 => 0.409332  : 
1 => -3.60869  : 
2 => -4.52237  : 
3 => -4.49587  : 
4 => -0.557327  : 
5 => 6.62171  : 
6 => 19.9842  : ***
7 => -9.71854  : 
8 => 3.16726  : 
9 => -4.7647  : 


---------------------------


@@@@@@@@@@@@@@@@@@@@@@@@@@@@
@@@@@@@@@@@@@@@@@@@@@@@@@@@@
@@@@@@@@@@@@@@@@@@@@@@@@@@@@
@@@@@@@@@@@@@@@@@@@@@@@@@@@@
@@@@@@@@@@@@@@@@@@@@@@@@@@@@
@@@@@@@@@@@@@@@@@@@@@@@@@@@@
@@@@@@@%=#@@@@@%=%@@@@@@@@@@
@@@@@@@           %@@@@@@@@@
@@@@@@@           %@@@@@@@@@
@@@@@@@#:-#-.     %@@@@@@@@@
@@@@@@@@@@@@#    #@@@@@@@@@@
@@@@@@@@@@@@@    #@@@@@@@@@@
@@@@@@@@@@@@@:  :@@@@@@@@@@@
@@@@@@@@@%+==   *%%%%%%%%%@@
@@@@@@@@%                 -@
@@@@@@@@@#+.          .:-%@@
@@@@@@@@@@@*     :-###@@@@@@
@@@@@@@@@@@*   -%@@@@@@@@@@@
@@@@@@@@@@@*   *@@@@@@@@@@@@
@@@@@@@@@@@*   @@@@@@@@@@@@@
@@@@@@@@@@@*   #@@@@@@@@@@@@
@@@@@@@@@@@*   *@@@@@@@@@@@@
@@@@@@@@@@@*   *@@@@@@@@@@@@
@@@@@@@@@@@*   @@@@@@@@@@@@@
@@@@@@@@@@@*   @@@@@@@@@@@@@
@@@@@@@@@@@@+=#@@@@@@@@@@@@@
@@@@@@@@@@@@@@@@@@@@@@@@@@@@
@@@@@@@@@@@@@@@@@@@@@@@@@@@@
10 eltCount
--- OUTPUT ---
0 => -6.70799  : 
1 => 0.957398  : 
2 => 3.31229  : 
3 => 2.58422  : 
4 => 3.30001  : 
5 => -3.82085  : 
6 => -6.51343  : 
7 => 16.7635  : ***
8 => -2.20583  : 
9 => -5.96497  : 


---------------------------


@@@@@@@@@@@@@@@@@@@@@@@@@@@@
@@@@@@@@@@@@@@@@@@@@@@@@@@@@
@@@@@@@@@@@@@@@@@@@@@@@@@@@@
@@@@@@@@@@@@@@@@@@@@@@@@@@@@
@@@@@@@@@@@@@@@@@@@@@@@@@@@@
@@@@@@@@@@@@@@@@@@@@@@@@@@@@
@@@@@@@@@%+-:  =@@@@@@@@@@@@
@@@@@@@%=      -@@@**@@@@@@@
@@@@@@@   :%#@-#@@@. #@@@@@@
@@@@@@*  +@@@@:*@@@  *@@@@@@
@@@@@@#  +@@@@ @@@%  @@@@@@@
@@@@@@@.  :%@@.@@@. *@@@@@@@
@@@@@@@@-   =@@@@. -@@@@@@@@
@@@@@@@@@%:   +@- :@@@@@@@@@
@@@@@@@@@@@%.  : -@@@@@@@@@@
@@@@@@@@@@@@@+   #@@@@@@@@@@
@@@@@@@@@@@@@@+  :@@@@@@@@@@
@@@@@@@@@@@@@@+   *@@@@@@@@@
@@@@@@@@@@@@@@: =  @@@@@@@@@
@@@@@@@@@@@@@@ :@  @@@@@@@@@
@@@@@@@@@@@@@@ -@  @@@@@@@@@
@@@@@@@@@@@@@# +@  @@@@@@@@@
@@@@@@@@@@@@@* ++  @@@@@@@@@
@@@@@@@@@@@@@*    *@@@@@@@@@
@@@@@@@@@@@@@#   =@@@@@@@@@@
@@@@@@@@@@@@@@. +@@@@@@@@@@@
@@@@@@@@@@@@@@@@@@@@@@@@@@@@
@@@@@@@@@@@@@@@@@@@@@@@@@@@@
10 eltCount
--- OUTPUT ---
0 => -5.12389  : 
1 => -3.94476  : 
2 => -0.990646  : 
3 => 1.20684  : 
4 => 3.48777  : 
5 => -0.614695  : 
6 => -4.78878  : 
7 => -2.69351  : 
8 => 14.321  : ***
9 => 3.12232  : 


---------------------------


@@@@@@@@@@@@@@@@@@@@@@@@@@@@
@@@@@@@@@@@@@@@@@@@@@@@@@@@@
@@@@@@@@@@@@@@@@@@@@@@@@@@@@
@@@@@@@@@@@@@@@@@@@@@@@@@@@@
@@@@@@@@@@@@@@@@@@@@@@@@@@@@
@@@@@@@@@@@@@@@@@@@@@@@@@@@@
@@@@@@@@@@@@@@%.-@@@@@@@@@@@
@@@@@@@@@@@*-    %@@@@@@@@@@
@@@@@@@@@@= .-.  *@@@@@@@@@@
@@@@@@@@@= +@@@  *@@@@@@@@@@
@@@@@@@@* =@@@@  %@@@@@@@@@@
@@@@@@@@..@@@@%  @@@@@@@@@@@
@@@@@@@# *@@@@-  @@@@@@@@@@@
@@@@@@@: @@@@%   @@@@@@@@@@@
@@@@@@@: @@@@-   @@@@@@@@@@@
@@@@@@@: =+*= +: *@@@@@@@@@@
@@@@@@@*.    +@: *@@@@@@@@@@
@@@@@@@@%#**#@@: *@@@@@@@@@@
@@@@@@@@@@@@@@@: -@@@@@@@@@@
@@@@@@@@@@@@@@@+ :@@@@@@@@@@
@@@@@@@@@@@@@@@*  @@@@@@@@@@
@@@@@@@@@@@@@@@@  %@@@@@@@@@
@@@@@@@@@@@@@@@@  #@@@@@@@@@
@@@@@@@@@@@@@@@@: +@@@@@@@@@
@@@@@@@@@@@@@@@@- +@@@@@@@@@
@@@@@@@@@@@@@@@@*:%@@@@@@@@@
@@@@@@@@@@@@@@@@@@@@@@@@@@@@
@@@@@@@@@@@@@@@@@@@@@@@@@@@@
10 eltCount
--- OUTPUT ---
0 => -2.75228  : 
1 => -1.51535  : 
2 => -4.11729  : 
3 => 0.316925  : 
4 => 3.73423  : 
5 => -3.00593  : 
6 => -6.18866  : 
7 => -1.02671  : 
8 => 1.937  : 
9 => 14.8275  : ***

Average over 10 runs is 1.05167 ms.

nvidia@tegra-ubuntu$ ./sample_googlenet
Building and running a GPU inference engine for GoogleNet, N=4...
Bindings after deserializing:
Binding 0 (data): Input.
Binding 1 (prob): Output.
conv1/7x7_s2 + conv1/relu_7x7 input refo 0.378ms
conv1/7x7_s2 + conv1/relu_7x7            1.465ms
pool1/3x3_s2                             0.488ms
pool1/norm1                              0.137ms
conv2/3x3_reduce + conv2/relu_3x3_reduce 0.178ms
conv2/3x3 + conv2/relu_3x3               2.240ms
conv2/norm2                              0.415ms
pool2/3x3_s2                             0.531ms
inception_3a/1x1 + inception_3a/relu_1x1 0.275ms
inception_3a/3x3 + inception_3a/relu_3x3 0.578ms
inception_3a/5x5 + inception_3a/relu_5x5 0.134ms
inception_3a/pool                        0.245ms
inception_3a/pool_proj + inception_3a/re 0.096ms
inception_3a/1x1 copy                    0.026ms
inception_3b/1x1 + inception_3b/relu_1x1 0.561ms
inception_3b/3x3 + inception_3b/relu_3x3 1.156ms
inception_3b/5x5 + inception_3b/relu_5x5 0.613ms
inception_3b/pool                        0.140ms
inception_3b/pool_proj + inception_3b/re 0.132ms
inception_3b/1x1 copy                    0.048ms
pool3/3x3_s2                             0.247ms
inception_4a/1x1 + inception_4a/relu_1x1 0.286ms
inception_4a/3x3 + inception_4a/relu_3x3 0.279ms
inception_4a/5x5 + inception_4a/relu_5x5 0.068ms
inception_4a/pool                        0.075ms
inception_4a/pool_proj + inception_4a/re 0.076ms
inception_4a/1x1 copy                    0.020ms
inception_4b/1x1 + inception_4b/relu_1x1 0.302ms
inception_4b/3x3 + inception_4b/relu_3x3 0.423ms
inception_4b/5x5 + inception_4b/relu_5x5 0.096ms
inception_4b/pool                        0.076ms
inception_4b/pool_proj + inception_4b/re 0.081ms
inception_4b/1x1 copy                    0.017ms
inception_4c/1x1 + inception_4c/relu_1x1 0.299ms
inception_4c/3x3 + inception_4c/relu_3x3 0.408ms
inception_4c/5x5 + inception_4c/relu_5x5 0.092ms
inception_4c/pool                        0.076ms
inception_4c/pool_proj + inception_4c/re 0.082ms
inception_4c/1x1 copy                    0.014ms
inception_4d/1x1 + inception_4d/relu_1x1 0.300ms
inception_4d/3x3 + inception_4d/relu_3x3 0.042ms
inception_4d/3x3 + inception_4d/relu_3x3 0.892ms
inception_4d/3x3 + inception_4d/relu_3x3 0.080ms
inception_4d/5x5 + inception_4d/relu_5x5 0.115ms
inception_4d/pool                        0.075ms
inception_4d/pool_proj + inception_4d/re 0.081ms
inception_4d/1x1 copy                    0.012ms
inception_4e/1x1 + inception_4e/relu_1x1 0.441ms
inception_4e/3x3 + inception_4e/relu_3x3 0.578ms
inception_4e/5x5 + inception_4e/relu_5x5 0.195ms
inception_4e/pool                        0.078ms
inception_4e/pool_proj + inception_4e/re 0.137ms
inception_4e/1x1 copy                    0.025ms
pool4/3x3_s2                             0.072ms
inception_5a/1x1 + inception_5a/relu_1x1 0.196ms
inception_5a/3x3 + inception_5a/relu_3x3 0.250ms
inception_5a/5x5 + inception_5a/relu_5x5 0.074ms
inception_5a/pool                        0.044ms
inception_5a/pool_proj + inception_5a/re 0.076ms
inception_5a/1x1 copy                    0.009ms
inception_5b/1x1 + inception_5b/relu_1x1 0.279ms
inception_5b/3x3 + inception_5b/relu_3x3 0.016ms
inception_5b/3x3 + inception_5b/relu_3x3 0.749ms
inception_5b/3x3 + inception_5b/relu_3x3 0.030ms
inception_5b/5x5 + inception_5b/relu_5x5 0.104ms
inception_5b/pool                        0.053ms
inception_5b/pool_proj + inception_5b/re 0.080ms
inception_5b/1x1 copy                    0.011ms
pool5/7x7_s1                             0.059ms
loss3/classifier input reformatter 0     0.005ms
loss3/classifier                         0.022ms
prob                                     0.009ms
Time over all layers: 18.039
Done.

상위와 같이 간단한 테스트들은 잘되고 쉽으며, TensorRT만으로도 동작이 된다.


  • NVIDIA DLA (Deep Learning Accelerator)
구글링을해보면, TensorRT Accelerator 라고하는데, giexec가 먼저나오고, trtexec가 나왔다고 하는데, 기능은 거의 동일하다고 보면될 것 같다.

- TensorRT (previously known as GPU Inference Engine (GIE))


nvidia@tegra-ubuntu$ ./trtexec     //tensorRT exec 

Mandatory params:
  --deploy=      Caffe deploy file
  OR --uff=      UFF file
  --output=      Output blob name (can be specified multiple times)

Mandatory params for onnx:
  --onnx=        ONNX Model file

Optional params:
  --uffInput=,C,H,W Input blob names along with their dimensions for UFF parser
  --model=       Caffe model file (default = no model, random weights used)
  --batch=N            Set batch size (default = 1)
  --device=N           Set cuda device to N (default = 0)
  --iterations=N       Run N iterations (default = 10)
  --avgRuns=N          Set avgRuns to N - perf is measured as an average of avgRuns (default=10)
  --percentile=P       For each iteration, report the percentile time at P percentage (0
Generate a serialized TensorRT engine --calib= Read INT8 calibration cache file. Currently no support for ONNX model. nvidia@tegra-ubuntu$./giexec Mandatory params: --deploy= Caffe deploy file OR --uff= UFF file --output= Output blob name (can be specified multiple times) Mandatory params for onnx: --onnx= ONNX Model file Optional params: --uffInput=,C,H,W Input blob names along with their dimensions for UFF parser --model= Caffe model file (default = no model, random weights used) --batch=N Set batch size (default = 1) --device=N Set cuda device to N (default = 0) --iterations=N Run N iterations (default = 10) --avgRuns=N Set avgRuns to N - perf is measured as an average of avgRuns (default=10) --percentile=P For each iteration, report the percentile time at P percentage (0
Generate a serialized TensorRT engine --calib= Read INT8 calibration cache file. Currently no support for ONNX model.

NVIDIA DLA (Deep Learning Accelerator)
  https://docs.nvidia.com/deeplearning/sdk/tensorrt-developer-guide/index.html#dla_topic

  • NVIDIA CUDA Example 


nvidia@tegra-ubuntu$ ls /home/nvidia/NVIDIA_CUDA-9.0_Samples/bin/aarch64/linux/release
alignedTypes           conjugateGradientPrecond     fp16ScalarProduct       mergeSort                simpleCubemapTexture       simpleTexture_kernel64.ptx
asyncAPI               conjugateGradientUM          freeImageInteropNPP     MersenneTwisterGP11213   simpleCUBLAS               simpleVoteIntrinsics
bandwidthTest          convolutionFFT2D             FunctionPointers        MonteCarloMultiGPU       simpleCUBLASXT             simpleZeroCopy
batchCUBLAS            convolutionSeparable         histEqualizationNPP     nbody                    simpleCUDA2GL              smokeParticles
BiCGStab               convolutionTexture           histogram               newdelete                simpleCUFFT                SobelFilter
bicubicTexture         cppIntegration               HSOpticalFlow           oceanFFT                 simpleCUFFT_2d_MGPU        SobolQRNG
bilateralFilter        cppOverload                  imageDenoising          p2pBandwidthLatencyTest  simpleCUFFT_MGPU           sortingNetworks
bindlessTexture        cudaOpenMP                   inlinePTX               particles                simpleDevLibCUBLAS         stereoDisparity
binomialOptions        cuSolverDn_LinearSolver      interval                postProcessGL            simpleGL                   template
BlackScholes           cuSolverRf                   jpegNPP                 ptxjit                   simpleHyperQ               threadFenceReduction
boxFilter              cuSolverSp_LinearSolver      lineOfSight             quasirandomGenerator     simpleLayeredTexture       threadMigration
boxFilterNPP           cuSolverSp_LowlevelCholesky  Mandelbrot              radixSortThrust          simpleMultiCopy            threadMigration_kernel64.ptx
c++11_cuda             cuSolverSp_LowlevelQR        marchingCubes           randomFog                simpleMultiGPU             transpose
cannyEdgeDetectorNPP   dct8x8                       matrixMul               recursiveGaussian        simpleOccupancy            UnifiedMemoryStreams
cdpAdvancedQuicksort   deviceQuery                  matrixMulCUBLAS         reduction                simplePitchLinearTexture   vectorAdd
cdpBezierTessellation  deviceQueryDrv               matrixMulDrv            scalarProd               simplePrintf               vectorAddDrv
cdpLUDecomposition     dwtHaar1D                    matrixMulDynlinkJIT     scan                     simpleSeparateCompilation  vectorAdd_kernel64.ptx
cdpQuadtree            dxtc                         matrixMul_kernel64.ptx  segmentationTreeThrust   simpleStreams              volumeFiltering
cdpSimplePrint         eigenvalues                  MC_EstimatePiInlineP    shfl_scan                simpleSurfaceWrite         volumeRender
cdpSimpleQuicksort     fastWalshTransform           MC_EstimatePiInlineQ    simpleAssert             simpleTemplates            warpAggregatedAtomicsCG
clock                  FDTD3d                       MC_EstimatePiP          simpleAtomicIntrinsics   simpleTexture
concurrentKernels      FilterBorderControlNPP       MC_EstimatePiQ          simpleCallback           simpleTexture3D
conjugateGradient      fluidsGL                     MC_SingleAsianOptionP   simpleCooperativeGroups  simpleTextureDrv

  https://tm3.ghost.io/2018/07/06/setting-up-the-nvidia-jetson-tx2/


  • Multimedia 와 TensorRT
Yolo 처럼 자동차가 지나가는 것을 쉽게 파악이 가능하다.

nvidia@tegra-ubuntu:$ cd ~/tegra_multimedia_api/samples/
nvidia@tegra-ubuntu:$ ls
00_video_decode  02_video_dec_cuda  04_video_dec_trt  06_jpeg_decode    08_video_dec_drm        10_camera_recording  13_multi_camera  common    Rules.mk
01_video_encode  03_video_cuda_enc  05_jpeg_encode    07_video_convert  09_camera_jpeg_capture  12_camera_v4l2_cuda  backend          frontend  v4l2cuda

nvidia@tegra-ubuntu:$ cd backend
nvidia@tegra-ubuntu:$ ./backend 1 ../../data/Video/sample_outdoor_car_1080p_10fps.h264 H264 --trt-deployfile ../../data/Model/GoogleNet_one_class/GoogleNet_modified_oneClass_halfHD.prototxt --trt-modelfile ../../data/Model/GoogleNet_one_class/GoogleNet_modified_oneClass_halfHD.caffemodel --trt-forcefp32 0 --trt-proc-interval 1 -fps 10
// Xwindow에서 실행 , HDMI 연결후 

  https://devtalk.nvidia.com/default/topic/1027851/jetson-tx2/jetpack-3-2-tegra_multimedia_api-backend-sample-won-t-run/
  https://www.youtube.com/watch?v=D7lkth34rgM

  • OpenCV4Tegra
CUDA를 이용하는 OpenCV로 별도로 설치를 해줘야 가능한 것 같은데, 검사할 방법이 있다면 찾아보는 것이 낫을 것 같다.

  https://jkjung-avt.github.io/opencv3-on-tx2/
  https://github.com/jetsonhacks/buildOpenCVTX2
  https://www.youtube.com/watch?v=gvmP0WRVUxI

  https://devtalk.nvidia.com/default/topic/822903/jetson-tk1/opencv4tegra-libraries/
  https://devtalk.nvidia.com/default/topic/1043074/jetson-tx2/how-to-download-and-install-opencv4tegra/
  https://devtalk.nvidia.com/default/topic/1042056/jetson-tx2/jetpack-3-3-opencv-error-no-cuda-support-the-library-is-compiled-without-cuda-support-/post/5285618/#5285618


  • Jetson TX2 Yolo 실행 및 성능 
  https://jkjung-avt.github.io/yolov3/

1/16/2019

Jetson TX2 Jetpack3.3 설치 및 USB Device 관련사항

1. Jetson Tx2 Jetpack 설치 

회사일을 Jetson Tx2관련일을 하게되어 이에 관련된 일을 간단히 정리하고자 한다.
그리고, 인터넷에 오픈된 것만 관련하여 간단히 서술한다.

현재 Ubuntu는 16.04LTS이며, 아래와 같이 Jetpack 3.3 설치를 하며, 설치 방법도 EVM의 영문 매뉴얼을 참조하면 어느정도 이해를 할수 있다.

  • Jetson TX2 Jetpack 설치 정보 
현재 나의 경우는 JetPack L4T를 설치를 Force Recovery Mode를 이용하여 최종으로 설치한다음 아래와 같이 update와 upgrade를 진행했다.

$ sudo apt update && sudo apt upgrade -y 

아래의 부분은 Jetson TX2에서 진행을 했지만, 동작이 되지 않았다.

$ sudo ./jetson_clocks.sh
$ cd ~/tegra_multimedia_api/samples/backend
./backend 1 ../../data/Video/sample_outdoor_car_1080p_10fps.h264 H264 --trt-deployfile ../../data/Model/GoogleNet_one_class/GoogleNet_modified_oneClass_halfHD.prototxt --trt-modelfile ../../data/Model/GoogleNet_one_class/GoogleNet_modified_oneClass_halfHD.caffemodel --trt-forcefp32 0 --trt-proc-interval 1 -fps 10

관련정보
  https://judo0179.tistory.com/19


JetPack 3.3 Download
  https://developer.nvidia.com/embedded/jetpack

JetPack Manual
 https://docs.nvidia.com/jetson/jetpack/index.html
 https://docs.nvidia.com/jetson/jetpack/introduction/index.html
 https://docs.nvidia.com/jetson/jetpack/release-notes/index.html

  https://devblogs.nvidia.com/jetson-tx2-delivers-twice-intelligence-edge/

2. JetPack 설치 후 USB Device 정보 

Jetson TX2의 Jetpack 3.3 설치 후 아래와 같이 USB의 설정확인하였으며, 간단히 정리해본다.


일반적인 USB 정보 알아두자.
  https://ahyuo79.blogspot.com/2014/11/class-descriptor.html
  https://ahyuo79.blogspot.com/search/label/IF-USB

  • Host PC 확인  (JetsonTX2 USB 접속)
Jetpack 3.3 설치 후 아래와 같이 USB를 확인을 해보면 Nvidia 관련사항을 확인가능
좀더 자세히 분석하여 알아 보면 다음과 같다.

Jetson TX2의 USB Device Mode 일경우 지원사항
  1. USB Mass Storage :  USB CDC 관련 Manual 내용 
  2. USB CDC-ACM :  /dev/ttyACM0 으로 Serial로 쉽게 Login 가능 
  3. USB CDC-RNDIS:  USB를 통하여 Window의 RNDIS Ethernet 사용가능 
  4. USB CDC-ether:  USB CDC Ethernet이며 RNDIS와 같이 연동되는 것 같음  
결론적으로 USB Ethernet이 두개 지원가능하며, Serial도 지원가능 및 Mass Storage도 지원
Window에서는 Network는 상위 CDC-RNDIS만 지원될 것라고 생각함


USB CDC-Network Adapters (Kernel Config 사항) 
( Device Drivers - Network device support - USB Network Adapters)
CONFIG_USB_NET_CDCETHER
CONFIG_USB_NET_RNDIS_HOST
CONFIG_USB_NET_CDC_EEM
CONFIG_USB_NET_CDC_MBIM

USB CDC ACM (Kernel Config 사항)
( Device Drivers - USB support)
CONFIG_USB_ACM

**CDC-ACM은 Ethernet 기반의 Adapter가 아니므로 별도로 /dev/ttyACMx 존재하지만,
상위 Network Adapters들의 경우 별도의 /dev는 존재하지 않음 주의   

USB CDC 관련세부사항 
  https://en.wikipedia.org/wiki/Ethernet_over_USB
  http://processors.wiki.ti.com/index.php/Networking_over_USB


$ lsusb
Bus 002 Device 001: ID 1d6b:0003 Linux Foundation 3.0 root hub
Bus 001 Device 007: ID 0955:7020 NVidia Corp. 
Bus 001 Device 003: ID 045e:00cb Microsoft Corp. Basic Optical Mouse v2.0
Bus 001 Device 002: ID 045e:07f8 Microsoft Corp. Wired Keyboard 600 (model 1576)
Bus 001 Device 001: ID 1d6b:0002 Linux Foundation 2.0 root hub

$ lsusb -t  // Host USB 와 Module 관련부분 확인 
/:  Bus 02.Port 1: Dev 1, Class=root_hub, Driver=xhci_hcd/6p, 5000M
/:  Bus 01.Port 1: Dev 1, Class=root_hub, Driver=xhci_hcd/12p, 480M
    |__ Port 9: Dev 7, If 0, Class=Communications, Driver=rndis_host, 480M
    |__ Port 9: Dev 7, If 1, Class=CDC Data, Driver=rndis_host, 480M
    |__ Port 9: Dev 7, If 2, Class=Communications, Driver=cdc_acm, 480M
    |__ Port 9: Dev 7, If 3, Class=CDC Data, Driver=cdc_acm, 480M
    |__ Port 9: Dev 7, If 4, Class=Mass Storage, Driver=usb-storage, 480M
    |__ Port 9: Dev 7, If 5, Class=Communications, Driver=cdc_ether, 480M
    |__ Port 9: Dev 7, If 6, Class=CDC Data, Driver=cdc_ether, 480M
    |__ Port 11: Dev 2, If 0, Class=Human Interface Device, Driver=usbhid, 1.5M
    |__ Port 11: Dev 2, If 1, Class=Human Interface Device, Driver=usbhid, 1.5M
    |__ Port 12: Dev 3, If 0, Class=Human Interface Device, Driver=usbhid, 1.5M

$ lsusb -d 0955:7020 -v  // Jetson TX2 USB Descriptor 확인 

Bus 001 Device 004: ID 0955:7020 NVidia Corp. 
Couldn't open device, some information will be missing
Device Descriptor:
  bLength                18
  bDescriptorType         1
  bcdUSB               2.10
  bDeviceClass          239 Miscellaneous Device
  bDeviceSubClass         2 ?
  bDeviceProtocol         1 Interface Association
  bMaxPacketSize0        64
  idVendor           0x0955 NVidia Corp.
  idProduct          0x7020 
  bcdDevice            0.01
  iManufacturer           1 
  iProduct                2 
  iSerial                 3 
  bNumConfigurations      1
  Configuration Descriptor:
    bLength                 9
    bDescriptorType         2
    wTotalLength          248
    bNumInterfaces          7
    bConfigurationValue     1
    iConfiguration          4 
    bmAttributes         0x80
      (Bus Powered)
    MaxPower                2mA
    Interface Association:
      bLength                 8
      bDescriptorType        11
      bFirstInterface         0
      bInterfaceCount         2
      bFunctionClass          2 Communications
      bFunctionSubClass       6 Ethernet Networking
      bFunctionProtocol       0 
      iFunction               7 
    Interface Descriptor:
....


  • Host PC에서 관련 Module Driver 확인 
사용되어지는 Module Driver를 알았으니, Depend를 알아보자.

$ lsmod        // Host PC Module 사용확인 
Module                  Size  Used by
rndis_wlan             57344  0
rndis_host             16384  1 rndis_wlan
cfg80211              622592  1 rndis_wlan
cdc_ether              16384  1 rndis_host
usbnet                 45056  3 rndis_wlan,rndis_host,cdc_ether
mii                    16384  1 usbnet
uas                    24576  0
usb_storage            69632  2 uas
cdc_acm                32768  2
pci_stub               16384  1
vboxpci                24576  0
vboxnetadp             28672  0
vboxnetflt             28672  0
vboxdrv               471040  3 vboxpci,vboxnetadp,vboxnetflt
binfmt_misc            20480  1
nls_iso8859_1          16384  2
snd_hda_codec_hdmi     49152  1
intel_rapl             20480  0
snd_hda_codec_realtek   106496  1
snd_hda_codec_generic    73728  1 snd_hda_codec_realtek
x86_pkg_temp_thermal    16384  0
intel_powerclamp       16384  0
coretemp               16384  0
kvm_intel             217088  0
kvm                   598016  1 kvm_intel
snd_hda_intel          40960  3
snd_hda_codec         126976  4 snd_hda_codec_generic,snd_hda_codec_hdmi,snd_hda_intel,snd_hda_codec_realtek
irqbypass              16384  1 kvm
snd_hda_core           81920  5 snd_hda_codec_generic,snd_hda_codec_hdmi,snd_hda_intel,snd_hda_codec,snd_hda_codec_realtek
snd_hwdep              20480  1 snd_hda_codec
snd_pcm                98304  4 snd_hda_codec_hdmi,snd_hda_intel,snd_hda_codec,snd_hda_core
crct10dif_pclmul       16384  0
crc32_pclmul           16384  0
snd_seq_midi           16384  0
ghash_clmulni_intel    16384  0
snd_seq_midi_event     16384  1 snd_seq_midi
joydev                 24576  0
pcbc                   16384  0
input_leds             16384  0
aesni_intel           188416  0
aes_x86_64             20480  1 aesni_intel
snd_rawmidi            32768  1 snd_seq_midi
crypto_simd            16384  1 aesni_intel
snd_seq                65536  2 snd_seq_midi,snd_seq_midi_event
snd_seq_device         16384  3 snd_seq,snd_seq_midi,snd_rawmidi
glue_helper            16384  1 aesni_intel
snd_timer              32768  2 snd_seq,snd_pcm
cryptd                 24576  3 crypto_simd,ghash_clmulni_intel,aesni_intel
snd                    81920  17 snd_hda_codec_generic,snd_seq,snd_seq_device,snd_hda_codec_hdmi,snd_hwdep,snd_hda_intel,snd_hda_codec,snd_hda_codec_realtek,snd_timer,snd_pcm,snd_rawmidi
soundcore              16384  1 snd
intel_cstate           20480  0
intel_rapl_perf        16384  0
mei_me                 40960  0
shpchp                 36864  0
mei                    90112  1 mei_me
acpi_pad              180224  0
mac_hid                16384  0
parport_pc             36864  1
ppdev                  20480  0
lp                     20480  0
parport                49152  3 parport_pc,lp,ppdev
autofs4                40960  2
hid_generic            16384  0
usbhid                 49152  0
hid                   118784  2 usbhid,hid_generic
i915                 1630208  104
i2c_algo_bit           16384  1 i915
drm_kms_helper        172032  1 i915
syscopyarea            16384  1 drm_kms_helper
e1000e                249856  0
sysfillrect            16384  1 drm_kms_helper
sysimgblt              16384  1 drm_kms_helper
fb_sys_fops            16384  1 drm_kms_helper
ptp                    20480  1 e1000e
drm                   401408  6 drm_kms_helper,i915
pps_core               20480  1 ptp
ahci                   36864  3
libahci                32768  1 ahci
video                  45056  1 i915


  • Udev 관련부분 확인 
좀 더 자세히 알고 싶다면 USB와 같이 동작되는 Udev 관련부분을 찾아보자.
이 부분 까지 조사하지 않고 서술만 한다.

$ ls /lib/udev/rules.d/
39-usbmuxd.rules                     73-special-net-names.rules
40-crda.rules                        73-usb-net-by-mac.rules
40-usb-media-players.rules           75-net-description.rules
...

$ ls /sys/class/net/
enp0s20f0u9  enp0s20f0u9i5  enp0s31f6  lo

  https://wiki.archlinux.org/index.php/Android_tethering
  https://unix.stackexchange.com/questions/388300/udev-does-not-rename-usb-ethernet-device

Udev관련 Rule
  http://fewstreet.com/2015/06/09/ubuntu-udev-naming-rules.html


  • Jetson TX2의 USB-ACM Interface 
Jetson Manual을 읽어보면, 기본으로 nvidia/nvidia 로 id/pw로 제공을 하며, 두번째 id와 pw는 ubuntu/ubuntu를 제공해준다.


$ ls /dev/ttyACM0    // USB ACM  Interface 확인 
/dev/ttyACM0
$ minicom -s    // JetsonTx2 접속  nvidia:nvidia 


2.1 Jetson의 USB Ethernet 통신 설정 

Host PC와 Jetson Tx2 USB의 설정을하면 USB를 통하여 Internet 통신이 가능하다.
이를 이용하여 SSH 와 SFTP 및 추후 GDB까지 기능확장이 가능하다.
이 관련 Manual은 Mass Storage의 영문 Manual을 참조하자.

  • Host PC의 USB Host 의 Network 설정 
나의 경우 Host PC 아래와 같이  두 개의 USB Interface가 잡히며, 이를 설정해주자.
이 관련내용은 Mass Storage의 영문 매뉴얼을 참조하자.

직접설정

$ sudo ifconfig enp0s20f0u9 192.168.55.3 netmask 255.255.255.0 up
$ sudo ifconfig enp0s20f0u9i5 192.168.55.4 netmask 255.255.255.0 up

설정환경

$ sudo vi /etc/network/interfaces
auto lo
iface lo inet loopback

#allow-hotplug enp0s20f0u9
auto enp0s20f0u9
iface enp0s20f0u9 inet static
address 192.168.55.3
netmask 255.255.255.0
#gateway 192.168.55.1

$ sudo /etc/init.d/networking restart
$ sudo ifup enp0s20f0u9 

  https://wiki.debian.org/NetworkConfiguration

설정후 확인

$ ifconfig -a
enp0s20f0u9 Link encap:Ethernet  HWaddr 86:dd:47:07:ec:e4  
          inet addr:192.168.55.3  Bcast:192.168.55.255  Mask:255.255.255.0
          inet6 addr: fe80::84dd:47ff:fe07:ece4/64 Scope:Link
          UP BROADCAST RUNNING MULTICAST  MTU:1500  Metric:1
          RX packets:761 errors:0 dropped:0 overruns:0 frame:0
          TX packets:1065 errors:0 dropped:0 overruns:0 carrier:0
          collisions:0 txqueuelen:1000 
          RX bytes:95357 (95.3 KB)  TX bytes:229667 (229.6 KB)

enp0s20f0u9i5 Link encap:Ethernet  HWaddr 16:bd:4f:fa:6a:df  
          inet addr:192.168.55.4  Bcast:192.168.55.255  Mask:255.255.255.0
          inet6 addr: fe80::14bd:4fff:fefa:6adf/64 Scope:Link
          UP BROADCAST RUNNING MULTICAST  MTU:1500  Metric:1
          RX packets:800 errors:0 dropped:0 overruns:0 frame:0
          TX packets:1017 errors:0 dropped:0 overruns:0 carrier:0
          collisions:0 txqueuelen:1000 
          RX bytes:98669 (98.6 KB)  TX bytes:178966 (178.9 KB)

enp0s31f6 Link encap:Ethernet  HWaddr 70:85:c2:3e:a8:2b  
          inet addr:10.0.0.107  Bcast:10.0.0.255  Mask:255.255.255.0
          inet6 addr: fe80::725b:9a50:8ca0:81e8/64 Scope:Link
          UP BROADCAST RUNNING MULTICAST  MTU:1500  Metric:1
          RX packets:31853921 errors:0 dropped:0 overruns:0 frame:0
          TX packets:317267 errors:0 dropped:0 overruns:0 carrier:0
          collisions:0 txqueuelen:1000 
          RX bytes:46162303120 (46.1 GB)  TX bytes:35161467 (35.1 MB)
          Interrupt:16 Memory:df000000-df020000 

lo        Link encap:Local Loopback  
          inet addr:127.0.0.1  Mask:255.0.0.0
          inet6 addr: ::1/128 Scope:Host
          UP LOOPBACK RUNNING  MTU:65536  Metric:1
          RX packets:21308 errors:0 dropped:0 overruns:0 frame:0
          TX packets:21308 errors:0 dropped:0 overruns:0 carrier:0
          collisions:0 txqueuelen:1000 
          RX bytes:2903284 (2.9 MB)  TX bytes:2903284 (2.9 MB)


  • Jetson TX2의 USB Ethernet Device 설정 
상위의 Serial 프로그램(minicom)을 이용하여 ttyACM0 접속하여  Jetson TX2의 ethernet 환경을 살펴보자

Jetson Network 환경 확인

$ ifconfig -a                                              
docker0   Link encap:Ethernet  HWaddr 02:42:d0:89:67:5a                         
          inet addr:172.17.0.1  Bcast:172.17.255.255  Mask:255.255.0.0          
          UP BROADCAST MULTICAST  MTU:1500  Metric:1                            
          RX packets:0 errors:0 dropped:0 overruns:0 frame:0                    
          TX packets:0 errors:0 dropped:0 overruns:0 carrier:0                  
          collisions:0 txqueuelen:0                                             
          RX bytes:0 (0.0 B)  TX bytes:0 (0.0 B)                                
                                                                                
dummy0    Link encap:Ethernet  HWaddr 16:34:65:bc:75:19                         
          BROADCAST NOARP  MTU:1500  Metric:1                                   
          RX packets:0 errors:0 dropped:0 overruns:0 frame:0                    
          TX packets:0 errors:0 dropped:0 overruns:0 carrier:0                  
          collisions:0 txqueuelen:1000                                          
          RX bytes:0 (0.0 B)  TX bytes:0 (0.0 B)                                
                                                                                
eth0      Link encap:Ethernet  HWaddr 00:04:4b:c5:80:6f                         
          inet addr:10.0.0.170  Bcast:10.0.0.255  Mask:255.255.255.0            
          inet6 addr: fe80::9fdc:aa1b:faf4:9ad0/64 Scope:Link                   
          UP BROADCAST RUNNING MULTICAST  MTU:1500  Metric:1                    
          RX packets:208078 errors:0 dropped:0 overruns:0 frame:0               
          TX packets:1925 errors:0 dropped:0 overruns:0 carrier:0               
          collisions:0 txqueuelen:1000                                          
          RX bytes:20077947 (20.0 MB)  TX bytes:354820 (354.8 KB)               
          Interrupt:42                                                          
                                                                                
l4tbr0    Link encap:Ethernet  HWaddr 7a:f3:26:af:7a:49                         
          inet addr:192.168.55.1  Bcast:192.168.55.255  Mask:255.255.255.0      
          inet6 addr: fe80::3851:d0ff:feaa:b4c4/64 Scope:Link                   
          UP BROADCAST RUNNING MULTICAST  MTU:1500  Metric:1                    
          RX packets:10704 errors:0 dropped:0 overruns:0 frame:0                
          TX packets:101 errors:0 dropped:0 overruns:0 carrier:0                
          collisions:0 txqueuelen:1000                                          
          RX bytes:1739228 (1.7 MB)  TX bytes:10780 (10.7 KB)                   
                                                                                
lo        Link encap:Local Loopback                                             
          inet addr:127.0.0.1  Mask:255.0.0.0                                   
          inet6 addr: ::1/128 Scope:Host                                        
          UP LOOPBACK RUNNING  MTU:65536  Metric:1                              
          RX packets:219 errors:0 dropped:0 overruns:0 frame:0                  
          TX packets:219 errors:0 dropped:0 overruns:0 carrier:0                
          collisions:0 txqueuelen:1                                             
          RX bytes:16393 (16.3 KB)  TX bytes:16393 (16.3 KB)                    
                                                                                
tunl0     Link encap:IPIP Tunnel  HWaddr                                        
          NOARP  MTU:1480  Metric:1                                             
          RX packets:0 errors:0 dropped:0 overruns:0 frame:0                    
          TX packets:0 errors:0 dropped:0 overruns:0 carrier:0                  
          collisions:0 txqueuelen:1                                             
          RX bytes:0 (0.0 B)  TX bytes:0 (0.0 B)                                
                                                                                
usb0      Link encap:Ethernet  HWaddr 9e:52:2b:63:ed:f2                         
          inet6 addr: fe80::9c52:2bff:fe63:edf2/64 Scope:Link                   
          UP BROADCAST RUNNING MULTICAST  MTU:1500  Metric:1                    
          RX packets:5407 errors:5407 dropped:0 overruns:0 frame:5407           
          TX packets:4407 errors:0 dropped:0 overruns:0 carrier:0               
          collisions:0 txqueuelen:1000                                          
          RX bytes:874353 (874.3 KB)  TX bytes:813177 (813.1 KB)                
                                                                                
usb1      Link encap:Ethernet  HWaddr 7a:f3:26:af:7a:49                         
          inet6 addr: fe80::78f3:26ff:feaf:7a49/64 Scope:Link                   
          UP BROADCAST RUNNING MULTICAST  MTU:1500  Metric:1                    
          RX packets:5297 errors:0 dropped:0 overruns:0 frame:0                 
          TX packets:4519 errors:0 dropped:0 overruns:0 carrier:0               
          collisions:0 txqueuelen:1000                                          
          RX bytes:864875 (864.8 KB)  TX bytes:633831 (633.8 KB)                
                                                                                
wlan0     Link encap:Ethernet  HWaddr 00:04:4b:c5:80:6d                         
          UP BROADCAST MULTICAST  MTU:1500  Metric:1                            
          RX packets:0 errors:0 dropped:0 overruns:0 frame:0                    
          TX packets:0 errors:0 dropped:0 overruns:0 carrier:0                  
          collisions:0 txqueuelen:1000                                          
          RX bytes:0 (0.0 B)  TX bytes:0 (0.0 B)   

usb0 직접 설정 or DHCP 설정

$ sudo ifconfig usb0 192.168.55.2 netmask 255.255.255.0 up
or
$ udhcpc -i usb0   // DHCP Client로 설정 

network 환경설정

$ sudo vi /etc/network/interfaces
# interfaces(5) file used by ifup(8) and ifdown(8)
# Include files from /etc/network/interfaces.d:
source-directory /etc/network/interfaces.d

auto usb0
iface usb0 inet static
netmask 255.255.255.0
address 192.168.55.2


상위와 같이 설정후  Host PC에서 Jetson(192.168.55.2)로 접속가능.(SSH/SFTP/NFS)

$ ssh nvidia@192.168.55.2   // ID: ubuntu 가능 
$ sftp nvidia@192.168.55.2  // ID: ubuntu 가능 

  • Jetson 의 NFS지원 
아래와 같이 Kernel에서 NFS는 지원이 되지만, /sbin/mount의 NFS가 지원이 되지 않아 별도의 package 설치
 
$ cat /proc/filesystems | grep nfs  // Kernel의 NFS지원확인 
$ sudo apt-get install nfs-common   // mount nfs 지원 
$/sbin/mount  // mount 명령어 nfs 지원확인 
mountall                mount.ecryptfs_private  mount.lowntfs-3g        mount.nfs4              mount.ntfs-3g
mount.ecryptfs          mount.fuse              mount.nfs               mount.ntfs  

Host PC의 NFS Server 설정 후 아래와 같이 테스트

$ mount -t nfs -o nolock 192.168.5.3:/home/jhlee/test /home/nvidia/test 


2.2 USB Storage

이 부분은 추후 사용하기 위해 만든 것이며, 지금은 자료만 모음

USB Mass Storage Disable
  https://askubuntu.com/questions/888052/how-to-block-all-usb-storage-devices-in-ubuntu
  https://www.cyberciti.biz/faq/linux-disable-modprobe-loading-of-usb-storage-driver/
  https://help.ubuntu.com/community/Mount/USB

3.  Flash Jetson TX2

Host PC에서 USB를 통해 손쉽게 Flash하며, Backup 도 가능하기 때문에 관련 Command를 소개한다.


  • USB Force Recovery Mode


  • flash.sh 기본사용법 
Host PC와 Jetson의 microUSB 과 연결하여 USB를 통하여 Image를 Write or Read 할 수 있는 기능이다.


  • Host PC USB 연결확인 
만약 문제가 있다면, 상위 USB Force Recovery Mode로 진입하자.

$ lsusb  // Host 에서 USB 로 Jetson TX2 연결 후 Connection 확인
.....
Bus 001 Device 036: ID 0955:7020 NVidia Corp. 

  • Image Flash 방법  (USB 연결확인 후)
$  cd jetsonTX2/64_TX2/Linux_for_Tegra // JetPack 3.3 설치 위치  
$ sudo ./flash.sh  jetson-tx2 mmcblk0p1// For Jetson TX2 


  • Image Backup 및 Flash 방법 
$ sudo ./flash.sh -r -k APP -G clone.img jetson-tx2 mmcblk0p1    //기존에 사용하던 Image Backup
$ ls
clone.img  clone.img.raw
$ sudo cp clone.img.raw bootloader/system.img             // 실행전 반드시 bootloader/system.img bakcup  
$ sudo ./flash.sh -r -k APP jetson-tx2 mmcblk0p1                              // 적용된 이미지로 Flash


  • mount system.img.raw 방법 
system.img 는 mount가 되지 않으며, system.img.raw만 mount가 되었으며, mount 한 후에 NVIDIA에서 제공하는 SDK가 제대로 설치되었는지 확인하자.

$ mkdir test   //mount 할 장소 
$ sudo mount -t ext4 -o loop ./bootloader/system.img.raw ./test    // RAW File Mount

$ ls test/      // Target File System , APP 
README.txt  bin  boot  dev  etc  home  lib  lost+found  media  mnt  opt  proc  root  run  sbin  snap  srv  sys  tmp  usr  var // Target Filesystem 

$ ls ./test/usr/local/      //CUDA 설치확인 
bin  etc  games  include  lib  man  sbin  share  src    // 미설치 

$ ls ./test/usr/src/      //tensorrt 설치 확인  /usr/src/tensorrt/bin/   , /usr/src/tensorrt/samples/
linux-headers-4.4.38-tegra

$ sudo umount test   // 반드시 unmount

  • flash.sh 사용법
$ ./flash.sh -h

Usage: sudo ./flash.sh [options]  
  Where,
 target board: Valid target board name.
 rootdev: Proper root device.
    options:
        -b  --------- nvflash boot control table config file.
        -c  --------- nvflash partition table config file.
        -d  --------- device tree file.
        -e  ------- Target device's eMMC size.
        -f  -------- Path to flash application: nvflash or tegra-rcm.
        -h ------------------- print this message.
        -i ------------------- pass user kernel commandline as-is to kernel.
        -k  ---- partition name or number specified in flash.cfg.
        -m  ----- MTS preboot such as mts_preboot_si.
        -n  -------- Static nfs network assignments
                               :::
        -o  --------- ODM data.
        -p  --------- Total eMMC HW boot partition size.
        -r ------------------- skip building and reuse existing system.img.
        -s ----- PKC key used for signing and building bl_update_payload.
        -t  ------- tegraboot binary such as nvtboot.bin
        -u  -------- PKC server in @ format.
        -w  --------- warm boot binary such as nvtbootwb0.bin
        -x  --------- Tegra CHIPID. default = 0x18(jetson-tx2)
                               0x21(jetson-tx1), 0x40(jetson-tk1).
        -y  -------- PKC for secureboot, NS for non-secureboot.
        -z  -------------- Serial Number of target board.
        -B  --------- BoardId.
        -C  --------- Kernel commandline arguments.
                               WARNING:
                               Each option in this kernel commandline gets
                               higher preference over the same option from
                               fastboot. In case of NFS booting, this script
                               adds NFS booting related arguments, if -i option
                               is omitted.
        -F  --------- Flash server such as fastboot.bin.
        -G  ------- Read partition and save image to file.
        -I  ---------- initrd file. Null initrd is default.
        -K  ---------- Kernel image file such as zImage or Image.
        -L  ------ Bootloader such as cboot.bin or u-boot-dtb.bin.
        -M  -------- MTS boot file such as mts_si.
        -N  --------- i.e. :/my/exported/nfs/rootfs.
        -P  -- Primary GPT start address + size of PPT + 1.
        -R  ------ Sample rootfs directory.
        -S  ------------ Rootfs size in bytes. Valid only for internal
                               rootdev. KiB, MiB, GiB short hands are allowed,
                               for example, 1GiB means 1024 * 1024 * 1024 bytes.
        -T  -------- ITS file name. Valid only for u-boot.
        --no-flash ----------- perform all steps except physically flashing the board.
                               This will create a system.img.
        --bup ---------------- Generate bootloader update payload(BUP).
        --multi-spec---------- Enable support for building multi-spec BUP.
        --clean-up------------ Clean up BUP buffer when multi-spec is enabled.
        --usb-instance  -- Specify the USB instance to connect to; integer
                               ID (e.g. 0, 1), bus/dev (e.g. 003/091), or USB
                               port path (e.g. 3-14). The latter is best.


  • Jetson TX2 Partion 구조 (Jetson TX2 확인)
Jetson TX2에서 Terminal에 접속후에 MBR이 아닌 GPT 방식 이므로 아래와 같이 확인하자

$nvidia@tegra-ubuntu:~$ sudo fdisk -l /dev/mmcblk0
Disk /dev/mmcblk0: 29.1 GiB, 31268536320 bytes, 61071360 sectors
Units: sectors of 1 * 512 = 512 bytes
Sector size (logical/physical): 512 bytes / 512 bytes
I/O size (minimum/optimal): 512 bytes / 512 bytes
Disklabel type: gpt
Disk identifier: 00000000-0000-0000-0000-000000000000

Device             Start      End  Sectors   Size Type
/dev/mmcblk0p1      4097 58724352 58720256    28G Microsoft basic data
/dev/mmcblk0p2  58724353 58732544     8192     4M Microsoft basic data
/dev/mmcblk0p3  58732545 58740736     8192     4M Microsoft basic data
/dev/mmcblk0p4  58740737 58741760     1024   512K Microsoft basic data
/dev/mmcblk0p5  58741761 58742784     1024   512K Microsoft basic data
/dev/mmcblk0p6  58742785 58743808     1024   512K Microsoft basic data
/dev/mmcblk0p7  58743809 58744832     1024   512K Microsoft basic data
/dev/mmcblk0p8  58744833 58750976     6144     3M Microsoft basic data
/dev/mmcblk0p9  58750977 58757120     6144     3M Microsoft basic data
/dev/mmcblk0p10 58757121 58761216     4096     2M Microsoft basic data
/dev/mmcblk0p11 58761217 58762424     1208   604K Microsoft basic data
/dev/mmcblk0p12 58762425 58763632     1208   604K Microsoft basic data
/dev/mmcblk0p13 58763633 58764632     1000   500K Microsoft basic data
/dev/mmcblk0p14 58764633 58765632     1000   500K Microsoft basic data
/dev/mmcblk0p15 58765633 58769728     4096     2M Microsoft basic data
/dev/mmcblk0p16 58769729 58773824     4096     2M Microsoft basic data
/dev/mmcblk0p17 58773825 58786112    12288     6M Microsoft basic data
/dev/mmcblk0p18 58786113 58798400    12288     6M Microsoft basic data
/dev/mmcblk0p19 58798401 58802496     4096     2M Microsoft basic data
/dev/mmcblk0p20 58802497 59064640   262144   128M Microsoft basic data
/dev/mmcblk0p21 59064641 59326784   262144   128M Microsoft basic data
/dev/mmcblk0p22 59326785 59392320    65536    32M Microsoft basic data
/dev/mmcblk0p23 59392321 59457856    65536    32M Microsoft basic data
/dev/mmcblk0p24 59457857 59588928   131072    64M Microsoft basic data
/dev/mmcblk0p25 59588929 59720000   131072    64M Microsoft basic data
/dev/mmcblk0p26 59720001 59721024     1024   512K Microsoft basic data
/dev/mmcblk0p27 59721025 59722048     1024   512K Microsoft basic data
/dev/mmcblk0p28 59722049 60246336   524288   256M Microsoft basic data
/dev/mmcblk0p29 60246337 61071326   824990 402.8M Microsoft basic data


$nvidia@tegra-ubuntu:~$ sudo gdisk -l /dev/mmcblk0
GPT fdisk (gdisk) version 1.0.1

Partition table scan:
  MBR: protective
  BSD: not present
  APM: not present
  GPT: present

Found valid GPT with protective MBR; using GPT.
Disk /dev/mmcblk0: 61071360 sectors, 29.1 GiB
Logical sector size: 512 bytes
Disk identifier (GUID): 00000000-0000-0000-0000-000000000000
Partition table holds up to 29 entries
First usable sector is 4097, last usable sector is 61071327
Partitions will be aligned on 1-sector boundaries
Total free space is 1 sectors (512 bytes)

Number  Start (sector)    End (sector)  Size       Code  Name
   1            4097        58724352   28.0 GiB    0700  APP
   2        58724353        58732544   4.0 MiB     0700  mts-bootpack
   3        58732545        58740736   4.0 MiB     0700  mts-bootpack_b
   4        58740737        58741760   512.0 KiB   0700  cpu-bootloader
   5        58741761        58742784   512.0 KiB   0700  cpu-bootloader_b
   6        58742785        58743808   512.0 KiB   0700  bootloader-dtb
   7        58743809        58744832   512.0 KiB   0700  bootloader-dtb_b
   8        58744833        58750976   3.0 MiB     0700  secure-os
   9        58750977        58757120   3.0 MiB     0700  secure-os_b
  10        58757121        58761216   2.0 MiB     0700  eks
  11        58761217        58762424   604.0 KiB   0700  bpmp-fw
  12        58762425        58763632   604.0 KiB   0700  bpmp-fw_b
  13        58763633        58764632   500.0 KiB   0700  bpmp-fw-dtb
  14        58764633        58765632   500.0 KiB   0700  bpmp-fw-dtb_b
  15        58765633        58769728   2.0 MiB     0700  sce-fw
  16        58769729        58773824   2.0 MiB     0700  sce-fw_b
  17        58773825        58786112   6.0 MiB     0700  sc7
  18        58786113        58798400   6.0 MiB     0700  sc7_b
  19        58798401        58802496   2.0 MiB     0700  FBNAME
  20        58802497        59064640   128.0 MiB   0700  BMP
  21        59064641        59326784   128.0 MiB   0700  BMP_b
  22        59326785        59392320   32.0 MiB    0700  SOS
  23        59392321        59457856   32.0 MiB    0700  SOS_b
  24        59457857        59588928   64.0 MiB    0700  kernel
  25        59588929        59720000   64.0 MiB    0700  kernel_b
  26        59720001        59721024   512.0 KiB   0700  kernel-dtb
  27        59721025        59722048   512.0 KiB   0700  kernel-dtb_b
  28        59722049        60246336   256.0 MiB   0700  CAC
  29        60246337        61071326   402.8 MiB   0700  UDA


관련문서는 아래를 참조 혹은 설치시 Start_L4T_Docs.html 부분을 참조

Jetson_X2_Developer_Kit_User_Guide.pdf
  https://developer.nvidia.com/embedded/dlc/l4t-27-1-jetson-tx2-user-guide