10/28/2014

i p b frame

http://blueheartscabin.blogspot.kr/2013/08/ipb.html

http://www.streaminglearningcenter.com/articles/producing-h264-video-for-flash-an-overview.html?page=4

http://www.axis.co.kr/img/product/brochure/wp_h264_kor_lo.pdf

http://www.programering.com/a/MjNwcTMwATg.html

http://www.mathcs.emory.edu/~cheung/Courses/558a/Syllabus/2-video/mpeg2.html

I frame : key frame

P - frame : 이전 I frame or 이전의 P frame을 정보를 사용하며 ,  P Frame은  전체 이미지가  바뀌는 것이 아니라, 이지지의 블럭들이 옆으로 이동하는 것을 움직이것을 것을 생각하여, 차이 값을  부호화 하여 기록 .


B - Frame :  이전, 이후의 I- Frame 과 P Frame을 모두 사용  , P frame과의 차이는 단 반향 혹은 양방향이냐의 차이 .


http://en.wikipedia.org/wiki/H.264/MPEG-4_AVC


http://microdev.tistory.com/109
http://microdev.tistory.com/110

10/20/2014

Linux debug Strace 사용 (추후 정리후 삭제)

Strace Debug

$ strace -h
usage: strace [-CdffhiqrtttTvVwxxy] [-I n] [-e expr]...
              [-a column] [-o file] [-s strsize] [-P path]...
              -p pid... / [-D] [-E var=val]... [-u username] PROG [ARGS]
   or: strace -c[dfw] [-I n] [-e expr]... [-O overhead] [-S sortby]
              -p pid... / [-D] [-E var=val]... [-u username] PROG [ARGS]

Output format:
  -a column      alignment COLUMN for printing syscall results (default 40)
  -i             print instruction pointer at time of syscall
  -o file        send trace output to FILE instead of stderr
  -q             suppress messages about attaching, detaching, etc.
  -r             print relative timestamp
  -s strsize     limit length of print strings to STRSIZE chars (default 32)
  -t             print absolute timestamp
  -tt            print absolute timestamp with usecs
  -T             print time spent in each syscall
  -x             print non-ascii strings in hex
  -xx            print all strings in hex
  -y             print paths associated with file descriptor arguments
  -yy            print ip:port pairs associated with socket file descriptors

Statistics:
  -c             count time, calls, and errors for each syscall and report summary
  -C             like -c but also print regular output
  -O overhead    set overhead for tracing syscalls to OVERHEAD usecs
  -S sortby      sort syscall counts by: time, calls, name, nothing (default time)
  -w             summarise syscall latency (default is system time)

Filtering:
  -e expr        a qualifying expression: option=[!]all or option=[!]val1[,val2]...
     options:    trace, abbrev, verbose, raw, signal, read, write
  -P path        trace accesses to path

Tracing:
  -b execve      detach on execve syscall
  -D             run tracer process as a detached grandchild, not as parent
  -f             follow forks
  -ff            follow forks with output into separate files
  -I interruptible
     1:          no signals are blocked
     2:          fatal signals are blocked while decoding syscall (default)
     3:          fatal signals are always blocked (default if '-o FILE PROG')
     4:          fatal signals and SIGTSTP (^Z) are always blocked
                 (useful to make 'strace -o FILE PROG' not stop on ^Z)

Startup:
  -E var         remove var from the environment for command
  -E var=val     put var=val in the environment for command
  -p pid         trace process with process id PID, may be repeated
  -u username    run command as username handling setuid and/or setgid

Miscellaneous:
  -d             enable debug output to stderr
  -v             verbose mode: print unabbreviated argv, stat, termios, etc. args
  -h             print help message
  -V             print version


$ sudo cat /proc/550/maps  // 실행과 관련된 공유라이브러리 확인 
$ sudo cat /proc/550/status  // Process 상태확인 
$ readelf -h /proc/550/exe    // 실행파일 확인 
$ readelf -s /proc/550/exe    // symbol table 확인     


$ strace -p 550 -f -t
...........
[pid   994] 11:25:13 pselect6(0, NULL, NULL, NULL, {0, 10000000}, NULL) = 0 (Timeout)
[pid   994] 11:25:13 openat(AT_FDCWD, "/proc/irq/366/spurious", O_RDONLY) = 31
[pid   994] 11:25:13 fstat(31, {st_mode=S_IFREG|0444, st_size=0, ...}) = 0
[pid   994] 11:25:13 fstat(31, {st_mode=S_IFREG|0444, st_size=0, ...}) = 0
[pid   994] 11:25:13 read(31, "count 180\nunhandled 0\nlast_unhan"..., 1024) = 42
...............

$ strace -p 550 -f -tt
[pid   994] 11:30:52.563464 fstat(31, {st_mode=S_IFREG|0444, st_size=0, ...}) = 0
[pid   994] 11:30:52.563761 fstat(31, {st_mode=S_IFREG|0444, st_size=0, ...}) = 0
[pid   994] 11:30:52.564047 read(31, "count 180\nunhandled 0\nlast_unhan"..., 1024) = 42

$ strace -cp 550 -f
strace: Process 550 attached with 4 threads
^Cstrace: Process 550 detached
strace: Process 743 detached
strace: Process 994 detached
strace: Process 995 detached
% time     seconds  usecs/call     calls    errors syscall
------ ----------- ----------- --------- --------- ----------------
 98.67    0.488000        1132       431           pselect6
  0.94    0.004653          12       382           sendto
  0.13    0.000666           2       382           openat
  0.10    0.000495           1       382           close
  0.09    0.000457           1       764           fstat
  0.06    0.000310           1       382           read
  0.00    0.000000           0         4         2 futex
------ ----------- ----------- --------- --------- ----------------
100.00    0.494581                  2727         2 total


http://www.brendangregg.com/perf.html
https://brunch.co.kr/@alden/12

http://linuxspot.tistory.com/253

http://man7.org/linux/man-pages/man1/strace.1.html

10/19/2014

USB Device Descriptor 기본구조

1. USB의 Descriptor 의 역할 

Descriptor의 역할은 Host와 Device 사이에 DATA를 어떻게 주고 받을 것인지, Interface를
어떻게 설정할지 데이타의 흐름을 어떻게 설정하지 등 구체적인 설정하는 것이다.

이 정보는 USB Device가 가지고 있어야 하며, USB Host는 이에 맞게 Driver를 연결해야한다.
  1. Device Descriptor  (Host에서는 이를 Device로 인식)
  2. Configuration Descriptor (Device의 상태 및 설정)
  3. Interface Descriptor  ( 실제 연결되는 Interface Driver 연결, HID,CDC, Mass Storage)
  4. Endpoint Descriptor ( 전송방식과 전송방향 ,데이타구조 정의)

  • 일반적인 USB Device ( Class Device )
대표적인 USB Host에는 기본적으로 많이 사용이 되는 Class Device Driver 들이 존재하며 Device가 연결될때 이 Class Device Driver 연결한다.
USB 범용으로 사용되는 Class Device Driver는 윈도우에서도 동일하게 지원을 하고 있다.

  • 개별정의 USB Device 
만약 별도의 USB Device가 본인이 직접 설정하여 Descriptor 구성을 한다면 USB Host에서 별도의 Device Driver는 만들어 구성했지만,
이전에는 직접 이렇게 했는데, 요즘 거의 이렇게까지 할일이 거의 없으며, 표준 Class Device Driver 에 연결하여 사용한다.


  http://www.jungo.com/st/support/documentation/windriver/10.2.1/wdusb_manual.mhtml/wd_usb_arch.html

2. USB의 Device Descriptors의 구조 

Device -> Coifnguration-> Interface -> Endpoint Tree 형태로 구성이 되어있으며, 각각의 Descriptor 에 하단의 Descritor의 갯수를 정의하여, 각 구성이 가능하다.


Configuration Descriptor 는 각각의 Interface Descriptor 가지고 있으며, 이는Host에서  Device Driver 에서 Device/Interface의 Class 정보를 가지고 
각 Class Device Driver를 구동을 하여 실행이 가능하다. 


3. USB Descriptor 의 Table 구성 

실제 USB Device의 Descriptor의 구성을 살펴보자.

  • Device Descriptor 
USB Device 의 최상위에 있는 Descriptor로 Vendor 정보와 Class 정보를 가지고 있다.

0bLength1NumberSize of the Descriptor in Bytes (18 bytes)
1bDescriptorType1ConstantDevice Descriptor (0x01)
2bcdUSB2BCDUSB Specification Number which device complies too.
4bDeviceClass1ClassClass Code (Assigned by USB Org)
If equal to Zero, each interface specifies it’s own class code
If equal to 0xFF, the class code is vendor specified.
Otherwise field is valid Class Code.
5bDeviceSubClass1SubClassSubclass Code (Assigned by USB Org)
6bDeviceProtocol1ProtocolProtocol Code (Assigned by USB Org)
7bMaxPacketSize1NumberMaximum Packet Size for Zero Endpoint. Valid Sizes are 8, 16, 32, 64
8idVendor2IDVendor ID (Assigned by USB Org)
10idProduct2IDProduct ID (Assigned by Manufacturer)
12bcdDevice2BCDDevice Release Number
14iManufacturer1IndexIndex of Manufacturer String Descriptor
15iProduct1IndexIndex of Product String Descriptor
16iSerialNumber1IndexIndex of Serial Number String Descriptor
17bNumConfigurations1IntegerNumber of Possible Configurations

중요하게 봐야 할 부분

  1. ID / Vendor ID: 정해진 값으로 Device 제조사에 의해 결정  
  2. ID / Product: 정해진 값으로 Device 제조사에 의해 결정 
  3. Class/Sub Class/Protocol : 

VendorID 신청 


  • Configuration Descriptor 

0bLength1NumberSize of Descriptor in Bytes
1bDescriptorType1ConstantConfiguration Descriptor (0x02)
2wTotalLength2NumberTotal length in bytes of data returned
4bNumInterfaces1NumberNumber of Interfaces
5bConfigurationValue1NumberValue to use as an argument to select this configuration
6iConfiguration1IndexIndex of String Descriptor describing this configuration
7bmAttributes1BitmapD7 Reserved, set to 1. (USB 1.0 Bus Powered)
D6 Self Powered
D5 Remote Wakeup
D4..0 Reserved, set to 0.
8bMaxPower1mAMaximum Power Consumption in 2mA units

  • Interface Descriptor 
가장 중요한 Interface Descriptor 이며, 이는 곳 Driver와 관계가 되니 잘봐야한다.

0bLength1NumberSize of Descriptor in Bytes (9 Bytes)
1bDescriptorType1ConstantInterface Descriptor (0x04)
2bInterfaceNumber1NumberNumber of Interface
3bAlternateSetting1NumberValue used to select alternative setting
4bNumEndpoints1NumberNumber of Endpoints used for this interface
5bInterfaceClass1ClassClass Code (Assigned by USB Org)
6bInterfaceSubClass1SubClassSubclass Code (Assigned by USB Org)
7bInterfaceProtocol1ProtocolProtocol Code (Assigned by USB Org)
8iInterface1IndexIndex of String Descriptor Describing this interface


USB의 Class 정보
  https://www.usb.org/defined-class-codes

Interface Decirptor
  https://www.beyondlogic.org/usbnutshell/usb5.shtml#InterfaceDescriptors

  • Endpoint Descriptor 

0bLength1NumberSize of Descriptor in Bytes (7 bytes)
1bDescriptorType1ConstantEndpoint Descriptor (0x05)
2bEndpointAddress1EndpointEndpoint Address
Bits 0..3b Endpoint Number.
Bits 4..6b Reserved. Set to Zero
Bits 7 Direction 0 = Out, 1 = In (Ignored for Control Endpoints)
3bmAttributes1BitmapBits 0..1 Transfer Type
    00 = Control
    01 = Isochronous
    10 = Bulk
    11 = Interrupt
Bits 2..7 are reserved. If Isochronous endpoint,
Bits 3..2 = Synchronisation Type (Iso Mode)

    00 = No Synchonisation
    01 = Asynchronous
    10 = Adaptive
    11 = Synchronous
Bits 5..4 = Usage Type (Iso Mode)
    00 = Data Endpoint
    01 = Feedback Endpoint
    10 = Explicit Feedback Data Endpoint
    11 = Reserved
4wMaxPacketSize2NumberMaximum Packet Size this endpoint is capable of sending or receiving
6bInterval1NumberInterval for polling endpoint data transfers. Value in frame counts. Ignored for Bulk & Control Endpoints. Isochronous must equal 1 and field may range from 1 to 255 for interrupt endpoints.

각 Endpoint 마다 Transer Type을 정의하고 Endpoint를 2 (In/Out)개 혹은 그 이상으로 정의하여 각각의 Stream Pipe 구성한다.


  • USB Transfer Type은 총 4가지 종류
  1. Control Transfers: Control 하기위해 사용되며 Host에서 Device에게 명령전달
  2. Interrupt Transfers: 작은용량의 Data를 비동기적으로 받을경우 사용 
  3. Isochronous Transfers: 시간에 제한되어지는 Device 사용되며, 대표적으로 telephony
  4. Bulk Transfers: 많은용량으로 사용할 경우 사용하며, 대표적으로 Mass Storage 


Endpoint의 통신방식
  http://www.beyondlogic.org/usbnutshell/usb4.shtml
  http://www.jungo.com/st/support/documentation/windriver/10.2.1/wdusb_manual.mhtml/USB_data_transfer_types.html

  • String Descriptor 

0bLength1NumberSize of Descriptor in Bytes
1bDescriptorType1ConstantString Descriptor (0x03)
2wLANGID[0]2numberSupported Language Code Zero
(e.g. 0x0409 English - United States)
4wLANGID[1]2numberSupported Language Code One
(e.g. 0x0c09 English - Australian)
nwLANGID[x]2numberSupported Language Code x
(e.g. 0x0407 German - Standard)


0bLength1NumberSize of Descriptor in Bytes
1bDescriptorType1ConstantString Descriptor (0x03)
2bStringnUnicodeUnicode Encoded String


  • 더 자세한 내용은 아래사이트 (상위내용은 아래에서 참고)
USB Descriptor의 구조
  http://www.beyondlogic.org/usbnutshell/usb5.shtml

USB의 SETUP Packet
  http://www.beyondlogic.org/usbnutshell/usb6.shtml

10/15/2014

FILE SYSTEM의 수정 및 Script 수정 (정리가 필요)

1. 목적 

기존 ODROID에서 사용하던 File system을 TI File system 으로 대체
ODROID는 FILE SYSTEM은  Ubuntu 을 TI Linux Embed File system으로 변경.

2. Script 및 Service  on /off 


2.1  Background 

service를 제어를 하는데 있어서 현재 두가지 방법이 있으며, 관련 directory는 아래와 같다.

  • /etc/init.d   :   System init tool 방식 기존 부터 존재하던 방식 
      * ubuntu에서 /lib/init/upstart-job에 symbolic link로 연결되어 이거나, shell로 구성.

  • /etc/init      :   ubuntu 에서 적용하는 방식이며, 파일은 service의 설정파일

2.2 ubuntu 

  • 런레벨 설정 
$ vi /etc/init/rc-sysinit.conf 
env DEFAULT_RUNLEVEL=2
  • X Manager 제어
        - 런레벨이 2일 경우, 아래와 같이 스크립트 수정으로, 실행금지

 $ vi /etc/init/lightdm.conf
start on ((filesystem
           and runlevel [!026]
           and started dbus
           and (drm-device-added card0 PRIMARY_DEVICE_FOR_DISPLAY=1
                or stopped udev-fallback-graphics))
          or runlevel PREVLEVEL=S)

  •   기타 다른 제어  (/etc/init service 기능) 
          - 아래와 같이 각각의 원하는 서비스의 기능의 runleve을 수정.
$ cd /etc/init
$ grep -r runlevel .


  • /etc/init.d  제어 
        /etc/rc2.d 에 symbolic link로 실행하고자하는 service들이 등록되어 있는데, 이를 제거
       ex) S20xrdp : X의 remote disply 로 원격접속에 사용 이를 제거


       ps --ppid 2 -p 2 --deselect  (user process : 2 kthreadd)

  http://askubuntu.com/questions/5039/what-is-the-difference-between-etc-init-and-etc-init-d
  http://snoopybox.co.kr/1720

2.3 TI Filesystem  

inittab 사용

3. 수정사항 

   1. /lib/module  sync  ( 기본 모듈 복사)
   2. /dev  sync             ( 기존 dev 복사 )
   3. /etc/inittab 수정     ( TI Filesystem 은 inittab 사용)

          sudo vi inittab
                S:2345:respawn:/sbin/getty 115200 ttySAC1  // kernel Arg 참조
          // tty1-6 가상 console이므로, 속도는 상관없음           

  4.  /etc/rc5.d             ( 불필요한 서비스 제거 )

 $ ls etc/rc5.d 
 $ sudo vi ../init.d/mount-sdcard  // 현재 UUID로 마운트 필요없는 부분제거

-
  6. /lib/ld-linux-armhf.so.3  ( loader 복사 및 관련 lib 복사)
  7. 연관된 프로그램 복사


http://onestep.tistory.com/78

10/14/2014

Linux debug ( syslogd vs klogd ) 소개

Linux debug ( syslogd vs klogd ) 소개
Log Server 로 File로 저장이 가능하여,  Debug 정보를 저장이 가능하다.
  http://blog.naver.com/PostView.nhn?blogId=dudwo567890&logNo=130158473389
  http://dooeui.blogspot.kr/2010/04/linux-logging-syslogd-vs-klogd.html
  http://reebok.tistory.com/entry/klogd-syslogd


FILE SYSTEM의 IMAGE 수정 (추후 TEST 완료 후 삭제)

1. 목적

기존에 존재하던 image 파일을 수정하여 새로운 image 파일을 만드는 것이 목적.
TI에서 제공하는 Filesystem  사용
  • emmc_backup_2014_90_30.img의 filesystem을 지우고, TI-Filesystem 대체
  • emmc_backup_2014_90_30.img resize 

2. Image 수정

FAT는 Boot file이기에 건들지 않고, Linux File system만 외부의 파일 system에서 가져와
새로 파티션을 만들어 수정한다.

2.1 각각의 Image 구성 확인

  • 각 구성은 1. boot   2. Linux filesystem 으로 구성 

$ fdisk -l /media/sf_SHARED/emmc_backup_2014_09_30.img 

Disk /media/sf_SHARED/emmc_backup_2014_09_30.img: 7818 MB, 7818182656 bytes
255 heads, 63 sectors/track, 950 cylinders, total 15269888 sectors
Units = sectors of 1 * 512 = 512 bytes
Sector size (logical/physical): 512 bytes / 512 bytes
I/O size (minimum/optimal): 512 bytes / 512 bytes
Disk identifier: 0x000c4046

                                      Device Boot      Start         End      Blocks   Id  System
/media/sf_SHARED/emmc_backup_2014_09_30.img1            4096      266239      131072    b  W95 FAT32
/media/sf_SHARED/emmc_backup_2014_09_30.img2          266240    11532287     5633024   83  Linux  

2.2  Image 수정 

두번째 파티션 지우고 동시에 새로운 파티션을 만드며,각 사이즈를 정하고, Sector 크기를
2의 배수로 정한다. ( 1 Block이 2 Sector)

 $ fdisk /media/sf_SHARED/emmc_backup_2014_09_30.img 

Command (m for help): m
Command action
   a   toggle a bootable flag
   b   edit bsd disklabel
   c   toggle the dos compatibility flag
   d   delete a partition
   l   list known partition types
   m   print this menu
   n   add a new partition
   o   create a new empty DOS partition table
   p   print the partition table
   q   quit without saving changes
   s   create a new empty Sun disklabel
   t   change a partition's system id
   u   change display/entry units
   v   verify the partition table
   w   write table to disk and exit
   x   extra functionality (experts only)

Command (m for help): d
Partition number (1-4): 2

Command (m for help): p

Disk /media/sf_SHARED/emmc_backup_2014_09_30.img: 7818 MB, 7818182656 bytes
255 heads, 63 sectors/track, 950 cylinders, total 15269888 sectors
Units = sectors of 1 * 512 = 512 bytes
Sector size (logical/physical): 512 bytes / 512 bytes
I/O size (minimum/optimal): 512 bytes / 512 bytes
Disk identifier: 0x000c4046

                                      Device Boot      Start         End      Blocks   Id  System
/media/sf_SHARED/emmc_backup_2014_09_30.img1            4096      266239      131072    b  W95 FAT32

Command (m for help): n
Partition type:
   p   primary (1 primary, 0 extended, 3 free)
   e   extended
Select (default p): p
Partition number (1-4, default 2): 2
First sector (2048-15269887, default 2048): 266240
Last sector, +sectors or +size{K,M,G} (266240-15269887, default 15269887): 1712089        //1606499 -160650 = 1712089            

Command (m for help): p

Disk /media/sf_SHARED/emmc_backup_2014_09_30.img: 7818 MB, 7818182656 bytes
255 heads, 63 sectors/track, 950 cylinders, total 15269888 sectors
Units = sectors of 1 * 512 = 512 bytes
Sector size (logical/physical): 512 bytes / 512 bytes
I/O size (minimum/optimal): 512 bytes / 512 bytes
Disk identifier: 0x000c4046

                                      Device Boot      Start         End      Blocks   Id  System
/media/sf_SHARED/emmc_backup_2014_09_30.img1            4096      266239      131072    b  W95 FAT32
/media/sf_SHARED/emmc_backup_2014_09_30.img2          266240     1712089      722925   83  Linux

Command (m for help): w


2.3 Image Resizing

위의 emmc_backup_2014_09_30.img 의 경우 아직 7818MB이며, 15269888 sectors 사용중 하지만 우리의 새로운 image의 end는
아래와 같이 dd 명령어를 사용해서, image를 resize를 한다.

마지막 sector가 1712089 이고 해서, 이를 짝수를 맞추고, 여분을 주기위해서, +1011줌.
현재 1 block = 2 sectors
* bs  size에 속도차이가 심함

count 값은 위의 sectors 값을 반으로 나눈값 , bs를 변경 해도 됨

 $ dd if=/media/sf_SHARED/emmc_backup_2014_09_30.img of=/media/sf_SHARED/test_newImage.img  bs=1k count=$(((1712089+1011)/2)) 

결과물로 test_newImage.img

3. Filesystem 복사

$ fdisk -l /media/sf_SHARED/test_newImage.img 

Disk /media/sf_SHARED/test_newImage.img: 877 MB, 877107200 bytes
255 heads, 63 sectors/track, 106 cylinders, total 1713100 sectors
Units = sectors of 1 * 512 = 512 bytes
Sector size (logical/physical): 512 bytes / 512 bytes
I/O size (minimum/optimal): 512 bytes / 512 bytes
Disk identifier: 0x000c4046

                             Device Boot      Start         End      Blocks   Id  System
/media/sf_SHARED/test_newImage.img1            4096      266239      131072    b  W95 FAT32
/media/sf_SHARED/test_newImage.img2          266240     1712089      722925   83  Linux  

 $ fdisk -l /media/sf_SHARED/TI-IMAGE.img 

Disk /media/sf_SHARED/TI-IMAGE.img: 3965 MB, 3965190144 bytes
255 heads, 63 sectors/track, 482 cylinders, total 7744512 sectors
Units = sectors of 1 * 512 = 512 bytes
Sector size (logical/physical): 512 bytes / 512 bytes
I/O size (minimum/optimal): 512 bytes / 512 bytes
Disk identifier: 0x00000000

                        Device Boot      Start         End      Blocks   Id  System
/media/sf_SHARED/TI-IMAGE.img1   *          63      144584       72261    c  W95 FAT32 (LBA)
/media/sf_SHARED/TI-IMAGE.img2          160650     1606499      722925   83  Linux
/media/sf_SHARED/TI-IMAGE.img3         1606500     7743329     3068415   83  Linux 

3.1 Filesystem 복사 방법 

A.   Mount 복사

$ sudo mount -o loop,offset=$((512 * 266240)) /media/sf_SHARED/test_newImage.img  ./tmp1
mount: wrong fs type, bad option, bad superblock on /dev/loop1,
       missing codepage or helper program, or other error
       In some cases useful info is found in syslog - try
       dmesg | tail  or so

$ sudo mount -o loop,offset=$((512 * 160650)) /media/sf_SHARED/TI-IMAGE.img       ./tmp2  

      skip =  input block  offset
      seek = output block offset

위에서 에러가 나서, 그냥 dd로 전부 copy

B.   dd를 이용하여 복사 


 $ dd if=/media/sf_SHARED/TI-IMAGE.img of=/media/sf_SHARED/test_newImage.img  bs=512 skip=160650 seek=266240 count=$((1606499-160650)) 

위와 같이 여러번 했으나, 에러 발생으로 다른 방법시도
    참조:  http://forum.falinux.com/zbxe/index.php?document_srl=561988&mid=lecture_tip

C.  mkfs.ext4 와 losetup 을 이용 

$ sudo losetup -o$((512 * 266240)) /dev/loop0 /media/sf_SHARED/test_newImage.img   //attach device
$ sudo mkfs -t ext4 /dev/loop0
$ sudo losetup -d /dev/loop0   //detach device  


$ sudo mount -o loop,offset=$((512 * 266240)) /media/sf_SHARED/test_newImage.img  ./tmp1  
EXT4-fs (loop0): bad geometry: block count 1408255 exceeds size of device (214137 blocks) 

* 에러 메시지를 보고, 안되는 이유가 파티션의 사이즈 배분을 잘못해서 문제생김.

3.2  File system 복사 ( Porting Qt  및 기타 사항)
 
$ sudo mount -o loop,offset=$((512 * 266240))  /media/sf_SHARED/emmc_backup_2014_09_30.img ./tmp1
$ sudo mount -o loop,offset=$((512 * 160650)) /media/sf_SHARED/TI-IMAGE.img       ./tmp2 
$ cd tmp1
$ sudo rm -rf *
$ sudo cp -a ../tmp2/* .
$ cd usr/local
$ sudo cp -a /usr/local/Qt-4.8.6 .
 

3.3  SD 카드 이용시  할 경우

추후, TEST SD 카드 변경하여 아래와 같이 변경

$ sudo mount -o loop,offset=$((512 * 266240))  /media/sf_SHARED/emmc_backup_2014_09_30.img ./tmp1
$ sudo mount -o loop,offset=$((512 * 160650)) /media/sf_SHARED/TI-IMAGE.img                ./tmp2 
$ sudo umount tmp1 tmp2


1. lib/module 복사
2.  dev  복사  
3.  etc/rc5.d 수정  
       S02dbus-1  S20netperf  S20syslog  S90mount-sdcard  S98parse-ip
4. sudo vi inittab //commnad line보고 수정, tty1 가상 console 
              S:2345:respawn:/sbin/getty 115200 ttySAC1 
5.  sudo vi ../init.d/mount-sdcard  // 현재 UUID로 마운트 필요없는 부분제거 
6. /lib/ld-linux-armhf.so.3  loader 복사 
7.  QT 복사 
8. EMA 복사 
9. sudo ln -s libcmirisLib2_arm_2.1.3.so libcmirisLib2_arm_2.1.1.so  //usr/local/lib 

export LD_LIBRARY_PATH=/usr/lib:/lib:/usr/local/Qt-4.8.6/lib:/usr/local/lib
export QWS_DISPLAY="LinuxFb:/dev/fb6"
export PATH=$PATH:/usr/local/bin

TEST 
     cd /usr/local/
     ./deform -qws -display LinuxFb:/dev/fb6 

10/12/2014

Kernel의 printk debug-2

1. User에서 Printk 관련설정 

User에서 printk 설정 세부 확인

$ cat /proc/sys/kernel/printk  // printk 설정 및 보기  

상위를 보면 숫자 4개가 나오며 각각의 의미는 아래와 같다.
  1. console_loglevel,
  2. default_message_loglevel,
  3. minimum_console_level
  4. default_console_loglevel respectively.


These values influence printk() behavior when printing or logging error messages, which come from inside the kernel.
See syslog(2) for more information on the different log levels.

  • /proc/sys/kernel/console_loglevel
Messages with a higher priority than this will be printed to the console.

  • /proc/sys/kernel/default_message_level
Messages without an explicit priority will be printed with this priority.

  • /proc/sys/kernel/minimum_console_loglevel
Minimum (highest) value to which the console_loglevel can be set.

  • /proc/sys/kernel/default_console_loglevel
Default value for console_loglevel.


# cat /proc/sys/kernel/printk
기본 설정: 6 4 1 7

Kernel Message 막기 위해서 아래와 같이 설정 

# echo "0 4 1 7" > /proc/sys/kernel/printk
# echo 0 > /proc/sys/kernel/printk

1.1  Kernel message 보기 

# dmesg

혹은 klogd을 죽이고

#cat /proc/kmsg

  https://elinux.org/Debugging_by_printing


10/03/2014

Linux의 udev 와 sys filesystem 이해 (수정 및 정리-1)

1. Background

가끔 udevd 없는 filesystem이 존재하여, 매번 자동화의 필요성을 느끼며, Kernel 의 sys filesystem 및 udevd의 기능을 필요로 하여 관련부분을 정리하고자 한다.

오래전에는 Application 에서 Driver의 상태의 알어서 HW 이벤트 알고 다시 다른 Driver를 제어하려면
항상 애플리케이션 프로그램과 통신을 해서 알아내고 제어를 해야만 했다.
하지만, udev와 sys filefs가 나온 이후로 이 문제들이 간단히 해결이 되고 관리가 편해졌다.
간단한 예가 usb의 hotplug일 것이며, 이를 확장해서 사용도 가능하다.


1.1 NETLINK의 이해  

udev에서 Kernel과 UserInterface 사이를 쉽게 통신하기위해서 사용되는 IPC로 사용방법은 socket으로 사용하고, 중요한 것은 udev의 uevent의 전달일 것 같다.

  • NETLINK의 사용방식 및 구조
 int socket(AF_NETLINK, SOCK_DGRAM ''or'' SOCK_RAW, ''protocol'') 


protocol은 NETLINK_xxx 로 다양하게 지원하며, uevent는 NETLINK_KOBJECT_UEVENT
Netlink 사용방법 및 세부내용은 아래의 사이트 참고
  https://en.wikipedia.org/wiki/Netlink
  https://yhcting.tistory.com/entry/Linux-kobject-uevent-in-kernel

  • NETLINK의  Kernel 과 User 실제사용의 예 
TEST Program은 기본 NETLINK만 테스트 (uevent는 제외)
  1. NETLINK 테스트 Instruction
  2. NETLINK TEST Kernel Module   (protocl: NETLINK_USER 사용)
  3. NETLINK TEST User Interface    (socket(PF_NETLINK, SOCK_RAW, NETLINK_USER) 사용)

  https://stackoverflow.com/questions/3299386/how-to-use-netlink-socket-to-communicate-with-a-kernel-module
  https://gist.github.com/JeonghunLee/17db624665da91ee46c221b00e2b93f5


  • Kernel의 uevent 의 이해 
Kernel에서 제공해주는 uevent 관련함수들을 알아보자
  https://elixir.bootlin.com/linux/v4.2/source/lib/kobject_uevent.c#L386
  https://elixir.bootlin.com/linux/v4.2/source/lib/kobject_uevent.c#L414
  http://egloos.zum.com/furmuwon/v/11024590


1.2 D-BUS
Linux Application에서 사용하는 일종의 IPC의 한 종류로 기존에는 일대일 방식였지만, Message Bus system 개념형태로 변경되어 통신을 한다.

기본적인 동작형태는 D-Bus Instance와 중개자인 D-BUS Damon과 Socket으로 연결형태라고 생각하면된다.
아래에서 제공해주는 그림을 보면 쉽게 이해가 간다.

세부내용은 Wiki 참고
  https://en.wikipedia.org/wiki/D-Bus
  https://www.freedesktop.org/wiki/Software/dbus/
  https://dbus.freedesktop.org/doc/api/html/group__DBusMessage.html
  http://makersweb.net/lecture/16441


1.3 sysfs 의 이해

sysfs는 system filesystem의 약어이며, 이를 이용하여, USER에서 device driver의 상태확인 및 제어 쉽게 가능하다 

Kernel에서 만들어주는 Filesystem이기에, 각 Device driver에서 제공을 해주어야 하며,실제 Filesystem에서는 sysfs로 mount만 해주면 동작이 된다.
기존 /proc 와 다른 점은 /proc의 경우 상태확인만 가능했지만, /sys는 설정가능하다.

대표적인 예로 GPIO 설정을 쉽게 User에서 쉽게 변경가능하지만, Device Driver에서 제공을 해주어야하기에, Device Driver 마다 사용법이 다를 수 있다.

  https://en.wikipedia.org/wiki/Sysfs

sys filesystem의 실제 사용의 예제
  http://processors.wiki.ti.com/index.php/DSS2_SYSFS_Examples


1.4 udev의 기본이해

udev는 userspace 의 /dev로 주로 hotplug 와 hw event에 주로 사용되며, /dev 의 deivce node를 관리를 주목적으로 한다.

Linux device driver에 특정 HW event (hotplug)가 발생하면, User에서는 /dev의 device node를 필요시 새로 생성할 필요가 있다.

Kernel에서는 Netlink로 User에게 uevent를 전달하면, udevd에서 새로운 /dev/의 device node를 생성가능 하며,
그리고 더불어 User에서 정한 udev rule에 의해서

udev 는 NETLINK 통신하여 uevent를 받아 udev의 rule에 맞게 적용을 된 부분을 D-BUS를 이용하여 통신한다.

  • udev의 기본동작 
Kernel ----------> udev -----> Network Manager <--> D-Bus <--> Evolution
       (netlink socket)            (libudev를 사용한 damon )


  • udev의 daemon과 에 관련 tool
  1. libudev : systemd 이 사용이 하며, d-bus를 이용하기 위해서 사용되어짐.
  2. udevd :  user 영역에서  virtual /dev를 관리하며 netlink로 통신하며, uevent를 감지
  3. udevadm :  진단목적으로 만들어진 utility 라고 한다. 


  • udev의 Rules 
  1. /lib/udev/rules.d/  -규칙은 각각의 꾸러미가 설치하며, 보통 사용자가 바꾸어선 안됩니다.
  2. /etc/udev/rules.d/ - 최종유저가 설정한 규칙이 이라고하며, 새로운 규칙은 이곳에해야한다


  • 기본사항 참고
  https://en.wikipedia.org/wiki/Udev


  • Kernel 설정 및 기본설정방법 참고
  https://wiki.gentoo.org/wiki/Udev/ko


  • /lib/udev/rules.d  Manual 및 설정의 예 관련사항
  http://www.reactivated.net/writing_udev_rules.html
  https://docs.oracle.com/cd/E37670_01/E41138/html/ch07s03.html
  https://access.redhat.com/documentation/ko-KR/Red_Hat_Enterprise_Linux/6/html/Logical_Volume_Manager_Administration/udev_device_manager.html
  http://chaoxifer.egloos.com/viewer/1752706   (USB Auto mount)
  https://code.google.com/p/yad/wiki/USBFlash
  http://www.hanbit.co.kr/network/view.html?bi_id=1425
  https://access.redhat.com/documentation/ko-KR/Red_Hat_Enterprise_Linux/6/html/Logical_Volume_Manager_Administration/udev_device_manager.html#tb-udev-for-devicemap


2. udev 와 sysfs의 기본동작 

  1. udev를 이용하여, sysfs를 이용하는 방법
  2. udev를 이용하여 application에서 감지 

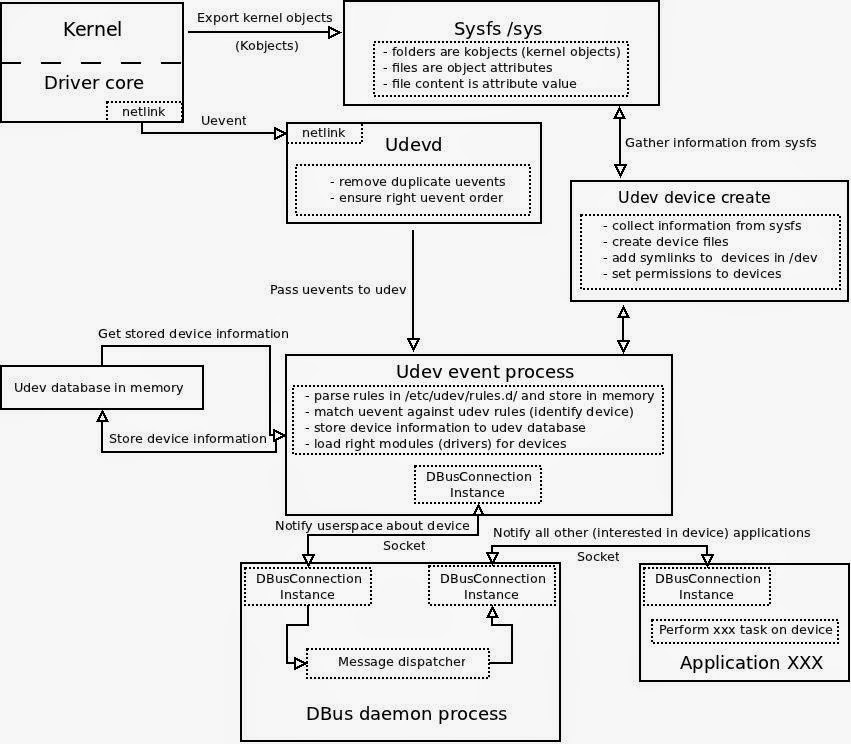
  • 동작-1  udevd과 Application 에서 감지
  1. device driver는 netlink를 이용하여 uevent를 발생 
  2. udevd는이를 감지하고 알아내고, 중복 uevents 들을 삭제한다. 
  3. udevd는 이 udev event process 에게 전달한다
  4. /xxx/udev/rules.d rules을 memory에 저장 및 parsing하여 rule 적용후 udev database 생성 
  5. 이를 d-bus를 이용하여 다른 App들에게 공유한다. 
  6. 최종 application은 d-bus를 통해 이를 감지하고 동작한다. 

  • 동작-2  sysfs 동작
  1. Kernel은 kobject_create 만들고 이를 sysfs를 속성 및 uevent 정보 생성 (/dev 관련정보)  
  2. uevent를 발생되면 sysfs 정보를 이용하여 /dev에 device node를 추가 

  http://kroah.com/log/blog/2013/06/26/how-to-create-a-sysfs-file-correctly/
  http://dynamicbu.egloos.com/m/3048465


그림은 상위 두가지 루틴을 다 설명해주며, 핵심은 udev event process이다.
출처: http://blogas.sysadmin.lt/?p=141

아래의 기본구조를 이해를 Driver 순서부터 보는 것이 좋고, uevent라는 HW Event message로 udevd이 이를 관리하고, udev event process에 전달하는 것이다.
이는 /etc/udev/rules.d/에서 설정 및 관리가 가능하다.

구조파악하기가 쉬움
  http://sonseungha.tistory.com/323


2.1 sysfs와 udev Kernel 실제동작예  

아래는 rtc driver의  udev 와 sys file system 의 좋은 예제이며, uevent의 봐야할 부분은 kobject_uevent_env 부분을 보면 기본동작이 이해가 간다
  1. user에서 rtc module 커널에 등록 
  2. rtc_init 함수는 misc_register->class_device_register를 호출 
  3. kobject_add 후 /sys/class/misc/rtc 의 base directory 생성 
  4. /sys/class/misc/rtc/uevent 생성 ( device name or interface 제공 )
  5. /sys/class/misc/rtc/dev 생성  ( /dev/rtc의  major/minor number 제공)
  6. kobject_uevent->kobject_uevent_env  호출되어 uevent의 환경설정과 uevent발생
  7. netlink에 의해 uevent 함께 환경값이 udevd에 의해 /dev/rtc 생성 (4번 ,5번정보)
  8. 설정된 uevent 환경값을 udev rule에 적용하여 추가동작 

/proc/sys/kernel/hotplug 이 부분도 연관이 있다고 하는데, 이부분은 추후파악


출처: http://www.embeddedlinux.org.cn/EssentialLinuxDeviceDrivers/final/ch04lev1sec3.html

udev 및 udevadm 사용 및 rule 관련내용
  https://wiki.archlinux.org/index.php/udev

udev와 sysfs 관련 분석
  http://furmuwon.egloos.com/m/11024590

  • udev의 정보확인방법 
udevadm를 이용하여 쉽게 udev rules의 정보를 넣어 쉽게 구현이 가능하다.

$ udevadm info -a -n /dev/sda1

  looking at device '/devices/platform/s5p-ehci/usb1/1-2/1-2.3/1-2.3.3/1-2.3.3:1.0/host0/target0:0:0/0:0:0:0/block/sda/sda1':
    KERNEL=="sda1"
    SUBSYSTEM=="block"
    DRIVER==""
    ATTR{partition}=="1"


  http://www.troot.co.kr/tc/1958
  https://stackoverflow.com/questions/36009559/sd-card-how-to-force-the-kernel-to-read-the-wp-pin-again-without-removing-the-s
  https://www.pks.mpg.de/~mueller/docs/suse10.1/suselinux-manual_en/manual/cha.udev.html

3. udev의 device 설정 

아래와 같이 설정추가

$ vi /etc/udev/rules.d/10-usbdisk.rules
....
SUBSYSTEMS="usb", ENV{ID_FS_USAGE}=="filesystem", ENV{UDISKS_MOUNT_OPTIONS}="rw"
....